Welcome to my heavy attack build guide! HA builds are an excellent way to get very high damage with much less effort and practice than a typical DPS build
This page will briefly showcase one-bar HA builds for all classes. This guide is mostly designed for PvE purposes and will work very well in both group and solo play
Table of Contents
- Basics
- Why Use an HA Build?
- Note on Stats
- Gear
- Using Your HA Build
- Skills and Rotations by Class
- No-Oakensoul Setup
- Character Setup
Basics
- Our weapon of choice will be the lightning staff. Lightning staves’ channeled heavy attacks are the strongest for HA builds, and the Tri Focus passive uniquely allows them to cleave to nearby enemies as well
- The Oakensoul ring will provide us with a truckload of buffs, including the Empower buff, which will give a whopping 70% boost to our heavy attacks
- Oakensoul comes with the cost of preventing bar swapping; thus we will only be using one skill bar. We’ll hardly want a second skill bar anyway though, since our long heavy attacks will leave us less time to cast so many skills
- The rest of our gear will be aimed at increasing the damage of our heavy attacks. We will use two 5-piece sets that do just that!
See Gear below for the full setup
You will need access to the following DLCs to obtain Oakensoul: Western Skyrim / Greymoor (to unlock the antiquity system), High Isle (for most leads), Murkmire (for one particular lead)
- Building without Oakensoul is possible as well, though less ideal. See No-Oakensoul Setup below for adjustments to make if you don’t have the DLC
Why Use an HA Build?
Heavy attack builds have proven to be a great option for:
- Newer players who want to do solid damage right off the bat
- Players who haven’t gotten the hang of light attack weaving
- Healer and tank players who want to try a DPS role without having to learn new rotations in depth
- Focusing on the mechanics of challenging content without worrying about a complex rotation
- Anyone just wanting an easy-to-use setup or a fun new playstyle!
If any of those is you, these builds are just what you’re looking for!
Pros
- Very easy damage! No need for tedious weaving or a proper rotation. Just hold the heavy attack button and things will die!
- (For those interested in numbers, I’ve hit 85-95k dummy parses with heavy attack builds on all classes, and around 60% of that damage comes from just heavy attacking)
- Easy sustain! Since HAs last extra long, we’ll be casting skills at half speed, leaving extra time for resource recovery. Never run out of resources again!
- Built in survival buffs! Oakensoul’s buffs include damage mitigation and recovery to help keep us alive
- (Specifically: Major Resolve and Minor Aegis, Fortitude, and Protection)
- Minimal difficult farming! Most of the gear in this guide comes from fairly easy base game dungeons (plus an antiquity piece and a single optional monster set piece)
- No expensive potions needed! Oakensoul provides all the offensive buffs we would normally get from potions
- (Specifically: Major Brutality/Sorcery/Savagery/Prophecy, and even Minor Heroism)
Cons
- Lower damage cap than a traditional build (but normally rivals all but the very best of non-HA DPSers)
- Limited bar space. Our one-bar setup means we’ll have less room for things like utility skills and heals
Note on Stats
- We can run either a stamina- or magicka-based build, take your pick! We’ll be casting skills slowly and so generally won’t run out of either resource
- One stat or the other might be slightly more optimal if you have a Max Stamina or Magicka bonus coming from your racial passives or one of your 5-piece gear sets. Either way, simply picking your favorite stat won’t be too detrimental to the build
- The important thing is to build fully into one stat or the other and not mix; our skill damage scales based on the higher value of those two stats, so we want to build a single stat as high as possible
Gear
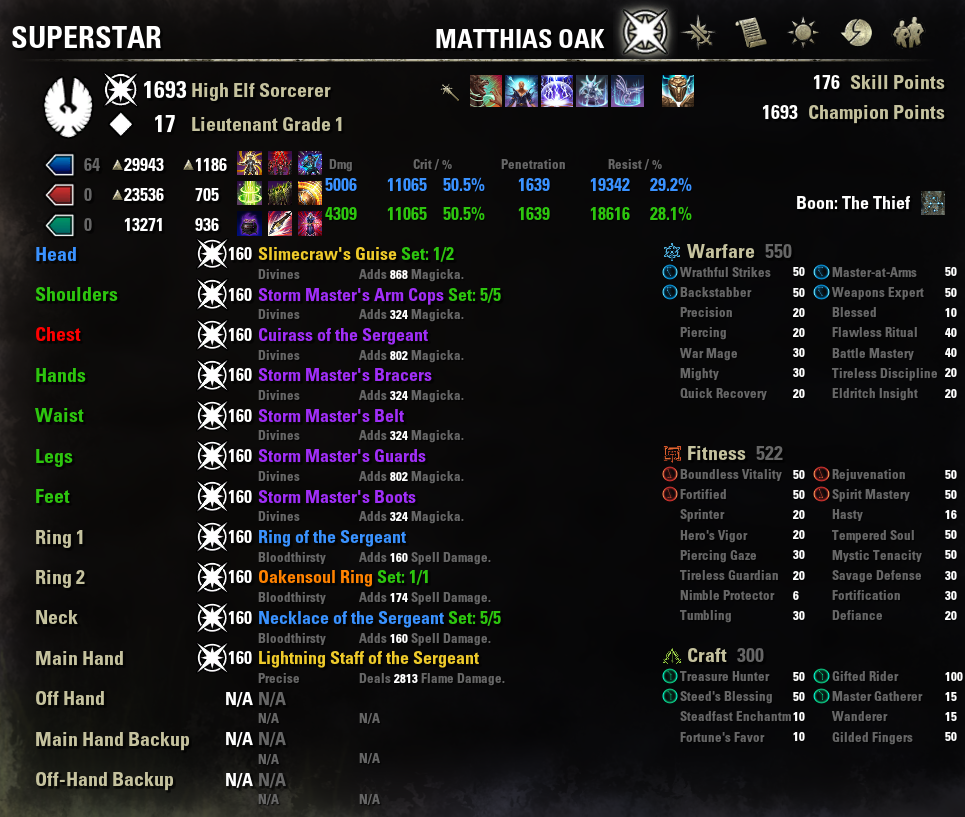
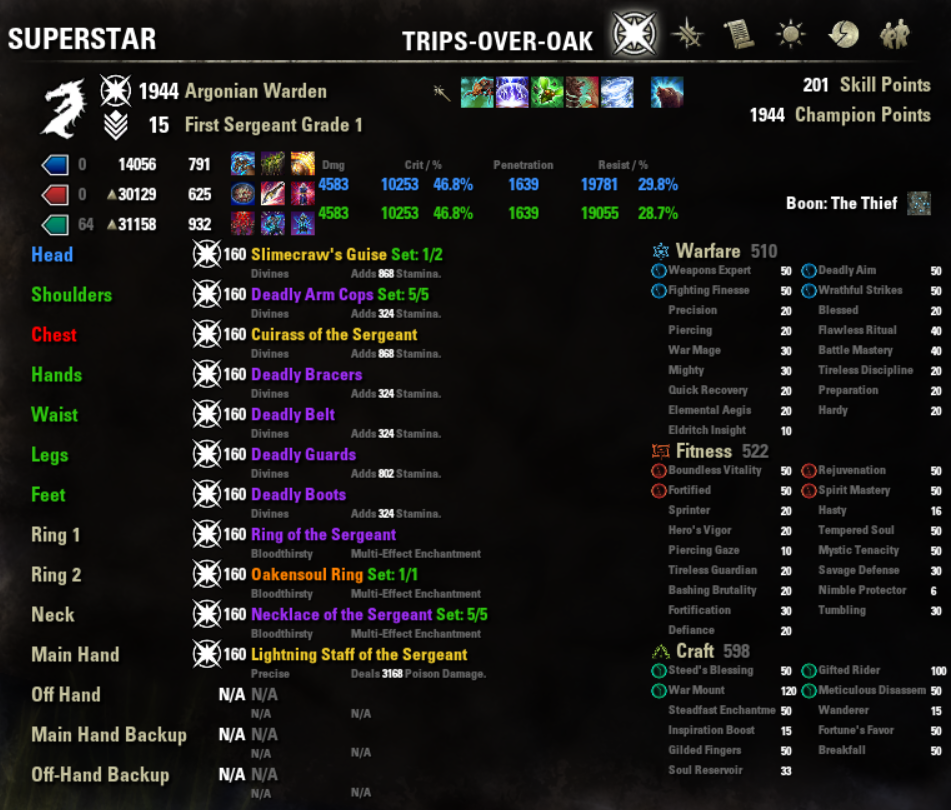
Sergeant’s Mail is the top-performing set for heavy attack builds, giving a big boost to our heavy attack damage. We’ll pair this with Deadly Strike, which will also enhance our heavy attacks
- Sergeant’s can be found in Wayrest Sewers dungeon (either version, 1 or 2). Farming the staff and jewelry needed may take some time
- Deadly is bought originally in Cyrodiil, from the quartermaster merchant in Bruma town. However, many people will find it simpler to buy from guild stores; the armor pieces sell fairly inexpensively, at least in off-traits
As mentioned above, we’ll be using the Oakensoul mythic and a lightning staff for maximum damage
Example Gear Layout
Small deviations from this layout (such as different traits, a different weight of Slimecraw, or swapping sets between different pieces) may offer slightly less damage (or defense) but certainly won’t make or break the build
| Gear Slot | Type | Set | Trait | Enchant |
|---|---|---|---|---|
 Head Head | Light | Slimecraw | Divines  | Max Stamina/Magicka   |
 Shoulders Shoulders | Medium | Deadly Strike | Divines | Max Stamina/Magicka |
 Chest Chest | Heavy | Sergeant’s Mail | Divines | Max Stamina/Magicka |
 Hands Hands | Medium | Deadly Strike | Divines | Max Stamina/Magicka |
 Waist Waist | Medium | Deadly Strike | Divines | Max Stamina/Magicka |
 Legs Legs | Medium | Deadly Strike | Divines | Max Stamina/Magicka |
 Feet Feet | Medium | Deadly Strike | Divines | Max Stamina/Magicka |
 Neck Neck | Sergeant’s Mail | Bloodthirsty  | Weapon/Spell Damage   | |
 Ring Ring | Sergeant’s Mail | Bloodthirsty | Weapon/Spell Damage | |
| Ring | Oakensoul Ring | Bloodthirsty | Weapon/Spell Damage | |
 Weapon Weapon | Lightning Staff | Sergeant’s Mail | Precise  | Poison/Flame   |
Notes
- Match your armor enchant to which stat you’re building into
- Pick either jewelry enchant, regardless of whether you’re specced into stamina or magicka
- Similarly, use either weapon glyph. Poison and Flame will work about equally well
- The Slimecraw piece can be changed for any other set piece if you don’t want to run the veteran dungeon (or spend Undaunted keys for the shoulder piece). However, it is one of the game’s absolute easiest vet dungeons
Alternative Gear
A few alternatives to Deadly Strike. Some of these can more powerful, but harder to use or harder to obtain. If you want to fully optimize your build, consider some of these options. If you aren’t too concerned with perfect optimization, any of these (including Deadly) will do just fine
Swapping out Sergeant’s Mail is not recommended; it’s stronger than any of these sets
- Storm-Cursed’s Revenge: Another great option providing some extra cleave damage
- Noble Duelist’s Silks: Generally the highest-damage option (unless you’re running with a thoroughly optimized group, in which case Deadly is strongest), but requires staying in melee range
- Storm Master: Another good option, though its bonus is a little finnicky since it relies on critting
- Infallible Mage: Another great option providing a useful debuff
- Order’s Wrath: A craftable option. Usually not quite as strong as the other options, but still good
Using Your HA Build
With all our buffs to heavy attacks, HAs will make up the vast majority of our damage (usually 60-75%). Therefore our focus in this section will be doing as much HA damage as possible; this build significantly dilutes the importance of skill casts
- Hold down your heavy attack button constantly throughout the duration of the fight
- Do not release your HA button between HAs or to cast skills. Perma-hold that button!
- Blocking is one of the few reasons to let go of HA. Note that you cannot block while holding HA
- During each heavy attack, you can (optionally) cast a single skill. Don’t try to cast multiple. HAs last just over 2.5 seconds, so you’ll be casting skills roughly that often
- Cast that skill in the middle of the heavy attack, rather than between HAs. This will “queue” the skill to go off when the HA finishes so that you don’t have to time your skill casts precisely between HAs
This clip demonstrates how to cast your skills. Hold down HA continuously, and press a skill button once in the middle of the HA

General Rotation Tips
Since most of our damage comes from heavy attacking, for casual play there is absolutely no need for a structured skill rotation. If you do want to optimize your rotation, you can check out the tips below; otherwise just skip down to the Skills section
All the rotations below will follow essentially the following format. (This format is more or less applicable to any rotation, heavy attack build or otherwise)
- Certain classes have a particularly high-damage skill on a short cooldown (e.g. Necromancer’s Blastbones or Sorcerer’s Prey). These skills do very significant damage, so if you’re one of those classes, you want to cast that skill on cooldown consistently
- On these classes you’ll benefit from a distinct 3- to 6-second “rhythm” of casting that skill in a consistent pattern, e.g. every third cast. See details below for each class
- In between these casts (if any), keep your DoTs running by casting them whenever they’re about to run out
- Whenever no DoTs are running out, cast your spammable if you have one slotted. (If you don’t, cast a skill with decent upfront damage, or just don’t cast anything at all)
- Cast your ultimate whenever it’s ready. Occasionally it’s useful to save your ultimate (e.g. when you have a difficult boss fight coming up soon), but in general just cast it when you have enough ult
Skills and Rotations by Class
HA builds can be used on any class! Sorcerers and Wardens are the top performers for heavy attack builds, but others are also more than capable of excellent damage
I intend for this section to briefly showcase many of the basic features and mechanics of each class, which are applicable to both heavy attack builds and traditional builds. After all, what better way to learn a class’s mechanics than on a simple build?
Click the tabs to view setups for different classes
Arcanist 
Example Bar Setup
 |  |  |  |  |  |
| Writhing Runeblades | Tentacular Dread | Inspired Scholarship | Barbed Trap | Evolving Runemend | The Tide King’s Gaze |
- Writhing Runeblades: Our spammable. Also generates a Crux which will enhance our next Tentacular Dread cast
- Tentacular Dread: Applies a debuff to increase our damage done to the enemy. If we have any Crux, that will get consumed to immensely enhance this debuff
- Inspired Scholarship (flex): Enhances our class skills (i.e. most of the skills we’re slotting) to make them do extra damage. Also assists in generating Crux
- Barbed Trap: Good single-target DoT
- Evolving Runemend (flex): Nice burst heal. Also generates a Crux to enhance our next Tentacular Dread cast
 The Tide King’s Gaze: Powerful ultimate to deal AoE damage to our foes
Useful Flex Skills
- More DoTs:
 Unstable Wall of Elements and
  Fulminating Rune are additional good DoT options
 - Ranged setup: Either of the above, in place of Barbed Trap
- Solo play: Either of
 Elemental Susceptibility or
  Razor Caltrops for the excellent Major Breach debuff
 - Alternative heal:
 Resolving Vigor for a slightly longer-lasting heal
Example Rotation
- We’ll start off by casting our DoTs and then spam Writhing Runeblades for the rest of the rotation
- Our Runeblades casts will build up Crux so that Tentacular Dread casts with full power. The following static rotation will work well for the above setup

Dragonknight 
Example Bar Setup
 |  |  |  | |  |
| Molten Whip | Venomous Claw | Eruption | Flames of Oblivion | Resolving Vigor | Standard of Might |
- Molten Whip: Our spammable. We can get a nice stat boost (and a buff to our next Whip cast) by slotting and casting other Ardent Flame abilities along with Whip
- Venomous Claw (flex): Nice single-target DoT. Does extra damage the longer it ticks
- Or use the
 Burning Embers morph for a small heal-over-time but a bit less damage
- Or use the
- Eruption: Great AoE DoT
- Flames of Oblivion: Another excellent AoE DoT
- Resolving Vigor (flex): Powerful heal skill. Also protects us with Minor Resolve
- Standard of Might: One of the best ultimates in the game! Damages enemies, boosts all of your other damage, reduces incoming damage, and provides a damage synergy for your allies
Useful Flex Skills
- More DoTs: Barbed Trap, Unstable Wall of Elements, and
 Engulfing Flames are additional good DoT options
 - Solo play:
 Noxious Breath for the excellent Major Breach debuff
 - Instant heal:
 Coagulating Blood for a more instantaneous (but smaller overall) heal
Example Rotation
- Nothing special here, just cast a DoT ( ) whenever one is running out, or our spammable Molten Whip if they’re all still ticking
Necromancer 
Example Bar Setup
 | |  |  | |  |
| Stalking Blastbones | Barbed Trap | Skeletal Archer | Detonating Siphon | Resolving Vigor | Elemental Rage |
- Blighted Blastbones: The necromancer’s huge burst damage skill. Does a powerful explosion after about 3 seconds
- Barbed Trap (flex): Good single-target DoT
- Skeletal Archer: Summons a skeleton to fight for you temporarily! Does extra damage the longer it fights
- Detonating Siphon: Good AoE DoT, and also passively increases our damage just by being slotted. Requires a corpse in order to cast, which we’ll be providing plenty of via Blastbones
- Resolving Vigor (flex): Powerful heal skill. Also protects us with Minor Resolve
- Elemental Rage: Powerful ultimate to deal substantial AoE damage to our foes
Useful Flex Skills
- More DoTs: Unstable Wall of Elements and
 Avid Boneyard are additional good DoT options
 - Ranged setup: Either of the above, in place of Barbed Trap
- Solo play: Either of Elemental Susceptibility or
 Unnerving Boneyard for the very useful Major Breach debuff
 - Instant heal:
 Resistant Flesh or
  Necrotic Potency for a more instantaneous (but smaller overall) heal
 - Alternative ultimate:
 Shooting Star for slightly more damage (but requires the rather tedious task of leveling the Mages Guild skill line)
 - Support ultimate:
 Glacial Colossus for less damage directly, but providing the Major Vulnerability debuff to help the entire group do more damage
Example Rotation
- Blighted Blastbones’s huge burst damage is by far our highest damage source besides heavy attacking, so we want to cast it as close to its 3-second cooldown as possible
- To do this, simply alternate Blastbones with DoTs ( ). The following static rotation will work well for the above setup
Nightblade 
Example Bar Setup
|  |  |  | |  |
| Unstable Wall of Elements | Twisted Path | Debilitate | Relentless Focus | Resolving Vigor | Soul Harvest |
- Unstable Wall of Elements (flex): Good AoE DoT
- Twisting Path: Great AoE DoT
- Debilitate (flex): Nice single-target DoT
- Relentless Focus: Procs after several attacks to allow casting a powerful bow attack. Also provides a nice stat boost built up by heavy (or light) attacking
- Resolving Vigor (flex): Powerful heal skill. Also protects us with Minor Resolve
- Soul Harvest: Powerful burst ultimate. Does a large burst of damage and increases all the damage we do for a brief period
Useful Flex Skills
- More DoTs: Barbed Trap and
 Dark Shade are additional good DoT options
 - Ranged setup: Flex in
 Swallow Soul as your spammable, and use Elemental Rage as your ultimate
 - Solo play: Either of Elemental Susceptibility or Razor Caltrops for the excellent Major Breach debuff
- Instant heal:
 Shrewd Offering for a more instantaneous (but smaller overall) heal
Example Rotation
- Relentless Focus’s bow damage proc will be one of our highest sources of damage besides heavy attacking, so cast it as often as possible
- The proc will be available every fourth heavy attack. In between, cast DoTs ( ) whenever one is running out
- The proc will be available every fourth heavy attack. In between, cast DoTs (
- This will look roughly like the sequence below
 indicates any skill other than Relentless Focus. If a DoT has expired (or is about to), cast that DoT; otherwise just cast nothing (or optionally re-cast Unstable Wall)
Sorcerer 
Example Bar Setup
|  | |  |  |  |
| Barbed Trap | Daedric Prey | Unstable Wall of Elements | Summon Volatile Familiar | Summon Twilight Matriarch | Summon Charged Atronach |
- Barbed Trap (flex): Good single-target DoT
- Daedric Prey: Does a big burst of damage after 6 seconds. Also increases your pets’ damage significantly
- Unstable Wall of Elements (flex): Good AoE DoT
- Summon Volatile Familiar: Great passive damage while the pet is summoned. Cast it while the pet is out to get some nice AoE damage
- Summon Twilight Matriarch: Also good passive pet damage. Cast it while summoned for a nice burst heal
- Or use the
 Summon Twilight Tormentor morph for a little extra damage but no heal
- Or use the
- Summon Charged Atronach: One of the highest damage ultimates in the game! Does a lot of damage, and provides a synergy for allies to get the excellent Major Berserk buff
Useful Flex Skills
- More DoTs:
 Hurricane and
  Lightning Flood are additional good DoT options
 - Ranged setup: Replace Barbed Trap with Lightning Flood
- Solo play: Either of Elemental Susceptibility or Razor Caltrops for the excellent Major Breach debuff
- Alternative heals:
 Critical Surge for a long-lasting heal-over-time, or Resolving Vigor for a briefer heal-over-time
 - Alternative ultimate:
 Power Overload for a big boost to your heavy attacks. Especially useful in AoE trash fights
Example Rotation
- Daedric Prey’s pet damage boost is a very substantial source of damage, so we want to cast it as close to its 6-second cooldown as possible
- To do this, cast Prey every third cast. In between, cast DoTs (). This will look roughly like the sequence below
- indicates any skill other than Prey. If a DoT has expired (or is about to), cast that DoT; otherwise just cast nothing (or optionally re-cast Barbed Trap)
No-Pet Option
Generally running both pets will yield optimal damage, but this no-pet setup will still pack a punch in case you prefer to avoid using pets
Example Bar Setup
 |  | | | | |
| Crystal Fragments | Haunting Curse | Unstable Wall of Elements | Barbed Trap | Critical Surge | Summon Charged Atronach |
- Crystal Fragments (flex): Our spammable. Can proc randomly anytime we cast a skill (including casting Frags itself), to make our next Frags cast more powerful
- Haunting Curse: Does two big bursts of damage in 12 seconds
- Unstable Wall of Elements (flex): Good AoE DoT
- Barbed Trap: Very nice single-target DoT
- Critical Surge (flex): Provides a constant stream of healing, proccing every time we do critical damage
- Summon Charged Atronach: One of the highest damage ultimates in the game! Does a lot of damage, and provides a synergy for allies to get the excellent Major Berserk buff
Example Rotation
- Haunting Curse is one of our biggest sources of damage besides heavy attacking, so we want to cast it as close to its 12-second cooldown as possible
- To do this, cast Curse every fifth cast. In between, cast DoTs ( ), Critical Surge, and our spammable Crystal Fragments. The following static rotation will work well for the above setup
Templar 
Example Bar Setup
 |  |  | | | |
| Biting Jabs | Power of the Light | Ritual of Retribution | Barbed Trap | Resolving Vigor | Elemental Rage |
- Biting Jabs: Our spammable. Unlike most spammables, it cleaves to nearby enemies
- Or use the
 Puncturing Sweep morph for a small heal but a little less cleave damage
- Or use the
- Power of the Light: Deals two big bursts of damage in 6 seconds. Also provides the Minor Breach debuff to break through some of the enemy’s armor
- Or use the
 Purifying Light morph for a heal at the expense of the Minor Breach debuff
- Or use the
- Ritual of Retribution (flex): Excellent AoE DoT
- Barbed Trap: Good single-target DoT
- Resolving Vigor (flex): Powerful heal skill. Also protects us with Minor Resolve
- Elemental Rage: Powerful ultimate to deal substantial AoE damage to our foes
Useful Flex Skills
- More DoTs:
 Blazing Spear, Unstable Wall of Elements and
  Vampire’s Bane are additional good DoT options
 - Powerful execute option:
 Radiant Oppression is an excellent execute skill to use when the enemy is at low health. It has potential for very high damage, though its long channeling time makes it a bit inconvenient to use with heavy attacks
 - Solo play: Either of Elemental Susceptibility or Razor Caltrops for the excellent Major Breach debuff
- Instant heal:
 Breath of Life for a more instantaneous (but smaller overall) heal
 - Alternative ultimate: Shooting Star for slightly more damage (but requires the rather tedious task of leveling the Mages Guild skill line)
Example Rotation
- Power of the Light is our biggest source of damage besides heavy attacking, so we want to cast it as close to its 6-second cooldown as possible
- To do this, cast Power every third cast. In between, cast DoTs () and spam Biting Jabs. This will look roughly like the sequence below
- indicates any skill other than Power. If a DoT has expired (or is about to), cast that DoT; otherwise cast our spammable Biting Jabs
- If you’re using Radiant Oppression, start using this skill as a replacement for your Jabs spams when the enemy reaches around 40% health, and then use it exclusively (replacing DoTs as well) after about 10%
Warden 
Example Bar Setup
 | |  | |  |  |
| Deep Fissure | Unstable Wall of Elements | Fetcher Infection | Barbed Trap | Arctic Blast | Wild Guardian |
- Deep Fissure: The warden’s huge burst damage skill. Deals two big bursts of damage in 9 seconds. Also provides the Major and Minor Breach debuffs to tear through enemies’ armor
- Unstable Wall of Elements (flex): Nice AoE DoT.
- Fetcher Infection: Great single-target DoT skill. Also provides the Minor Vulnerability debuff to make the enemy take more damage from everyone
- Barbed Trap: Good single-target DoT
- Arctic Blast (flex): Only a mediocre DoT, but helps maintain the Chilled debuff, which does lots of damage via the Glacial Presence passive. Also a great burst heal
- Wild Guardian: Summons a bear pet to fight with you! Cast it while summoned for an extra attack, especially when the enemy is at low health for the execute bonus
Useful Flex Skills
- More DoTs:
 Winter’s Revenge and
  Cutting Dive are additional good DoT options
 - Ranged setup: Either of the above, in place of
 Barbed Trap
 - Alternative heal: Resolving Vigor for a slightly longer-lasting heal
- Alternative ultimate: Elemental Rage or Shooting Star if you prefer to avoid using pets
Example Rotation
- Deep Fissure’s high burst damage is one of our biggest sources of damage besides heavy attacking, so we want to cast it as close to its 9-second cooldown as possible
- To do this, cast Fissure every fourth cast. In between, cast DoTs (). The following static rotation will work well for the above setup
- Wild Guardian is a particularly cheap ultimate and will be ready just in time to fit it into our rotation
No-Oakensoul Setup
Oakensoul is a huge part of what makes this build work smoothly and easily. I don’t recommend running this build without Oakensoul if you’re able to get it, but if you don’t have the DLC required, this section can be a reasonable alternative. You’ll need to manage your buffs quite a bit more, and you’ll miss out on Oakensoul’s survivability buffs, but otherwise you’ll still be able to get pretty good damage. Depending on your class, you may also need to level the Mages Guild skill line (a rather substantial task) to acquire the crucial Empower buff
- For this setup, substitute Oakensoul and Slimecraw for a full two-piece monster set. Maw of the Infernal, Stormfist, Selene, and Iceheart are excellent base game options
- I still recommend using only one skill bar for simplicity. It can be possible to get a bit higher dps with two bars, but only with significant effort that is against the spirit of this simple guide
- We will need an alternative source of Empower and (ideally) the other powerful offensive buffs that Oakensoul provides: Major Brutality/Sorcery, Major Savagery/Prophecy, and Minor Force. These can be acquired via various skills in your toolkit, and the Major buffs can be applied with potions as well. Empower is the most important, but the others are significant damage boosts as well
Empower
- Class options:
 Molten Armaments,
  Empowering Grasp,
  Ambush,
  Solar Barrage
 - Non-class options: Might of the Guild passive (activated with
 Degeneration or
  Scalding Rune)
Major Brutality/Sorcery
- Class options: Inspired Scholarship, Molten Armaments,
 Drain Power (either morph), Critical Surge, Biting Jabs,
  Betty Netch (either morph)
 - Non-class option: Degeneration
- Potion options: Weapon Power or Spell Power potion
Major Savagery/Prophecy
- Class options: Flames of Oblivion, Vampire’s Bane,
 Green Lotus
 - Non-class options:
 Camouflaged Hunter,
  Inner Light
 - Potion options: Weapon Power or Spell Power potion
Minor Force
- Non-class options: Barbed Trap,
 Race Against Time
Character Setup
Race
- First and foremost, play whatever race you enjoy! Racial differences are fairly minimal
- However, if you want to optimize,
 Dark Elf,
  High Elf, and
  Khajiit have potential for a little bit more damage output than other races
Attributes
- 64 Stamina or 64 Magicka, depending on which stat you’ve decided to build into
- Since our damage scales off our highest of the two stats, we want all our points in a single stat


Mundus Stone
 The Lover
- Gives you extra penetration to shred through enemies’ defenses. This is a great option for (1) when you’re leveling, or (2) when you’re not with a particularly organized group. When in doubt, Lover is likely the way to go
 The Thief
- Increases your critical chance, which is another excellent stat for maximizing damage. This is the best option when you have skill points, Champion Points, and group support invested into maxing out your penetration already
Consumables
Foods/Drinks
Bi-stat food (Max Health+Stamina or Max Health+Magicka) will be our food of choice. Since we’ll have plenty of sustain, we have no need for anything more complex. The foods listed below are for CP 150+; similar but differently named food exists for lower levels
- For a stamina setup, use any of these equivalent foods:
 Braised Rabbit with Spring Vegetables /
  Garlic Cod with Potato Crust /
  Sticky Pork and Radish Noodles
 - For a magicka setup, use any of these equivalent foods:
 Melon-Baked Parmesan Pork /
  Mistral Banana-Bunny Hash /
  Solitude Salmon-Millet Soup
Potions
For the most part, we have no need for potions. We’ll have little trouble with sustain, and Oakensoul provides all the offensive buffs we could get from potions
 Crown Tri-Restoration Potion (occasionally available from daily rewards) is an optional possibility for extra health recovery, and for the (likely rare) times when you need extra sustain
- You can also equivalently use craftable tri-stat potions or even just the health, magicka, or stamina potions looted from the wild
- Note that the Nightblade‘s Catalyst passive gives ultimate generation for drinking a potion. Unlike other classes, Nightblades have some extra incentive to use potions
Champion Points (level 50+)
A rough progression of what CP nodes to start with once you hit level 50. You’ll be able to use more of these nodes as you gain experience and accumulate more Champion Points. Fill each node completely before moving on to the next one
Warfare 
- Start with Precision and (in the Extended Might sub-tree) Piercing
- Then add these four slottables: Weapons Expert (in the Extended Might sub-tree), Deadly Aim, Fighting Finesse, Master-at-Arms. (Make sure you add them to your Champion Bar or they’ll have no effect!)
- For optimized group play, you can also swap out Fighting Finesse for Backstabber to get slightly more crit damage
- This will work well for all classes and races, but for certain ones you can make the following adjustment for somewhat better results in organized, well-optimized groups:
- Nightblades, Templars, and Wardens, as well as any class in Khajiit race, have a critical damage passive already and can swap Fighting Finesse out for Wrathful Strikes
- Next grab Tireless Discipline, and also the non-slottable CP from the Extended Might sub-tree (i.e. skip any CP with the “Add to Champion Bar to activate” note)
- Finally add the rest of the non-slottable CP throughout the Warfare tree
Fitness 
- Take these three slottables: Rejuvenation, Boundless Vitality, Fortified. (Make sure you add them to your Champion Bar or they’ll have no effect!)
- Grab Sprinter, Hasty (in the Wind Chaser sub-tree), and Hero’s Vigor
- Take the rest of the non-slottable CP throughout the Fitness tree, including those in the three subtrees
- At some point during the above step, take one more slottable CP of your choice (Celerity (in the Wind Chaser sub-tree), Bloody Renewal, Spirit Mastery are some of the most useful ones)
Craft 
- Use whatever you’d like here; these points mostly don’t affect your combat skill. There are lots of options for crafting, stealth, movement speed, and more in this tree
- Some early nodes I find good for very general usage are Steed’s Blessing, Breakfall, and Wanderer
Build Summary
Build summaries for a magicka-based sorcerer and a stamina-based warden. For other classes, simply substitute in the skills you want