Welcome to my healing guide! This guide will provide builds and tips for becoming a better PvE healer
We will go into some detail about how to heal, as well as how to build your healer to provide the best support to your group
This guide is intended for PvE groups and will have only very limited application to PvP
This guide is updated for U46 (June 2025)
While there are lots of ways to build your healer, this guide is for building fully into a healing setup. Want to make a healer/dps hybrid? Go for it! But endgame healers build mainly into a fully dedicated healing role, so this type of build will be the main focus of this guide
Table of Contents
The Healer Role
A good healer in ESO is usually able to do much more than just heal. In your toolkit you’ve also got lots of options for putting out damage buffs to help your team do more damage, and healers are also sometimes called on to perform extra tasks to deal with mechanics as content requires
Your Job
These five items sum up the role of a typical healer
- Heal! Obviously your chief role is to keep everyone alive. When your group is in a tough spot, everything else is secondary
- Buff your group’s defense and sustain. A couple of buffs to give everyone extra resistances and resources can go a long way toward keeping them alive and keeping their resources up to cast their skills
- Buff your group’s damage. The faster your team can kill the enemies, the less long you’ll need to heal them for
- Handle mechanics as needed. Healers are occasionally asked to perform extra tasks. Healers are particularly often given special roles like kiting roles (such as kiting Oaxiltso’s jumps in Rockgrove trial) and dealing with mechanics that require extra focused healing
- As some examples, some encounters have healing checks (where your whole group takes lots of damage very quickly and you must heal them through it) and others have mechanics requiring lots of healing toward one particular ally (such as tombs in the Lokkestiiz fight in Sunspire trial). Further specifics of such mechanics are beyond the scope of this guide, since they vary in each content; just be aware that they may come up!
- Do some damage. Your heals are already healing? Your buffs are already buffing? You might consider putting out some extra damage of your own
In endgame healing, putting out buffs for your group is at least as important as healing them. Good buff management can provide enough extra group damage to make the difference between a slow slog through a fight where mechanics appear over and over, and a quicker, cleaner clear without so much hassle
Not Your Job
Some tasks are distinctly out of your control or otherwise NOT your job
- Healing “Stupid.” You can’t heal everyone out of everything. Is a dps standing in a mechanic meant for a tank? Did a tank forget to block a one-shot kill? Tough luck, nothing you can do about that. In general, it’s your team’s job to deal with mechanics correctly, not yours to heal them out when they mess up. Provide some extra heals if you’re able, but ultimately if other people die from failing mechs, that is not your fault. You cannot heal people through one-shots
- Resurrecting Teammates. Your job is to heal your team. Don’t stop to rez, or you might let other people die too! Rezzing is the job of the dps, whose role is generally not so urgent; only rez in a desperate situation where there aren’t dps alive to handle rezzes themselves
Healing Basics
These three basics will get you a long way toward putting out lots of healing for your group
Rely on smart targeting
Any heals that don’t heal the whole group will normally automatically target people whose health percentage is lowest. When there are multiple teammates in range, you cannot (and generally don’t need to) choose a particular one to heal. Just rely on smart targeting to find the right person
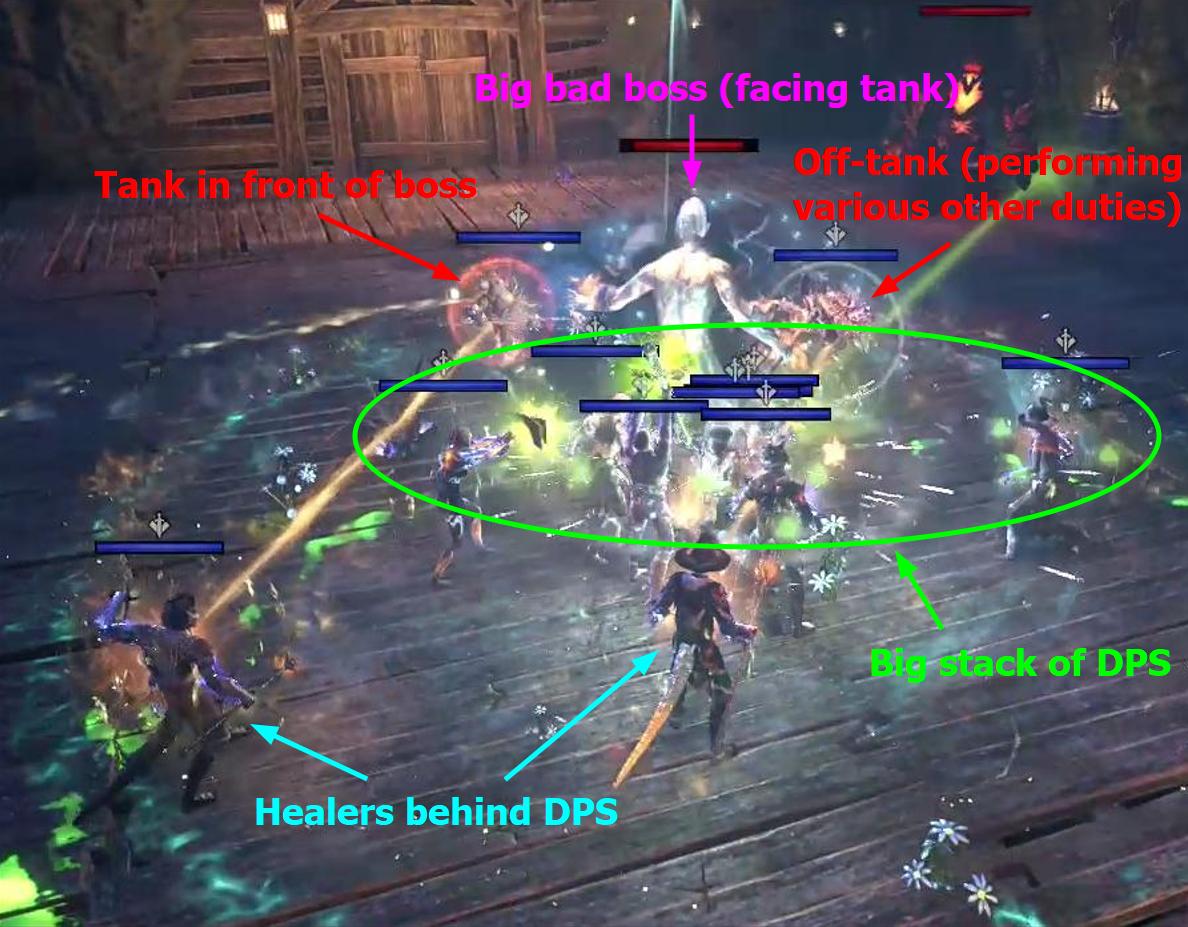
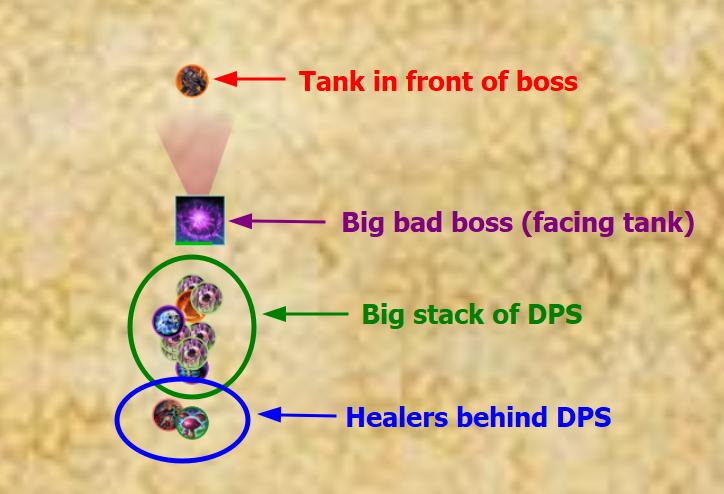
Stand behind the group
With few exceptions, heal skills (like most other skills) are directed in front of you, whether at a particular teammate or an area on the ground. It is very difficult to adequately heal people who are behind you. Therefore healers should aim to stand closely behind the group and face them whenever possible. Position yourself so that the dps are between you and the boss. This way your forward-facing heals will be able to heal everyone. Don’t stand too far from the group though; stay close so that your healing AoEs can heal both the group and yourself
Need to give extra heals to someone in particular (because they’re dying, or because you know they’ll be taking extra damage throughout the fight)? Make sure you’re facing in that person’s general direction, and smart targeting will normally apply your heals to them if they need it
These pictures show a very idealistic positioning of how your group should normally be standing. Most groups are not coordinated enough to have everyone stand quite this neatly together, but this should be your goal
Use your HoTs
A variety of heal-over-time (a.k.a. HoT) skills are available to you. Instead of one big burst of healing, these skills put out smaller amounts of healing that are applied repeatedly for typically 10 to 20 seconds. While each individual tick does only a little healing, a few well placed HoTs will add up to much more healing than you could do with just your burst heals. In fact, the bulk of your healing output should be done by HoTs
Don’t just heal responsively when you see people’s health dropping; by the time you notice, you might not have enough time to heal them before they die. Always make sure you’ve got at least one or two HoTs healing the group all the time, and ideally more; this will make your job a lot easier when someone actually is dying
Additionally, HoTs cost less magicka to cast than burst heals. Always use your HoTs!
Setting up Your Healer
As healers, the stats most important to us are:
- Max Magicka, which not only gives us more resources to cast our skills from, but also increases the healing power of our skills
- Spell/Weapon Damage, which boosts not just our damage but also our healing power, much like Max Magicka does. (Spell and weapon damage are essentially equivalent; nearly all sources of them will put points in both)
- Spell/Weapon Critical, which determines how often our heals randomly “crit” to do extra healing. (Spell and weapon crit are essentially equivalent; nearly all sources of them will put points in both)
- Magicka Recovery, which passively restores magicka gradually over time
In general, there’s no need to build your healer very tanky. You’ve got lots of ways to recover; you’re a healer after all! Stay behind the group out of the worst of enemy attacks, and keep on pushing out heals to heal both your group and yourself, and you’ll be fine for the most part. Just focus on providing all the buffs and healing you can
Attributes
All 64 attribute points go into magicka. Your skills do more healing based on your Max Magicka value (or Stamina, whichever is higher), so it is ideal to build your magicka as high as possible
- It’s possible to make a stamina-based healer, but so many staple healing skills are magicka-based that a magicka build is much more practical

Race
Race matters even less as a healer than it does for other roles, since the stat differences won’t do much more than affect your healing output by a small amount. (Remember, half your job is putting out buffs, and those will be more or less unaffected by your stats)
Seriously, use whatever race you like. But if you want to optimize a little extra, consider one of these options:
 High Elf,
  Dark Elf, or
  Argonian for the strongest healing stats
 Breton for the best magicka recovery
Mundus Stone
- The
 Ritual (+8% healing output) for extra healing
 - Or the
 Atronach (+310 magicka recovery) for extra sustain
Food/Drink
 Witchmother’s Potent Brew for a great and well rounded option: Max Magicka, Max Health, and Magicka Recovery. I recommend this for most healing builds
 Solitude Salmon-Millet Soup (or similar bi-stat food) for a stronger option if you don’t need magicka sustain: Max Magicka and Max Health
 Ghastly Eye Bowl for a strong option if you can confidently keep yourself alive: Max Magicka and Magicka Recovery, but no Health bonus
- Advanced option:
 Clockwork Citrus Filet for very advanced healing: larger amounts of Max Magicka, Max Health, Magicka Recovery, and Health Recovery. Due to the high cost/rarity of ingredients, I do not recommend this option unless you’re doing very sweaty endgame content
Potions
 Tri-stat potions (such as the Crown potions occasionally received for free in daily rewards) or
  Magicka potions are generally sufficient, especially if you have the Major Prophecy buff provided by a skill like Inner Light
 Spell Power potions are another good option that can act as an alternative source of Major Prophecy, as well as Major Sorcery. Consider these in particular if you don’t have Major Prophecy from elsewhere
Champion Points
A rough progression of what CP nodes to start with after level 50. Fill each node completely before moving on to the next one
Warfare (blue) 
Start with Precision, Eldritch Insight, and Blessed (in the Mastered Curation subtree) for some basic stat boosts, and then add the four slottables below. Once you’ve done that, add the non-slottable CP nodes in the Staving Death subtree, followed by the rest of the non-slottables throughout the tree in more or less any order
Slottables
- Soothing Tide (enhances area heals)
- Rejuvenator (enhances all healing)
- Swift Renewal (enhances HoTs)
- Enlivening Overflow (provides resource recovery for allies) or From the Brink (provides damage shields to dying allies)
Focused Mending (enhances single-target heals) can be very situationally useful for times when you need to apply a lot of focused single target healing, e.g. for tomb healing in Sunspire trial. But the above setup will be best for most scenarios
Advanced tip: Due to their respective 12 and 30 second cooldowns per target, both Enlivening Overflow’s and From the Brink’s effects do not stack or provide extra benefit when used by multiple people. Advanced trial groups will often assign just one healer to use each; one slots Enlivening and the other Brink
Fitness (red) 
Start with all of the first three slottable nodes listed below, then take Sprinter, Hasty (in the Wind Chaser subtree), and Hero’s Vigor. Then add Tumbling, Defiance, Tireless Guardian, and Fortification, as well as one of the fourth slottables listed below as soon as you can unlock it. Finally, get the rest of the non-slottable CP throughout the tree in more or less any order
Slottables
- Boundless Vitality (extra max health)
- Fortified (resistances)
- Rejuvenation (extra resource recovery)
- any of: Celerity (movement speed), Expert Evasion (free dodge-roll every so often), Slippery (free automatic break-free every so often), Bracing Anchor (increases how much damage Blocking will block, but makes you move slowly)
Craft (green) 
Green CP has essentially no effect on combat. Use whatever you find useful
- Many people find the movement speed boosts from Steed’s Blessing (movement speed while out of combat) and Gifted Rider (mount speed) fairly universally handy
Gear
For some full gear setups, skip down to Example Gear Setups below
Basics
- As a magicka based role, you’ll want mostly or all light armor to provide magicka recovery via the Evocation passive. I recommend all 7 pieces as light armor for this purpose
- A 6/1 build (using one medium piece) or a 5/1/1 (with one medium and one heavy) are also popular, to get some stat variation from medium armor passives and build up the passives in the Undaunted skill line, which give extra bonuses for wearing more armor types. 6/1 or a full 7 light are generally considered optimal, but the differences are minimal; any of these options will do fine. (But remember that fewer armor types means fewer armor skill lines you’ll need to level and spend skill points in!)
- With its strong healing and group buff skills, a restoration staff is the obvious choice for our frontbar weapon
- We’ll use a lightning staff or an ice staff on our backbar to provide some debuffs and utility
- A lightning staff will provide the off-balance debuff via the Elemental Blockade skill, while an ice staff’s Blockade will reduce enemy resistances and provide shields to allies. Normally the ice staff will provide stronger benefits, though an optimized tank in your group will typically use an ice staff and have these benefits covered
- Using a destruction staff also ensures that we can apply our backbar enchantment reliably. The Wall of Elements skill (like all weapon area DoT skills) is able to proc this enchantment as long as it’s doing damage, even while we’re on our frontbar. Restoration staves don’t have such an area DoT to proc the enchantment, so a resto backbar’s enchantment would only ever proc when we light attack on that bar, which would generally be far less consistent
- Running both bars as restoration staves can work fine for most scenarios, but you will provide more utility to your group by using a destruction staff on your backbar
- Blue or purple quality gear is entirely adequate for the vast majority of content in the game. You can consider gold weapons for a bit of extra healing power, but gold upgrades to armor and jewelry provide only very slight benefit and are largely not worth the cost of the upgrade
Gear Sets
Advanced healing almost always prioritizes gear that provides group buffs rather than putting out extra healing. Most of the best healing sets either boost your group’s dps or give them extra resources (which they can in turn use to deal more dps). Your skill casts will be plenty adequate for providing enough healing
However, you do not need advanced group buff sets to do perfectly adequate healing for much of the content in the game. If you’re just looking to do casual healing and aren’t too worried about optimization, check out the first two tabs below
Many trial and arena sets have perfected versions that come from veteran mode. Perfected sets give just a single extra stat bonus (usually magicka recovery or max magicka for the sets listed here). While these bonuses are nice to have, they provide only a little extra healing or sustain and are not at all critical to the main function of the sets. Don’t feel you need to spend long hours farming for the perfected versions; normal, non-perfected sets will be plenty adequate for pretty much any content
These tabs below show good healing sets to consider for both new healers and advanced healers. See Example Gear Setups below for a few full setups
Starting Gear
Still leveling? Haven’t done much gear farming yet? No problem, you’ll still be able to heal most content just fine! Try these craftable sets. You can have them crafted for you by other guild members, or craft them yourself if you have the necessary skills. No set farming needed! You’ll want two of these sets, ideally Order’s Wrath and one of the others
These sets will be entirely adequate for a casual healer, but anyone wanting to push more challenging or highly organized content will want different options
Five Piece Sets
- Order’s Wrath: Buffs our critical chance and critical healing so that we put out more healing
- Law of Julianos: A big stat bonus for stronger heals
- Armor of the Seducer: Makes our spells cheaper to keep our magicka pool full
Easy-to-Farm Gear
If you just want gear that’s relatively easy to farm but more interesting than crafted sets, give these a try! These sets come from basegame dungeons and the overland
Five Piece Sets
- Spell Power Cure: A big group damage buff. SPC is one of the most popular sets for healers even in the most advanced of content, and highly recommended for all healers to own. See the Meta Trial Gear tab for more details
- Worm’s Raiment: Provides magicka recovery to your group
- Sanctuary: Provides health recovery to your group
Meta Trial Gear
These are the sets most commonly used by most endgame groups
Five Piece Sets
- Spell Power Cure: Provides the powerful Major Courage buff, increasing your group’s damage. This great buff makes SPC a staple of most endgame groups
- SPC is a relatively easy dungeon set to farm and highly recommended for all healers to own. For best results, put out lots of healing to proc the buff consistently, as it only procs from overhealing (i.e. healing people who already have full health)
- Roaring Opportunist: Provides the powerful Major Slayer buff to boost your group’s damage. Another staple of endgame trial groups. Often paired with Jorvuld’s Guidance to provide Slayer for longer
- RO is very popular but requires some more difficult trial farming. RO requires a bit more finesse to use well than other sets do, since it needs to be procced with heavy attacks on a regular cooldown. Consider a simpler set if you’re just getting started with healing
- For best results, heavy attack every 22 seconds when the set’s cooldown ends. See more info in Example Gear Setups below
- Jorvuld’s Guidance: Causes buffs and shields you apply to allies to last longer. In particular, this set is often paired with Roaring Opportunist to lengthen its Major Slayer buff
- Advanced tip: Jorvuld is most useful for extending buffs that can’t be given at full uptime. For instance, RO has a 22 second cooldown for providing Slayer, but it only provides the buff for 12 of those seconds; Jorvuld will extend this to 16.8 seconds out of 22. Similarly, the Aggressive Horn ultimate provides its buffs for 10 and 30 seconds, but it will take longer than that to build up your ultimate to cast the skill again
- Jorvuld is not recommended for buffs that can be procced anytime you want. If you can reapply the buff by just casting a skill or proccing a set with no cooldown, you’ll be better off keeping a close eye on that skill or buff timer and using a different set instead
- Pillager’s Profit: Gives everyone in your group some ult whenever you use your own ultimate, allowing them to cast their ultimates more often
- Also comes from a trial, but also popular and powerful. For best results, cast your ultimate often; anytime your ult meter is sitting at full, that’s ult that your group isn’t getting!
- Powerful Assault: Gives your group a stat boost for extra damage whenever you cast an ability from the Assault skill line. Only affects 6 people at a time, so in a trial you’ll need two skill casts to buff everyone
- PA is a medium armor set, so it’s best used on weapons and jewelry pieces rather than armor. This way you can use light armor for your body pieces
- Normally you’ll use the Echoing Vigor skill to proc PA, since this skill is already an excellent heal
- Master Architect: An alternative to Roaring Opportunist, providing Major Slayer to six people whenever you use your ultimate. Only buffs six people, so most trial healers should just use RO; but in a dungeon MA works great for anyone
- Advanced tip: Advanced trial groups will often put two people in MA to buff the whole group. However, unlike some other effects, MA prioritizes giving Slayer to people near you and doesn’t check if they already have the buff. In a trial, this means that two people wearing MA might just end up buffing the same six people. For optimal use, the group needs to split themselves into two different stacks of six people, so that the two Slayer providers can each give one stack Slayer based on that proximity priority. This makes MA impractical to use well for groups that aren’t highly coordinated, but if utilized well, it can provide longer stretches of Slayer uptime than RO+Jorvuld can
- Xoryn’s Masterpiece: Just a simple stat buff for your group. This buff is a little less strong than the others in this list, so it’s a bit less appealing but still pretty strong
Monster Sets
These are the top monster sets used by most endgame healers
- Symphony of Blades: Extra resources for your group
- Ozezan the Inferno: Extra resistances for your group, plus a buff to incoming healing
- The Blind: A damage shield and Minor Force damage buff for your group
- Nazaray: Makes debuffs on nearby enemies last longer whenever you use your ultimate. Frequently used by tanks, but occasionally worn by a healer instead. Commonly used to extend the powerful Major Vulnerability debuff, proccing the extension with an ultimate right after Vuln is applied
Arena Sets
- Grand Rejuvenation (Master/DSA restoration staff): Extra resources for your group when you cast Grand Healing (or a morph of it). Best general-use arena weapon for healers
- Mender’s Ward (Blackrose restoration staff): Provides Major Vitality for extra healing to the one individual you’ve warded with Steadfast Ward (or a morph of it). Excellent for specific fights where one person in particular needs a lot of healing, e.g. for tomb healing in Sunspire trial
Mythics
- Cryptcanon Vestments: Causes your ultimate casts to distribute ult to the rest of your group so that they can cast ultimates more often. (However, your own ultimate’s actual effect is disabled)
- Pearls of Ehlnofey: Extra ult for you when you cast healing skills while your magicka is low. Generally only used in advanced content, since it requires maintaining a low magicka meter
- Spaulder of Ruin: A damage buff for six group members, but at the expense of some of your own resource sustain. Use with caution!
- Note that this mythic is a shoulder piece, so it will prevent you from wearing a full monster set
Alternative Gear
This section shows gear that is centered around putting out group buffs, but aren’t the ones usually used by optimized groups. Check out the Meta section first, but try these sets if you’re looking for something interesting that may not be just exactly what everyone else is using
Five Piece Sets
- Saxhleel Champion: Provides the powerful Major Force buff to your group for lots of extra damage whenever you cast your ultimate. This set can complement the Aggressive Horn ultimate (which gives the same buff) by extending its timer, or let you use a different ultimate but get Force anyway
- Saxhleel is a heavy armor set, so it’s best used on weapons and jewelry pieces rather than armor. This way you can use light armor for your body pieces
- Vestment of Olorime: An alternative Major Courage set to Spell Power Cure. Potentially provides Courage a little more consistently, but requires your group to stand in its circle to get the buff
- Hollowfang Thirst: Provides extra magicka and a healing buff to your group
- Stone-Talker’s Oath: Provides extra magicka and stamina to your group
Monster Sets
- Sentinel of Rkugamz: Provides resources and healing to nearby allies. This is a great basegame monster set to start out with. Small healing radius, so works best if the group is staying close together
- Magma Incarnate: Puts out a couple of useful buffs, but only to a couple of people at a time. Can be useful in dungeons, where your group is small anyway, but is rather ineffective in trials
- Nightflame: Provides some extra healing
- Troll King: Provides some extra emergency healing to allies who are at low health
Traits and Enchantments
Just healing casually? You’ll be just fine with any traits and enchantments; whatever you have around will do fine. Most of your effectiveness as a healer comes from your sets, skills, and personal familiarity with healing. However, certain traits and enchants are more useful to a healer than others. If you’re looking to optimize your healer, set up as follows
- Armor: Divines trait to boost your mundus effect, and Max Magicka glyphs to enhance your magicka pool
- Jewelry: Infused trait to boost the enchantments, and either Spell Damage glyphs for stronger heals or Magicka Recovery or Reduce Spell Cost glyphs if you need extra sustain
- Arcane trait is also a good option that’s cheaper to craft and unlock
- Frontbar (restoration staff): Powered trait for extra healing output, and Weapon Damage glyph for stronger heals
- A Decisive trait can also be useful sometimes, to cast ultimates like Aggressive Horn or certain class ultimates more often
- Backbar (destruction staff): Infused trait to boost its enchantment, and Weakening glyph to weaken the enemy’s damage against your group
- Crusher enchantment is another good option here, to lower the enemy’s resistances. Good tanks will normally have this debuff covered, but it can sometimes be helpful for healers to slot it anyway in case they don’t
- Or try Absorb Magicka enchantment if you feel you need more magicka
Example Gear Setups
These are some example setups, showing some beginner setups as well as some of the most common endgame trial setups. Consider them as templates for your own builds. Don’t have correctly traited gear pieces? Prefer a different set than one of the listed ones? Just swap in what you’ve got!
These setups use optimized traits and enchantments, but again this sort of heavy optimization isn’t too critical. Using whatever you’ve got around will be perfectly fine for most content
For best results, do your best to use different buff sets from the other supports on your team. While some sets will still work at their full potential when used twice, there’s no use in providing, say, duplicate Major Courage buffs. Consider coordinating beforehand with the other healer (if in a trial) and perhaps even the tank(s), and if you’re wearing the same sets as someone else, swap to a different setup or ask them to do so if possible
Setup 1: Starting Gear
This setup uses the crafted gear listed above: Order’s Wrath and Law of Julianos. Wretched Vitality just provides a two-piece magicka recovery bonus to fill out our last two pieces
Use Training traits if you’re leveling your character and want extra XP, or the alternative traits to spec more toward a proper healing build:
| Gear Slot | Type | Set | Trait | Enchantment |
|---|---|---|---|---|
 Head Head Shoulders Shoulders | Light | Wretched Vitality | Training (or Divines) | Max Magicka |
 Chest Chest Hands Hands Waist Waist Legs Legs Feet Feet | Light | Order’s Wrath | Training (or Divines) | Max Magicka |
 Neck Neck Ring Ring Ring Ring | Law of Julianos | Arcane | Magicka Recovery / Spell Damage | |
 Front Weapon Front Weapon | Restoration Staff | Law of Julianos | Training (or Powered/ Decisive) | Weapon Damage |
| Back Weapon | Ice/Lightning Staff | Law of Julianos | Training (or Infused) | Weakening/Crusher |
Setup 2: Spell Power Cure + Pillager’s Profit (+ Master Resto or Pearls)
Here we have Spell Power Cure for its powerful Major Courage damage buff, and Pillager’s Profit to give our group extra ult to cast their ultimates more often
It doesn’t really matter which pieces are SPC and which are PP, as long as you have five of each. Below is an example setup; it does not need to be followed precisely
| Gear Slot | Type | Set | Trait | Enchantment |
|---|---|---|---|---|
| Head Shoulders | Light | Symphony of Blades (or any monster set) | Divines | Max Magicka |
| Chest Hands Waist Legs Feet | Light | Spell Power Cure | Divines | Max Magicka |
| Neck Ring Ring | Pillager’s Profit | Infused (or Arcane) | Magicka Recovery / Spell Power | |
| Front Weapon | Restoration Staff | Pillager’s Profit (or Grand Rejuvenation) | Powered/ Decisive | Weapon Damage |
| Back Weapon | Ice/Lightning Staff | Pillager’s Profit | Infused | Weakening/Crusher |
- For some extra group utility, you can add in the Master restoration staff (Grand Rejuvenation). If you do this, make sure that your backbar staff is PP rather than SPC. SPC needs to be active on both bars because it procs from healing, and so will not perform well if it’s not active on your resto bar. Do not backbar SPC
- Also note that you’ll want to primarily cast only your backbar ultimate, since only that bar has PP active. Make sure whatever ultimate you’re planning to cast most often is on your backbar
Remember to always be putting out lots of healing to proc SPC’s buff. You want to have your group at full health as often as possible and keep on healing them while they’re full so that you’ll overheal them to trigger the buff
Also remember to be casting your ultimate often. Don’t let your meter stay full, or else you’re missing out on gaining more ult that you could be distributing to your group. Healers running PP will often cast ultimates when their ult meters fill even if the actual ultimate cast isn’t particularly useful at the moment, just to make sure the extra ult doesn’t go wasted
Setup 2.1: Add in Pearls of Ehlnofey [Advanced]
We can add in the Pearls of Ehlnofey mythic to generate a bunch of extra ult, which we can in turn use to dispense ult to our group with Pillager’s. I only recommend this setup for fairly confident and experienced healers, as it requires significant extra management both of your resources and of how you use your two weapon bars. Pearls is not worth running unless you are already very comfortable healing and using SPC and PP, and are willing to put in extra effort to constantly keep your magicka low to proc the bonus
- No arena weapon on this setup. Instead we’ll fit in the extra mythic piece by putting SPC on only our resto frontbar and PP on only our destro backbar
| Gear Slot | Type | Set | Trait | Enchantment |
|---|---|---|---|---|
| Head Shoulders | Light | Symphony of Blades (or any monster set) | Divines | Max Magicka |
| Chest Hands Waist | Light | Spell Power Cure | Divines | Max Magicka |
| Legs Feet | Light | Pillager’s Profit | Divines | Max Magicka |
| Neck | Pearls of Ehlnofey | Infused (or Arcane) | Magicka Recovery / Spell Power | |
| Ring Ring | Pillager’s Profit | Infused (or Arcane) | Magicka Recovery / Spell Power | |
| Front Weapon | Restoration Staff | Spell Power Cure | Powered/ Decisive | Weapon Damage |
| Back Weapon | Ice/Lightning Staff | Pillager’s Profit | Infused | Weakening/Crusher |
Remember, you’ll want to primarily cast only your backbar ultimate since that’s the only bar with Pillager’s active, and you’ll also want to make extra sure to stay on your frontbar most of the time to keep SPC’s buff up, since SPC won’t be proccing on your frontbar. Only go to your backbar briefly to cast whatever HoTs and buff skills you’ve got there, then switch right back to your frontbar
Advanced tip: Make the best use out of Pearls by keeping your magicka meter low and casting lots of healing skills. You want to constantly cast healing skills every second to proc Pearls as often as possible, even if your group doesn’t actually need that much healing. This will give you lots of extra ult so you can cast your ultimate more often, which will in turn allow you to give your group more ult via Pillager’s
Setup 3: Spell Power Cure + Powerful Assault (+ Master Resto)
Here we have Spell Power Cure for its powerful Major Courage damage buff, and Powerful Assault for its big stat bonus for the group. This setup is excellent in dungeons; it will work well in trials too but is not as popular there. Make sure to slot an Assault skill (usually Echoing Vigor) and use it regularly in order to proc PA’s buff
Since PA is medium weight, it ideally belongs on your weapons and jewelry pieces. Use SPC on your armor pieces so that you will be wearing light armor. However, it’s okay if a piece or two is swapped. Below is an example setup
| Gear Slot | Type | Set | Trait | Enchantment |
|---|---|---|---|---|
| Head Shoulders | Light | Symphony of Blades (or any monster set) | Divines | Max Magicka |
| Chest Hands Waist Legs Feet | Light | Spell Power Cure | Divines | Max Magicka |
| Neck Ring Ring | Powerful Assault | Infused (or Arcane) | Magicka Recovery / Spell Damage | |
| Front Weapon | Restoration Staff | Powerful Assault (or Grand Rejuvenation) | Powered/ Decisive | Weapon Damage |
| Back Weapon | Ice/Lightning Staff | Powerful Assault | Infused | Weakening (or Crusher) |
- For some extra group utility, you can add in the Master restoration staff (Grand Rejuvenation). If you do this, make sure that your backbar staff is PA rather than SPC. SPC needs to be active on both bars because it procs from healing, and so will not perform well if it’s not active on your resto bar. Do not backbar SPC
- Also make sure to put your Assault skill on your backbar so that it will proc your backbarred PA
Remember to always be putting out lots of healing to proc SPC’s buff. You want to have your group at full health as often as possible and keep on healing them while they’re full so that you’ll overheal them to trigger the buff
Setup 4: Roaring Opportunist + Jorvuld’s Guidance (+ Master Resto)
Roaring Opportunist + Jorvuld’s Guidance is the popular “RO/JO” setup, giving great Major Slayer uptime
It doesn’t really matter which pieces are RO and which are JG; you just need five of each. Below is an example setup; it does not need to be followed precisely
| Gear Slot | Type | Set | Trait | Enchantment |
|---|---|---|---|---|
| Head Shoulders | Light | Ozezan the Inferno (or any monster set) | Divines | Max Magicka |
| Chest Hands Waist Legs Feet | Light | Jorvuld’s Guidance | Divines | Max Magicka |
| Neck Ring Ring | Roaring Opportunist | Infused (or Arcane) | Spell Damage / Magicka Recovery | |
| Front Weapon | Restoration Staff | Roaring Opportunist (or Grand Rejuvenation) | Powered/ Decisive | Weapon Damage |
| Back Weapon | Ice/Lightning Staff | Roaring Opportunist | Infused | Weakening/Crusher |
- For some extra group utility, you can add in the Master restoration staff (Grand Rejuvenation). If you do this, make sure your backbar staff is RO rather than Jorvuld’s. We want 5 pieces of Jorvuld’s active at all times so it can continue extending your other buffs even while you’re on your frontbar. Also note that your RO heavies will need to be done on your backbar destro staff specifically in order to proc the set. This will be a little tricky, but adding in the DSA staff and confining RO to the backbar is the optimal way to use this setup
Remember, RO’s Slayer buff only buffs six people at a time. If you’re in a trial group, you’ll need to heavy attack twice to get everyone. The buff lasts for up to 12 seconds (or 16.8 with Jorvuld’s) but can only be reapplied every 22 seconds. For maximum buff uptime, do these heavies right as that 22 second cooldown falls off on its respective group members
Advanced tip: Consider using an addon like RoaringOpportunist to see the cooldowns on your screen. Watch the red timers to see when the 22 second cooldowns finish. One red timer shows the cooldown for one group of six people, and the other red timer shows the other six. Do your heavies right as each of these timers hits zero
- Ignore the blue timers; they just show when the Slayer buff is actually active, but you can’t reapply the buff till the red 22 second cooldowns finish

Skills
This section will not attempt to list all possible healing and utility skills, just the best ones. If a skill isn’t listed in this section, that’s most likely because it’s usually unnecessary, or because there’s another skill that will do something similar but better. But if you like those skills anyway, don’t let that stop you from slotting them!
Also remember to put skill points into your passives! A lot of those have great bonuses that will boost your healing power, your magicka regeneration, and other useful stats
For some full skill setups, skip down to Skill Setups below
Basic Skill Types
These types represent the main goals your skills accomplish. Some skills do multiple of these, e.g. some skills provide both buffs and healing, or provide both a burst heal and a HoT. A few examples are listed with each listing; these are just a few good examples and not at all a comprehensive list
- Burst Heals: These skills do a big burst of damage right when you cast them. Useful when you need to quickly heal someone who is dying, or when all your other skill timers are ticking and you just want to put out some extra healing. You usually just want one or two of these on your skill bars; having additional burst heal skills isn’t very useful
- Examples:
 Combat Prayer,
  Healthy Offering,
  Summon Twilight Matriarch,
  Enchanted Growth
- Examples:
- Heals over Time (HoTs): These skills do small amounts of healing every second or two for longer periods of time, usually 10 to 20 seconds. Even though they don’t do as much healing per second as burst heals, they add up to huge amounts of healing over the long period they’re running. You should usually slot several HoTs for maximum healing; using three or even four is common
- Most HoTs are cast on the ground, so they’ll heal everyone standing in the circle or rectangle where you cast them. Anyone not standing in the area will not be healed, so take care that you aim these ground heals correctly onto the group
- A few HoTs are “sticky” heals which are applied to allies directly, rather than being confined to an area on the ground. As long as people are near you when you cast the skill, the healing will continue ticking on them even if they move away afterward
- Examples:
 Illustrious Healing,
  Echoing Vigor,
  Cinder Storm,
  Extended Ritual
- Buff/Debuff Skills: These skills provide buffs to the group or debuff enemies to make your group do more damage or protect them from damage. Alternatively, they may provide just you with a buff to make you do more healing
- Examples:
 Aggressive Horn,
  Zenas’ Empowering Disc,
  Expansive Frost Cloak,
  Fetcher Infection,
  Vibrant Shroud,
  Inner Light
- Examples:
- Utility Skills: These skills are used to provide some other useful purpose for the group, e.g. cleansing debuffs, providing shields to negate future damage, or providing synergies to give allies extra resources, healing, or buffs
- Examples:
 Renewing Animation,
  Efficient Purge,
  Energy Orb
- Examples:
In large groups, you should use mostly area heals most of the time. While single target heals are often stronger, they generally perform poorly in trials since they only heal one person out of twelve; you don’t want to keep just one person alive while the rest of your team dies! Save single target heals for situations where you really do need to focus healing on one specific individual, e.g. for tomb healing in Sunspire trial
Most area heals, whether burst heals like Combat Prayer or HoTs like Illustrious Healing, have a target cap of six; each tick of healing can heal only six people. In a large group like a trial, this makes it extra important to put out lots of HoTs (and have two healers!)
Skill Setups
All classes are capable of being strong healers. Some classes provide more group utility than others, and so are more often sought for endgame healing roles, but others will still do an entirely adequate job for anything short of very advanced endgame content
Advanced healers will often swap out skills throughout a dungeon or trial to provide different support for different fights. However, most healers will do just fine keeping more or less the same skills on all the time
Skills marked as “Flex” can be swapped out for other skills as desired or needed. I highly recommend keeping all non-flex skills
Generic Setup Template
Most of the setups below roughly follow this template. Flex skills are very replaceable, and can be switched out for more healing skills or any other skills needed for a particular fight. Some classes’ skills may work better on one bar than the other, so this template can be rearranged slightly to make room
For the  slot, each class has an area HoT skill that you will normally want there. Class HoTs are usually the strongest HoTs in your toolkit
See below for full setups for each class, and farther below for descriptions of the generic skills in this template
| |  | | |  |
| Combat Prayer | Illustrious Healing | Radiating Regeneration | [Class HoT] | Inner Light | Reviving Barrier |
| |  | | | |
| Overflowing Altar | Energy Orb | Echoing Vigor | Elemental Blockade | Inner Light | Aggressive Horn |
Full Setups
Click on these tabs to see skill setups for each class. Several subclassing setups are listed as well
In terms of subclassing, Green Balance and Siphoning are the most universally strong skill lines for healing, providing healing passives as well as various group utility. Other more situationally strong skill lines are Restoring Light, Curative Runeforms, Daedric Summoning, and Living Death. See below for more information
Arcanist 
Arcanists are able to provide lots of extra group damage with their Domain and Rune of the Colorless Pool skills. They also have a unique channeled heal Remedy Cascade
| | | | | |
| Combat Prayer | Illustrious Healing | Radiating Regeneration | Chakram of Destiny | Inner Light | Reviving Barrier |
| | | | ||
| Overflowing Altar | Energy Orb | Echoing Vigor | Elemental Blockade | Zenas’ Empowering Disc | Glyphic of the Tides |
Dragonknight 
Dragonknights are usually considered one of the least optimal or user-friendly heal classes, but they’re still able to provide strong healing and some buffs for the group
| | | | | |
| Combat Prayer | Illustrious Healing | Radiating Regeneration | Energy Orb | Inner Light | Reviving Barrier |
| | |  | | |
| Overflowing Altar | Cinder Storm | Echoing Vigor | Elemental Blockade | Igneous Weapons | Aggressive Horn |
Necromancer 
Necromancers have a great source of group utility in their Glacial Colossus ultimate, which provides a powerful debuff to let the group deal more damage. They also have a unique resurrection ultimate Renewing Animation that can instantly rez multiple allies
| | |  | | |
| Combat Prayer | Illustrious Healing | Radiating Regeneration | Braided Tether | Inner Light | Renewing Animation |
| | |  |  | |
| Overflowing Altar | Energy Orb | Echoing Vigor | Elemental Blockade | Spirit Guardian | Glacial Colossus |
Nightblade 
Nightblades offer great group utility with their Twisting Path skill, which provides both resources and a speed buff. They’re also able to generate large amounts of ult through their Catalyst passive by drinking potions, allowing them to cast ultimates more often than other classes to buff the group
| | | | | |
| Combat Prayer | Illustrious Healing | Radiating Regeneration | Healthy Offering | Inner Light | Reviving Barrier |
 | | | |  | |
| Refreshing Path | Energy Orb | Echoing Vigor | Elemental Blockade | Relentless Focus | Aggressive Horn |
Sorcerer 
Sorcerers can provide lots of extra group damage with their Charged Atronach ultimate, which provides the Major Berserk buff via a synergy. They also have a pet that uniquely provides a huge 360 degree burst heal that can heal allies even if they’re standing behind you
Pet Setup
This setup uses the Matriarch pet for that burst heal utility:
| | | | | |
| Combat Prayer | Illustrious Healing | Radiating Regeneration | Summon Twilight Matriarch | Inner Light | Reviving Barrier |
| | | | |  |
| Energy Orb | Echoing Vigor | Elemental Blockade | Summon Twilight Matriarch | Vibrant Shroud | Summon Charged Atronach |
No-Pet Setup
This setup leaves off the Matriarch, leaving us more room for other skills:
| | | | | |
| Combat Prayer | Illustrious Healing | Radiating Regeneration | Vibrant Shroud | Inner Light | Reviving Barrier |
| | |  | | |
| Overflowing Altar | Energy Orb | Echoing Vigor | Elemental Blockade | Power Surge | Summon Charged Atronach |
Templar 
Templars are generally considered one of the most user-friendly and beginner-friendly healing classes, and are capable of the best raw healing of any class. They can also provide extra resources to the group and have a number of strong healing skills and passives, including a cleanse synergy
| | |  | | |
| Combat Prayer | Illustrious Healing | Radiating Regeneration | Purifying Light | Inner Light | Reviving Barrier |
| | | | | |
| Overflowing Altar | Energy Orb | Echoing Vigor | Elemental Blockade | Extended Ritual | Aggressive Horn |
Warden 
Wardens are able to provide several excellent group buffs. They can provide extra resistances, increased health pools via their Maturation passive, extra resource regeneration, and debuffs to increase group damage
| | |  | | |
| Combat Prayer | Illustrious Healing | Radiating Regeneration | Budding Seeds | Inner Light | Reviving Barrier |
| | | | | |
| Expansive Frost Cloak | Energy Orb | Echoing Vigor | Elemental Blockade | Enchanted Growth | Aggressive Horn |
Subclassing Setup
This setup will provide excellent healing output from Green Balance and Restoring Light, plus extra ultimate from the Siphoning skill line
Our skill lines here are:
- Green Balance (Warden)
- Restoring Light (Templar)
- Siphoning (Nightblade)
| | | | | |
| Combat Prayer | Illustrious Healing | Budding Seeds | Healthy Offering | Inner Light | Reviving Barrier |
| | | | | |
| Extended Ritual | Energy Orb | Echoing Vigor | Elemental Blockade | Inner Light | Aggressive Horn |
Subclassing Setup
This setup is focused on generating lots of ult and using it to buff the group. Siphoning will provide lots of ult, Daedric Summoning will make our ultimates cheaper to cast, and we’ll have two great options of class ultimates to cast to buff group damage
We’ll use the following skill lines here:
- Curative Runeforms (Arcanist)
- Daedric Summoning (Sorcerer)
- Siphoning (Nightblade)
Both ![]() Glyphic of the Tides and
Glyphic of the Tides and ![]() Summon Charged Atronach are excellent choices for your ultimate; pick whichever you’d like
Summon Charged Atronach are excellent choices for your ultimate; pick whichever you’d like
| | | | | |
| Combat Prayer | Illustrious Healing | Radiating Regeneration | Healthy Offering | Inner Light | Reviving Barrier |
| | | |||
| Chakram of Destiny | Energy Orb | Echoing Vigor | Elemental Blockade | Bound Aegis | Glyphic of the Tides / Summon Charged Atronach |
Skill Descriptions and Skill Line Breakdown
Expand each list for descriptions of the respective skills
Many class skill lines have been marked with one, two, or three stars based on how ideal they are as subclassing options. More stars mean stronger skills and passives for healing or buffing; fewer stars mean less healing utility, or utility that’s only useful situationally
Staple Skills
- Combat Prayer: Provides Minor Berserk and Minor Resolve buffs for group damage and resistance, as well as an AoE burst heal. These buffs make this skill a staple for essentially all healing setups. Combat Prayer will be our main spammable heal because of its AoE burst
- Illustrious Healing or
 Healing Springs: Excellent ground HoT. Also a staple healing skill that belongs on almost any healing setup. Use Illustrious for a longer heal or Springs for extra magicka
 - Energy Orb: Provides healing as well as a synergy to give group members extra resources and health
- Echoing Vigor: Applies a strong sticky HoT, which will continue healing teammates even if they move away. Costs stamina, so can help against overspending magicka
- Like most area HoTs, Vigor has a target cap of six. However, since it’s a sticky HoT rather than a ground HoT, recasting it won’t dispel the previous cast. This means that in a trial, you can (and should!) cast Vigor twice to hit all twelve group members with it
- Elemental Blockade: Provides some damage as well as extra effects depending on what staff you have equipped. A lightning staff provides the Off Balance debuff, which many dps setups can exploit for extra damage. An ice staff provides armor debuffs on the enemy as well as shields for your group
- Reviving Barrier or
 Replenishing Barrier [ultimate]: Provides huge shields for your whole group. Very useful in tough spots where people are taking lots of damage. Use Reviving for extra healing, or Replenishing to get extra magicka and ult back
 - Aggressive Horn [ultimate]: Provides the powerful Major Force buff as well as big stat boosts for your allies. Staple healing ultimate, though some classes have other powerful ultimates that are good alternatives
- You can also just slot Barrier in both of your ultimate slots if you’re not planning to cast any other ultimate
Additional flex skills
- Radiating Regeneration: Applies a sticky HoT to three allies. Excellent in dungeons and somewhat good in trials, especially when people are moving around too much to stay in your ground heals
- This skill’s sticky heal is particularly useful, but since it only hits three targets, it will do relatively little healing in a twelve-player trial. If your group is moving around a lot, a sticky HoT may be useful, but otherwise you might consider using a different skill
- Inner Light: This is just a passive bar-buffer skill that provides Major Prophecy crit boost and expands your magicka pool. Don’t cast it; it’s just there for passive buffs
 Overflowing Altar: Provides healing via its Lifesteal debuff, as well as a synergy that one person can take for a huge burst heal. Costs health rather than magicka, so can help keep from overspending magicka
- Advanced tip: Like all named debuffs, Lifesteal cannot be stacked multiple times onto enemies. Advanced groups will typically have one and only one healer slot Altar to avoid redundancy
 Ring of Preservation: Strong ground HoT but has a very small radius. Only use if you’re in a group that can stay stacked together well. Also provides Minor Protection buff to mitigate some damage from your group. Costs stamina, which can help keep your magicka pool up
 Dampen Magic: Big shield for yourself. Usually unnecessary, but can be useful in some kiting roles where you might be taking extra damage
 Elemental Susceptibility: Shoot this at an enemy to reduce its resistances with Major Breach, as well as apply several status effects for a little extra damage. Occasionally useful if your tank is not providing Breach, or if something the tank can’t reach needs Breach
 Crushing Shock: A ranged interrupt. Normally tanks and dps will be handling interrupts, but occasionally it can be useful for a healer to use one
 Ulfsild’s Contingency: Use the
  Damage Shield focus script on this scribing skill to give all your allies a damage shield. (Other scripts can be chosen as desired)
 Trample: use the
  Heroism affix script on this scribing skill to give all your allies Major Heroism, providing lots of ult to cast their ultimates more often. (Other scripts can be chosen as desired)
Niche use skills
These skills are typically only used for specific fights at fairly advanced levels. Most healers will probably rarely or never need them, but for the sake of completeness I’m listing them here
 Healing Ward: A big shield and HoT for one ally. Usually unnecessary, but can be very useful when one person in particular needs lots of healing, e.g. for tomb healing in Sunspire trial
- Efficient Purge: Cleanses effects like debuffs and sticky DoTs from group members. Usually unnecessary, as you can heal your group through most effects that this skill would cleanse; however, some advanced content does have effects that require a cleanse
 Mystic Guard: Protects one teammate by transferring some of the damage they’re taking to you. Only rarely necessary, but occasionally useful in very advanced content where someone (usually a tank) is taking very high damage. This skill will cause you to take extra damage, so use with caution. Must be slotted on both bars, or else the guard will fall off when you switch bars
Herald of the Tome
- (no useful skills here)
Soldier of Apocrypha
 Rune of the Colorless Pool: Applies Minor Vulnerability and Minor Brittle debuffs to an enemy to make it take more damage
Curative Runeforms **
Mostly useful for the Glyphic ultimate
 Chakram of Destiny (or
  Tidal Chakram): Applies a damage shield to four targets to absorb some incoming damage. Use Destiny for some extra shielding and for crux to spend, or Tidal to spend crux for some extra healing
- Zenas’ Empowering Disc (or
 Reconstructive Domain): Provides the group with Minor Courage damage buff as well as resource regeneration buffs. Use Zenas’ for better buff management, or Reconstructive to add a HoT
  Evolving Runemend: Single target burst heal. Also applies a small HoT
 Curative Surge or
  Cascading Fortune: Unique 4.5-second channeled beam heal. Very strong heal, but prevents casting other skills during the channel
 Glyphic of the Tides [ultimate]: Provides a damage buff to the group and a huge amount of healing
Ardent Flame
 Engulfing Flames: Debuffs enemies to strengthen any flame damage the group is doing against them
 Cauterize: Gives four allies a big heal once every three seconds. Potentially nice extra healing in dungeons, but not too useful in trials. Also gives you Major Prophecy/Savagery crit boost
Draconic Power
- (no useful skills here)
Earthen Heart
- Cinder Storm: The DK’s ground HoT. Strong healing but has a small radius, so works best when your group is standing together nicely
- Igneous Weapons: Provides the group with Major Sorcery and Brutality damage buffs
 Obsidian Shard: The DK’s burst heal. Shoot this at an enemy to heal two teammates near the enemy
 Fragmented Shield: We’d mainly use this for the Major Mending buff to boost all of our healing. Also gives us a big shield
Grave Lord *
Mostly useful for the Colossus ultimate
 Unnerving Boneyard: Provides the big Major Breach resistance debuff to enemies so they take more damage
- Glacial Colossus [ultimate]: Applies the powerful Major Vulnerability debuff to enemies, causing them to take much more damage
Bone Tyrant *
Necrotic Potency will provide you with huge amounts of extra ult if enough corpses are around
 Necrotic Potency: Generates ult from corpses. This skill has the potential to generate huge amounts of ult if many enemies are dying around you
Living Death **
Pretty good healing passives, a few good healing skills, and instant rezzes with the Renewing Animation ultimate
- Braided Tether (or
 Mortal Coil): The necro’s area HoT. Heals along a tether reaching from you to the corpse consumed. Also provides a 3% healing buff just by having it slotted. Use Braided to expand the healing area, or Coil for extra resources
 - Spirit Guardian (or
 Intensive Mender): Applies a big heal periodically, but only to one person (with Guardian) or three people (with Intensive). Also useful for activating the Undead Confederate passive which gives you extra resources
- Consider using Intensive Mender in a dungeon, where that three person cap is most of your group anyway. In a trial, you want to be able to heal more people at once, so consider Guardian for its longer timer so that you can focus on casting other, stronger skills
 Blood Sacrifice: The necro’s burst heal. Heals two allies if a corpse is available, or just one if not. The Minor Defile debuff is usually not a concern since you’ll normally be healing yourself plenty enough to not worry about it
- Renewing Animation [ultimate]: Provides an instant resurrect for three dead allies. Incredibly useful when lots of your team is dead and you don’t have time to rez manually
Assassination
- Relentless Focus: Passively provides a spell damage buff to increase your healing. Don’t cast this skill; it’s just there for the passive buff
 Lotus Fan: Applies Minor Vulnerability debuff to make enemies take more damage. Also launches you toward the enemy, so use with caution
 Soul Harvest [ultimate]: You can slot this ultimate passively on the frontbar to allow proccing the Hemorrhage passive to give the group a crit bonus. Don’t cast it; it’d just be there for the passive buff
Shadow
- Refreshing Path: The nightblade’s ground HoT. Also grants resources and Major Expedition movement speed buff to your team
 Mass Hysteria: Applies Major Cowardice to enemies to weaken their damage. Only used rarely in very high damage fights, as typical healing skills are usually adequate to keep everyone alive
Siphoning ***
Very strong for ult generation via the passives in this line; also provides decent healing passives
- Healthy Offering: The nightblade’s burst heal, healing one teammate. We use this mostly for the Minor Mending buff to increase all our healing, and for Magicka Flood passive for a stat boost. The health drain is usually not a concern since you’ll normally be healing yourself plenty enough to not worry about it
 Funnel Health: Shoot this at an enemy to give two group members a sticky HoT. Potentially useful in dungeons, but doesn’t heal enough people to normally be worth slotting in trials
 Siphoning Attacks: Sustain option. Provides you with extra resources and health
Dark Magic
- Vibrant Shroud: Area burst heal, also giving you Minor Vitality for extra healing power and applying Major Maim to enemies to weaken their attacks. We also use this skill to proc the Exploitation passive which gives the group the Minor Prophecy crit chance bonus
 Dark Conversion: Sustain option. Provides you with extra magicka
Daedric Summoning **
Mostly strong for the Atronach ultimate and for ultimate cost reduction provided by passives, allowing you to cast your ultimate more often. Also provides some useful buff skills
- Summon Twilight Matriarch: Strong 360 degree burst heal, healing two allies. Also deals a good amount of damage passively while summoned. Slot this on both bars, or else the pet will unsummon when you bar swap
 Regenerative Ward: Gives the group extra resources, and gives you a damage shield
 Bound Aegis: Just a filler skill we can use for a bigger magicka pool. Don’t cast it; it’s just there for the passive buff
- Summon Charged Atronach [ultimate]: On top of doing lots of damage, provides a synergy to give your group the powerful Major Berserk buff for a big damage boost
Storm Calling
- Power Surge: The sorc’s area HoT. Puts out healing every time your other heals crit, but only up to every 3 seconds. Also provides Major Sorcery/Brutality for an extra stat bonus. This is not a very strong heal and can be replaced with something else as needed
 Boundless Storm: Gives you the Major Expedition speed boost as well as Major Resolve resistance buff. Sometimes useful for kiting and any other situations where you want to move fast
Aedric Spear
 Luminous Shards: Provides a synergy that one person can take to restore resources
Dawn’s Wrath *
Mostly used for its ultimate cost reduction passive, to cast ultimates more often
- Purifying Light: Shoot this at an enemy to get an area HoT. This will also proc the Illuminate passive which gives your group the Minor Sorcery stat boost
Restoring Light **
Strong healing output all around via both passives and skills, in particular Extended Ritual
- Extended Ritual: The templar’s ground HoT. Also provides a cleanse to yourself and a synergy for a teammate to receive a cleanse too
 Breath of Life: The templar’s burst heal. Heals two targets
 Radiant Aura: Provides sustain buffs to the group
Animal Companions
- Fetcher Infection: Debuffs an enemy wth Minor Vulnerability to take more damage
 Blue Betty: Sustain option. Gives you extra magicka and Major Sorcery/Brutality stat boost, and cleanses a debuff from you occasionally
 Deceptive Predator: Provides you with Major Expedition speed boost and some damage reduction. Sometimes useful for kiting and any other situations where you want to move fast
 Wild Guardian [ultimate]: You can slot this ultimate passively on your frontbar for extra resources via the Flourish passive. Don’t summon or cast it (it will just unsummon on your other bar anyway); it’d just be there for that passive buff
Green Balance ***
Excellent skill line for buffing your group. Budding Seeds is also a very strong heal
- Budding Seeds: The warden’s ground HoT; also does a big burst heal at the end of its timer. Strong heal but has a short timer, so needs to be recast often for best results. Also provides a synergy for one person to get an extra HoT
- Enchanted Growth: The warden’s area burst heal. Also provides resource regeneration buffs for allies
Winter’s Embrace *
Provides a few good group buffs and debuffs via Expansive Frost Cloak as well as frost skills, which can put out the Chilled status effect and sometimes proc Minor Maim and Minor Brittle
- Expansive Frost Cloak: Provides Major Resolve to the whole group, giving extra resistances
Quick Guide to Skill Casting
- Remember, there is a one second global cooldown (GCD) for casting skills. After you cast a skill, you are unable to cast another skill for one second. Therefore it is ideal to cast skills on a consistent rhythm of one skill per second, the maximum speed allowed by the GCD. Consider using a metronome to get accustomed to this rhythm
- Naturally, casting this frequently will burn through a lot of resources, but any second where you’re not casting a skill is a second wasted where you could have been! If your group isn’t in need of a healing skill every second, consider slotting a damage skill or two. See Sustain Tips below if you’re running out of resources
- Also remember to weave a light attack between each skill. Along with dealing extra damage, this will cause you to generate ult and also assist in applying your weapon enchantments, which are activated by light attacks and weapon skills. A successful weaver will cast one skill and one light attack in each one-second interval
Rotation
Your goals in your rotation are:
- Keep your HoT and buff timers running at all times
- Cast a useful skill on every one-second GCD
Watch your skill timers! Make sure you can see timers visible for both your frontbar and backbar skills; there are several addons that will make timers clearer and easier to read than the basegame UI offers, so consider checking out such addons
- Whenever one of your HoT or buff timers has run out or is about to, cast that skill again to keep it running!
- Whenever your cooldowns are all still running, hit Combat Prayer for some extra just-in-case burst healing, or just cast a damage skill if you feel you’re putting out enough healing
- Try to avoid recasting HoTs before their timers expire, unless your group has moved. This will not provide any additional healing
You should spend most of your time on your resto staff frontbar. Just go to your backbar briefly to refresh skill timers
Casting skills infrequently is one of the biggest things that holds back most healers from putting out lots of healing. Dealing with mechanics and staying out of enemy attacks can take some time to get used to, but once you’re familiar with the fight, pushing your healing skills as close to that one-cast-per-second rhythm as possible will let you put out huge amounts of healing. In many cases, pushing out that extra healing will save you from the attacks you might have died from anyway
Sustain Tips
Try to avoid heavy attacking for extra magicka when possible. A heavy or two once in a while is okay, but doing many heavy attacks takes lots of time away that you could be using to cast skills. Better to improve your sustain in other ways whenever possible. (Of course, if you’re wearing Roaring Opportunist, you absolutely should be doing some heavies to proc it, but try not to do many extra!)
Healers tend to use a lot of magicka. Running out? Check on these items, which should be done fairly universally by all healers
- Have you bought all your passives? Your Light Armor and class skill lines have a number of passives that will give you extra magicka
- Are you using all light armor? If not, consider doing so for that big sustain passive
- Do you have CP points in the Rejuvenation passive (red tree)?
- Are you using food with a magicka recovery buff, like Witchmother’s Potent Brew?
- Are you using a potion with a magicka recovery buff? If so, do you have the Medicinal Use passive unlocked from the Alchemy crafting skill line? Without this passive, your potions will run out a while before you’re able to drink another one, but it does unfortunately require leveling Alchemy
- If you’re using Roaring Opportunist, are you heavy attacking occasionally to proc it?
- Do you have Echoing Vigor slotted, and are you double-casting it if you’re in a trial? Vigor costs stamina, so every cast of Vigor is avoiding using magicka
- Are you using your HoTs on cooldown? HoTs cost less magicka than burst heals and will help you save some magicka
If you’re still running out of magicka, you can try these additional options
- Try an additional non-magicka skill, like Overflowing Altar or Ring of Preservation
- Use magicka recovery glyphs on your jewelry
- Some class skills give magicka when you cast them. Consider slotting one; these skills are mentioned above in the class skills section