This is a guide to the mechanisms of how gear works in ESO. It will focus mainly on a PvE perspective on gear, though much of the information will be applicable to PvP as well
This guide will cover topics like:
- What each weapon type and armor weight is useful for
- How gear bonuses apply on your backbar weapon
- How set bonuses work
- How set collections work
- What traits and enchants will do for your gear
- How your gear degrades over time, and how to fix it
- How to modify your gear
This guide will go into much greater detail than most people will actually need to play the game at almost any level, but for the sake of comprehensiveness these details are included
This is not a build guide. It is not intended to show exactly what gear you should use on a particular build, but rather how gear works in the first place
Table of Contents
- Gear Slots
- Gear Types
- Sets
- Binding Gear
- Other Gear Specs
- Modifying Your Gear
- Deconstruction
- Gear Durability and Degradation
Gear Slots
First we’ll take a look at what gear slots are available on our character in the first place
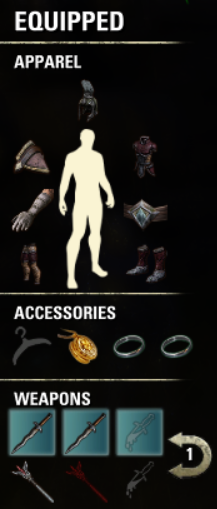
You can see from this diagram, viewable on the Inventory menu (I key), that we have:
- 7 armor slots: Head, Shoulders, Chest, Hands, Waist, Legs, Feet
- 3 jewelry slots: Necklace and two Rings
- 2 weapon slots on frontbar, and 2 on backbar
Since only one weapon bar (see below) is active at a time, this means we have 12 gear slots active at any given time, and 14 total with our two weapon bars
You can also see a slot for a poison next to each weapon bar, and a slot for a cosmetic disguise (used only in certain quests) next to the jewelry slots
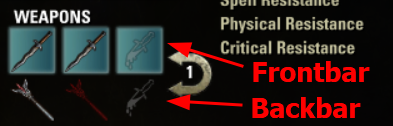
Weapon Bars
At level 15 you unlock your backbar to carry a separate weapon. Your second bar also has its own separate skill slots, allowing you to slot 10 skills plus 2 ultimates in total. You can swap between your bars with the backtick/tilde key (`/~)
Having two bars gives you the opportunity for more bonuses by using different traits, different enchantments, or even different weapons entirely on each bar
At the very least though, your two bars do need separate weapons, even if they’re identical. If you equip a weapon on only one bar, you will be unarmed if you switch to your other bar
Note: The Oakensoul mythic item overturns the weapon bar system a bit by preventing bar swapping, in return for lots of buffs. With this mythic, you can slot a weapon on just the one bar you’re using, and you’re good to go
Active Bonuses
Note that only the stats and bonuses on the weapon you’re actively holding will be active at a time. Your stats and bonuses may change when you swap bars, if your other weapon is different. The following things may be affected:
- Bonuses from weapons’ stats, traits, and enchantments (as listed on their tooltips)
- Passive bonuses from the weapons’ skill lines
- For instance, if you have dual daggers equipped on your frontbar and an inferno staff on your backbar, you will only have your active weapon’s skill line passives active at a given time, not both skill lines simultaneously
- If your weapons are from different sets, those set bonuses may disappear when you swap weapons
But effects with timers will keep on ticking
- Skills with timers will continue ticking, including damage ticks, healing ticks, buffs, and debuffs
- Weapon enchantment effects will remain until their own timers run out
- Set bonuses that have timers attached to them will keep ticking (but set bonuses that just state an effect with no timer will deactivate if you’re no longer wearing enough set pieces)
Fun fact: If you’ve read a few build guides, you may have noticed that the Infused trait (which enhances an item’s enchantment) is almost universally used on most builds’ backbar weapons, and this is exactly the reason. Other backbar traits would be inactive when we’re on our frontbar, but since the backbar’s enchantment effect keeps ticking, enhancing the enchantment with Infused does make a difference on the frontbar
Most builds load higher stats onto their frontbars and spend the majority of their time on the frontbar, using the backbar just for longer timer effects. That way they can just quickly refresh their timers and return right back to their higher-stat frontbars
Poisons
It’s also possible to equip a poison on each weapon bar. Poisons can provide an additional useful effect but will disable enchantments on the respective weapons. Enchantments are normally more powerful than poisons in PvE play, so poisons are almost never used in optimized PvE builds of any kind. (Because of this, further discussion of poisons will be outside the scope of this guide)
Gear Types
Gear comes in three categories: armor, weapons, and jewelry. Let’s take an in-depth look at the mechanisms of each type
Armor
As mentioned above, we have 7 slots for our armor: head, shoulders, chest, hands, waist, legs, and feet
Armor Weights
Armor will be in one of three weights: light, medium, or heavy. Each weight has a skill line associated with it to provide various bonuses. Don’t forget to spend your skill points there!
As a smaller difference, different armor weights also have different Armor bonuses. These bonuses add to your Physical Resistance and Spell Resistance stats to reduce incoming damage, which you’ll see reflected on your Character screen (C key). Normally though, you should just pick armor weights based on the skill line bonuses
|
Passives |
Armor |
Ideal for |
|
|---|---|---|---|
|
Light |
|
Low |
DPS, healers |
|
Medium |
|
Moderate |
DPS |
|
Heavy |
|
High |
Tanks |
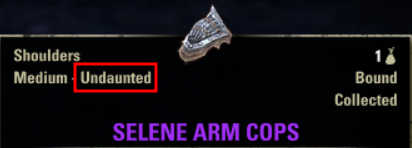
Consider mixing and matching weights to diversify bonuses. This will also take advantage of the passives in the Undaunted skill line, which rewards using multiple different weights. Most popular builds use 5-6 pieces of one weight, and 1-2 from one or both other weights
In sum, damage dealers typically wear light or medium armor, or a mix; healers typically wear mostly light armor; and tanks typically wear mostly heavy armor
Unlocking and Leveling Skill Lines
Remember that to unlock an armor skill line, you need to equip three pieces of the respective armor weight. Don’t make the mistake of just putting just one or two on a new character and assuming the skill line is active and leveling
Once you’ve unlocked the skill line, you only need one piece to continue leveling it, but wearing more pieces of that weight will level the skill line faster
Weapons
Your weapons are at the core of your build and your role. Each weapon is associated with a skill line which has different skills available to slot on your bar. The skill lines also provide various benefits to your damage, healing output, damage mitigation, and other bonuses
The Damage bonus on your weapons add to your Weapon Damage and Spell Damage stats to increase your damage output, which you can see reflected on your Character screen (C key)
Weapon Types
Different weapons have skills and passives that will do well for different tasks, and also have some different specs that will affect how you use them
- Melee weapons are meant to be used within about 7 meters, with mostly short-range skills. Ranged weapons can be used up to about 28 meters and have longer-ranged skills. Ranged weapons can be used just as well in melee range too; there’s no penalty for using them up close
- Four of the weapon skill lines use stamina-based skills, while the other two use magicka-based skills. However, it’s entirely feasible (and common!) to use an opposite-stat weapon on your build. This can even be helpful in making sure you have some opposite-resource skills to cast so that you don’t run out of your primary resource
- Some weapons are one handed, while others are two handed. 1H weapons need to be complemented by either a shield or a second 1H weapon to make use of the corresponding skill line (either Dual Wield or One Hand and Shield). Don’t run around with just a single 1H weapon!
|
Ideal for |
Stat |
Range |
Other notes |
|
|---|---|---|---|---|
|
Dual Wield |
DPS |
Stamina |
Melee |
|
|
Two Handed |
DPS |
Stamina |
Melee |
|
|
Bow |
DPS |
Stamina |
Ranged (or melee) |
|
|
Destruction Staff |
Inferno staff: DPS Lightning staff: DPS or healer Ice staff: Tank or healer |
Magicka |
Ranged (or melee) |
|
|
Restoration Staff |
Healer |
Magicka |
Ranged (or melee); targets allies |
|
|
One Hand and Shield (a.k.a. “Sword and Board”) |
Tank |
Stamina |
Melee |
|
Extra Notes
A few miscellaneous notes on special intricacies of weapons. (These are not important for most people to know, and are only included for the sake of thoroughness)
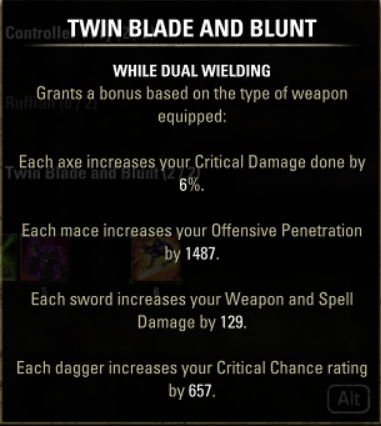
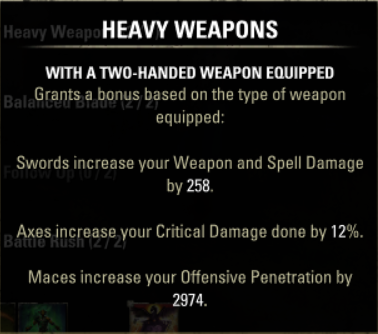
- Dual Wield
- Dual Wield setups get a penalty applied to their offhand weapon’s Damage stat, so that you don’t get extra stats by using two weapons. You’ll get the full bonus from your main hand weapon, but only about one third of your offhand weapon’s bonus will actually apply to your stats
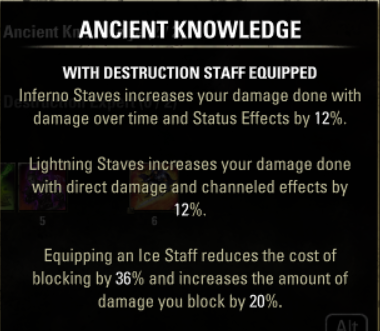
- Destruction Staves
- Inferno staves’ extra Wall of Elements damage and bonus to DoT damage makes them popular for DPS backbars, though they’ll often do well on the frontbar as well
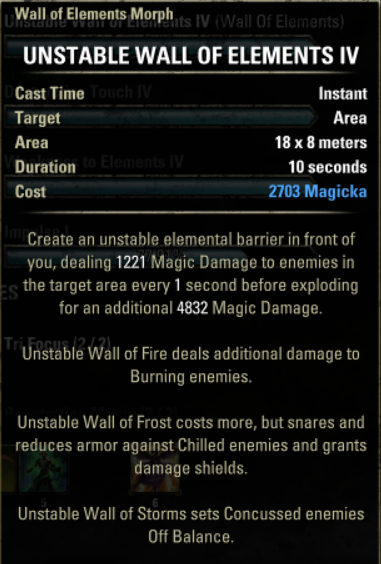
- Lightning staves’ bonuses to direct damage and channels make them good frontbar options particularly for templar DPS (with their Radiant Destruction channel) and arcanist DPS (with their Fatecarver channel). Healers often use lightning staff backbars to debuff enemies with off-balance from Wall of Elements, which many builds can exploit for more damage
- Ice staves’ damage mitigation passive, as well as the armor debuff and damage shields their Wall of Elements provides, make them useful for tanks. Additionally, their Destructive Clench converts to a taunt skill with the rare Major Maim debuff. Tanks popularly run ice staves on one or even both bars. Healers will also do well with an ice staff backbar
- Support roles frequently use a destruction staff as their backbar weapon to provide the bonuses mentioned above. In addition, using the Wall of Elements skill on your backbar will make sure that your backbar enchantment keeps proccing (see the notes on proc effects below). Healers and tanks often use enchantments that debuff enemies, making it extra important to maintain good uptime
In sum:
- Damage dealers typically use some combination of Dual Wield, Two Handed, Bows, and Destruction Staves (inferno or lightning)
- Healers typically use a Restoration Staff and either a lightning or ice staff
- Tanks usually use some combination of One Hand and Shield and ice staves
Unlocking and Leveling Skill Lines
Kill something with a weapon equipped to unlock the weapon’s skill line. To level the skill line, have skills from the skill line equipped while you gain XP
- The skills must be on your active bar when you gain the XP; skills on your other bar won’t level
Note: Technically you don’t have to have the respective weapon actually equipped to level the skill line; just having skills from that line on your bar will do the job, even with the wrong weapon
Jewelry
We have three slots for jewelry: a necklace slot and two identical ring slots. Jewelry is largely filler, with no special skill lines or stat bonuses. Just use it to complete your gear sets and get extra bonuses from enchantments and traits
Sets
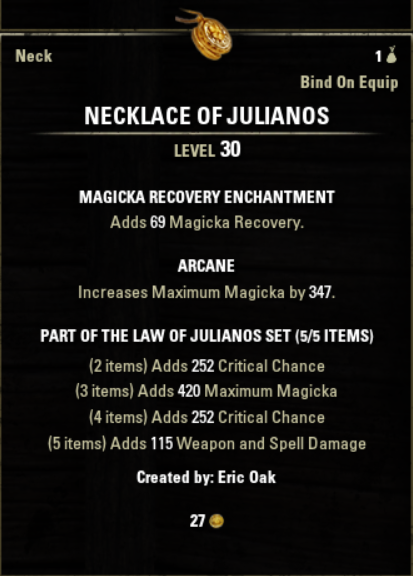
Item sets give you cumulative extra bonuses based on how many items you’re wearing from the set. For example, the first tooltip below shows that wearing two pieces of Spell Power Cure gives you Max Magicka, adding a third piece gives you more Max Magicka, a fourth piece adds Weapon and Spell Damage, and a fifth piece provides the Major Courage buff to group members under a certain condition
- Set bonuses apply once per set. For instance, wearing four pieces of Spell Power Cure gives you the Weapon and Spell damage bonus once, not four times
Item sets are often powerful and can even be a central part of your role in a group, providing anything from extra damage or defensive stats, to interesting proc effects, to big buffs for your entire group. Normally the last bonus listed is by far the most powerful (lower-tier bonuses just provide simple stat bonuses), so it’s important to wear full sets rather than mixing and matching partial sets
The vast majority of sets have bonuses up to 5 pieces, so with 12 gear slots available you are able to use two of these, and also have two slots left over
However, many other sets have fewer bonuses (and a very few sets have more). These sets can fill in those extra two slots you have, or you can use multiple of them to substitute a five piece set altogether
All types of two-handed weapons (including bows and staves) count as two items for counting set bonuses. For instance, using a restoration staff and just three other pieces from Spell Power Cure will be enough to give you the 5 piece bonus
(This prevents dual wield builds from having a big advantage over other builds with one extra slot for set bonuses)


Collecting Sets
Each set is collected from a certain location or source, e.g. a certain dungeon, a certain overland zone, the antiquity system, crafting, etc. A set will come from only one location or source, so for instance an overland or dungeon set will never also be craftable, and a dungeon set will never also be available in the overland, and so forth
Most sets drop in only one specific weight, usually fitting with what sort of task or group role the set was (at least in the developers’ vision) meant to be used for. For instance, most sets used by tanks are heavy armor sets, most healer sets are light armor, and most DPS sets are either medium or light armor
- Some sets do come in all weights though, most notably monster sets and certain PvP-sourced sets. Craftable sets can be created in any of the three weights as well
If you’re looking for where a particular set drops, you can search for it in the Collections (U key) menu under the Set Items tab, and you’ll be able to see where the set comes from. Searching for the set name online will also give lots of information about it
(Note that craftable sets do not appear under the Collections menu, since they’re not collected from the world; if your search comes up empty, it’s most likely a crafted set.)
Note that different pieces of a set may drop from different parts of a zone or dungeon. For instance, the endboss in a dungeon or trial will typically drop only weapons and jewelry, while all other earlier bosses will drop only armor. Within an overland zone, different sources like world bosses, delve bosses, dolmens, and so forth will each drop specific pieces of each set in the zone
Perfected Gear
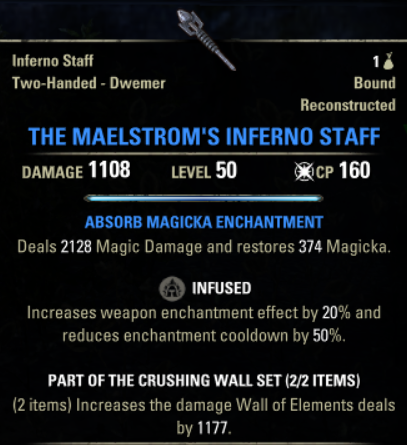
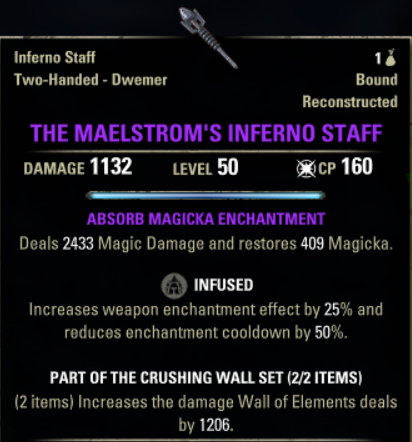
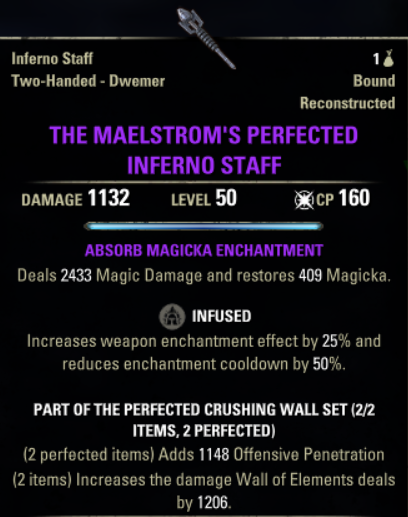
Arenas and most trials drop perfected gear when played in veteran mode. This gear has the added benefit of one extra line of stat bonus. For instance, Perfected Crushing Wall adds a penetration stat bonus over the regular version
- Note that only boss enemies will drop this perfected gear. Other drops like chests will always drop regular non-perfected gear
Perfected gear will make only a very minimal difference to the effectiveness of your build; 99% of the advantage of perfected gear is just bragging rights and a sense of accomplishment. The vast majority of players have absolutely no need to farm veteran content for perfected gear; for all but the sweatiest of veteran players, the normal non-perfected versions will be plenty sufficient
Note: For arena weapons in particular, perfected gear is often of essentially zero benefit anyway. Many of them, like Crushing Wall above, are normally run on the backbar, so the perfected set’s extra stat bonus is not even active most of the time while you’re on your frontbar. You won’t get much use out of that bonus, so you’re essentially just as well off with the normal-mode, non-perfected version
Set Collections (a.k.a. Stickerbook)
As soon as you collect and bind (see below) a piece of gear, that item will be permanently added to your Set Collections. You can access this feature in the Collections menu (U key) under the Set Items tab. For instance, binding a dagger from the Mother’s Sorrow set will add daggers to your Mother’s Sorrow collection
Now that the item is in your Collections, you can spend transmute crystals to reconstruct the item anytime you want to get another of the same item with the same set. For instance, now that the Mother’s Sorrow dagger is in your collections, you can make another Mother’s Sorrow dagger anytime at a transmute station. See below for more details on Reconstruction
Note that if a set is available in multiple weights (e.g. monster sets, class sets, and certain other sets), there will be a separate entry in Collections for each weight. For instance, if you’ve collected a heavy Slimecraw helm from Banished Cells 1 dungeon, you will only be able to reconstruct a heavy helm, not a light or medium one; you’ll have to collect those separately
Reconstructed gear will be created at the level of the character who made it. Reconstructing when you’re below the gear cap of CP 160 is not recommended; save your precious transmute crystals till you can get max-level gear
Drop Curation
Many gear drops are curated. When these drops give you an item, they’ll check your stickerbook and give you an item that you haven’t collected yet, if possible. For instance, if you collect and bind an Ansuul’s Torment dagger in Sanity’s Edge trial, you won’t get another of those daggers on your next run; you’re guaranteed an item you haven’t collected yet, until you’ve collected all the items that boss can drop
Note that you must actually collect an item into your stickerbook in order to guarantee a different drop in the future. Don’t forget to bind new items before rerunning the same content, or you risk just getting the same drops again! It’s good practice to always bind your gear as soon as you pick it up, except if you think you might actually trade it with someone
Note: Not all set item drops are subject to curation unfortunately. Notably, items in treasure chests and any item that comes in a coffer of some sort (e.g. certain quest rewards and many items bought from NPCs) will be fully random and ignore your Collections. You might get a new item you haven’t collected, but you also might not
Another note: Drops are always still limited to the specific pool of items that a source can actually drop. For instance, weapons and jewelry in a dungeon can only come from the endboss. Even if you’ve collected all the armor pieces available from sidebosses, the sidebosses will still keep giving you armor you’ve collected

Binding Gear
When you pick up a piece of gear, you have the opportunity to bind it. Binding does two things:
- It permanently attaches the item to your account, preventing you from ever giving it to any other player (no trading, selling, mailing, etc.)
- It adds the item to your Set Collections so that you can reconstruct another one later
Note: Some items in the game can be “Character Bound” and prevent transfer to even your own other characters. Gear doesn’t do this; it only binds to your account, and you’ll be able to freely transfer it between characters
You can bind an item by equipping it, or by right-clicking it in our Inventory and selecting Bind. The game is deliberately designed so that only one person can ever equip or bind a given item; once you do so, no one else can ever have that item
Destroying an item will also add it to your Collections. This also applies to other actions that remove the item from the game, like deconstructing or researching it. Since you’ve ensured that no one else can get the item, the game will go ahead and collect it for you. Therefore it’s impossible to “lose” an item and not get to collect it, unless you actually give it to someone else
Here’s a full list of actions that will add an item to your Collections (and bind it if it still exists)
- Right-clicking it and selecting Bind
- Equipping it
- Transmuting it (Reconstructed items will also always be bound immediately)
- Destroying it from your inventory
- Deconstructing it at a crafting station
- Selling it to an NPC (the item will bind after you sell 12 more items to make the item roll out of the Buyback tab)
- Researching it
- For gear from instanced content (e.g. dungeons), waiting two hours after picking it up (see below)
Note that improving gear quality and enchanting gear will not bind it; you can change these attributes and still transfer the item to another player
Types of Binding
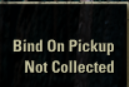
Some gear will be labeled as Bind on Pickup. These items will bind immediately when you pick them up, so that you can’t give it to anyone. This includes gear that you pick up from instanced content (dungeons, trials, or arenas), any gear that comes in a box or coffer, certain NPC-sold items, and mythic pieces

Dungeons, trials, and multiplayer arenas use a special kind of Bind on Pickup that allows very limited trading, indicated by a blue double-arrow. For a two-hour period after you loot the item, you can trade the item to other players who were in the instance with you (but no one else). Only trading directly is allowed, not mailing. After this two-hour period, the item will fully bind to whoever is holding it and prevent all trading
Note: You can only trade this gear to players who were grouped with you when you actually picked up the individual item. If someone joined for only part of the dungeon, or disconnected from the game at some point, you’ll only be able to trade them gear you picked up when they were actually present
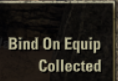
Other gear is Bind on Equip; you’re free to give it away, but as soon as you equip the item it will bind
Other Gear Specs
This section will explain other aspects of your gear like Traits, Enchantments, and Quality
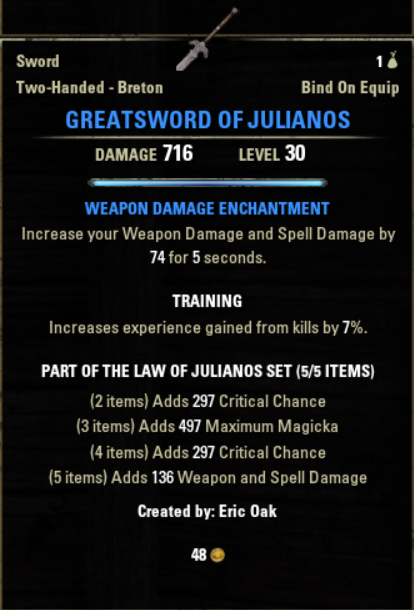
Traits
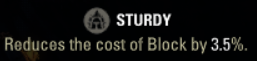
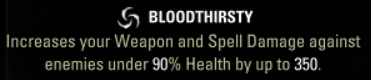
Any gear you loot will have a trait attached to it, providing it with a special bonus. These bonuses can have various effects from extra damage or defensive stats to extra ultimate to extra XP. Below are some examples; you can easily find a complete list of traits in the game online


Weapons, armor, and jewelry each have a different set of traits that can appear on a piece. (For example, the Decisive trait can appear only on weapons, the Reinforced trait only on armor, and the Training trait on both weapons and armor but not jewelry)
Note: Most gear drops with a random trait, but note that jewelry only drops naturally in three basic traits: Robust, Arcane, and Healthy. Weapons and armor can drop in any trait except Nirnhoned. Nirnhoned and the remaining jewelry traits must be applied by crafting or the transmute station
Another note: Two special traits, Ornate and Intricate, provide special bonuses granting extra gold and extra crafting inspiration. You cannot create an item with either of these traits through crafting or the transmute station; they only drop from random drops in the wild
Trait Research
In order to craft gear in a given trait, or transmute or reconstruct gear in a certain trait, you need to research that trait. Obtain a piece of gear that already has that trait on it, and then you can use a crafting station to learn that trait for that item
Traits are learned separately per item. For instance, if you research a light shoulder piece with Reinforced trait, you won’t be able to craft shoes with Reinforced, only shoulders. You can only research one trait on one item at a time per crafting discipline, or up to three with the correct passives
- A common way to acquire traited gear to research is to simply ask someone who has already researched the trait to make items for you
Research takes real time to complete, and the time will double for each trait you research on a particular item type. For instance, your first trait on medium helmets will take 6 hours, but your second will take 12 hours and your third a full 24. The final, ninth trait will take over 2 months. For this reason, it is highly recommended to decide which traits are most useful to you and make sure you research those traits first while research times are short. Research timers will keep ticking while you’re offline from the game
You can significantly reduce research times with a passive in each crafting skill line. These passives will also let you research three traits simultaneously on each crafting table instead of one (except for jewelry). You can also lower research times with research scrolls available from various sources
With all relevant passives, perfectly optimized researching, and no research scrolls, it will take nearly eleven months at minimum to complete all research in the game
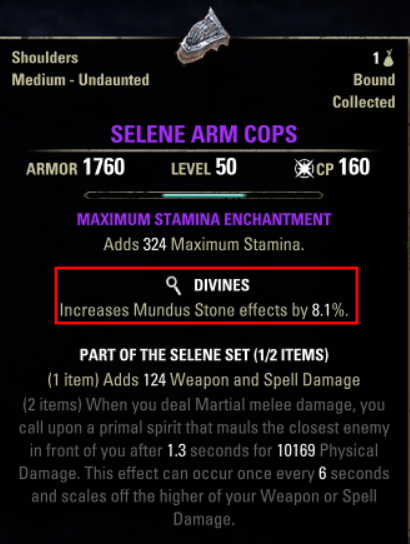
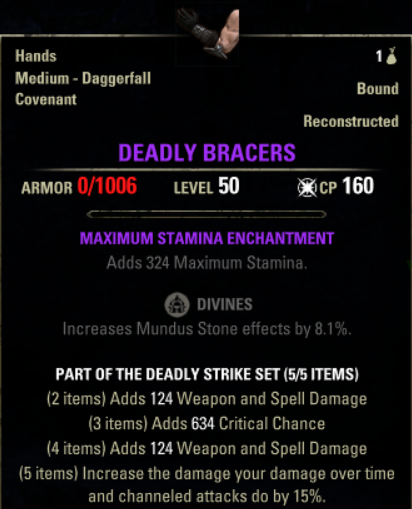
An item’s tooltip will show a magnifying glass if your character hasn’t researched that trait yet. Different special icons will appear here if the item is reconstructed or transmuted


Enchantments
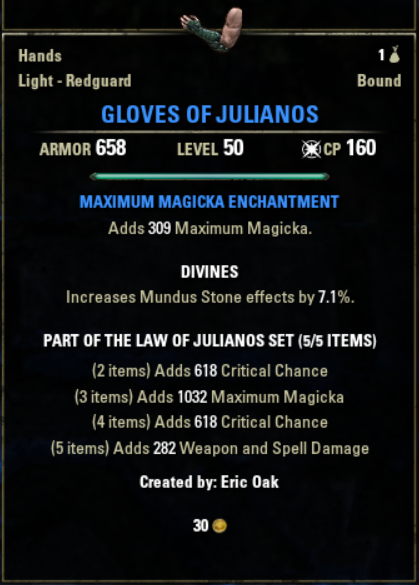
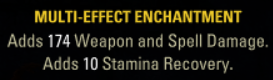
Gear will also come with an enchantment. Enchantments provide an extra bonus in the form of a stat boost or a proc effect. Below are some examples; you can easily find a complete list of enchantments online


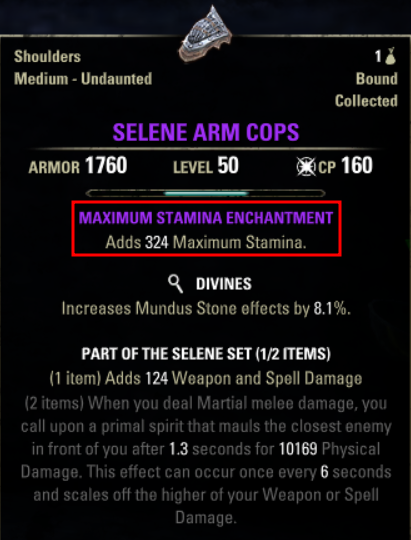
As with traits, enchantment possibilities are different for weapons, armor, and jewelry. e.g. Maximum Stamina enchantments are only available for armor, Fiery enchantments are only for weapons, and so forth
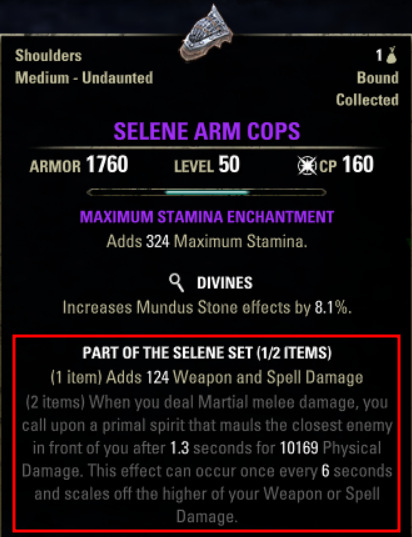
- Armor and jewelry enchantments simply have a constant, always-on effect that gives a stat boost or similar type of bonus
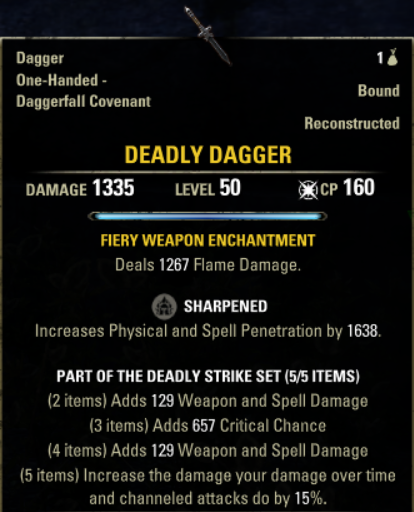
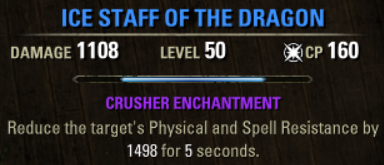
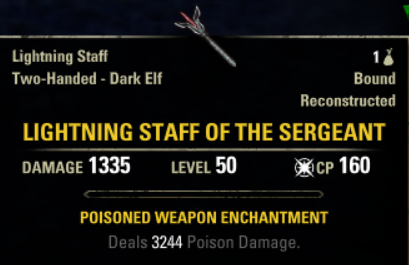
- Weapon enchantments, on the other hand, provide proc effects. These proc effects provide either a burst of damage (like the Fiery enchantment above) or a timed buff or debuff (like the Crusher enchantment above)
Note: Damage enchantments can proc on a 4 second cooldown. Buff and debuff enchantments last for 5 seconds and can proc on a 10 second cooldown. An infused trait on the weapon will halve these cooldowns to 2 and 5 seconds respectively
Weapon enchantments are procced by light and heavy attacks, as well as certain weapon skills. The area DoT skills in many weapons’ skill lines (specifically Wall of Elements, Volley, Blade Cloak, and Stampede) are able to proc enchantments even while you’re on the other bar, so it is always advantageous to have one of these skills slotted on your backbar
Enchanting Your Gear
You can apply a new enchantment to an item by crafting a glyph at an enchanting crafting station and then applying the glyph to your item. (This will override the existing enchantment)
- Note that you cannot enchant gear with a glyph of higher level than the item. The enchantment has to be lower or equal level to the gear
Note: For armor, certain pieces will not receive the full stat value you see on a glyph’s tooltip. Head, chest, and leg pieces are considered “large” pieces and receive the full value; shoulders, hands, waist, and feet are “small” pieces and get only about 40% of the stat value
Additionally, one-handed weapons like daggers will have halved enchantment effects, since you can apply a second enchantment to your other weapon or shield as well
If you find yourself unable to apply an enchantment to a particular gear piece, one of these is the case:
- The enchantment is for the wrong type of gear; e.g. you’re trying to put an armor enchantment on jewelry
- The enchantment is too high of a level; you can only put it on an item of equal or higher level
- You can, however, put a higher quality enchantment on a lower quality item; the restriction applies only to level
- The item already has that enchantment on it; the game will prevent you from applying an identical one
Note that the game only prevents applying an identical enchantment if you (or another player) applied the existing one yourself. As an odd distinction, you can re-apply an identical enchantment if the item dropped originally with the existing one. Be careful not to do this; it’s just a waste of your materials!
Note also that enchantments have quality separate from the quality of the gear they’re attached to. You could for instance have a green-quality helmet with a purple-quality enchantment
- The default UI does not show what quality an item’s enchantment is. To obtain the very useful ability to see enchantment quality, try the Enchanted Quality addon
Additional note: Most set items drop with a certain set of default enchantments (though some variation exists):
- Light armor sets usually have armor drop with Max Magicka enchants, jewelry with Magicka Recovery, and weapons with Absorb Magicka
- Medium armor sets usually have armor with Max Stamina, jewelry with Stamina Recovery, and weapons with Absorb Stamina
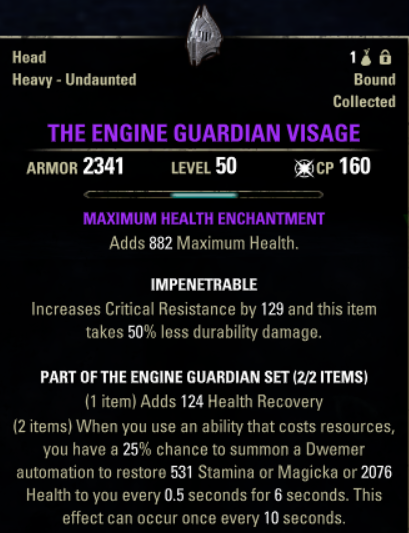
- Heavy sets usually have armor with Max Health, jewelry with Health Recovery, and weapons with Life Drain
Quality
Higher quality will increase stat values and certain other bonuses in a gear piece. There are five quality levels in ESO, each designated with a particular color in the game’s UI: Normal (white), Fine (green), Superior (blue), Epic (purple), and Legendary (gold). A special Mythic (orange) quality also exists specifically for mythic antiquity items. You can see an item’s quality by the color of its name on its tooltip
Gear will always drop in a pre-determined quality depending on what content you’re doing and where the gear is dropping from. Difficult content will often drop higher-quality gear than simpler content
You can upgrade an item’s quality at a crafting station. Below is an example of a green-quality gear piece, and the differences in effects when that same piece is upgraded to blue, purple, and gold
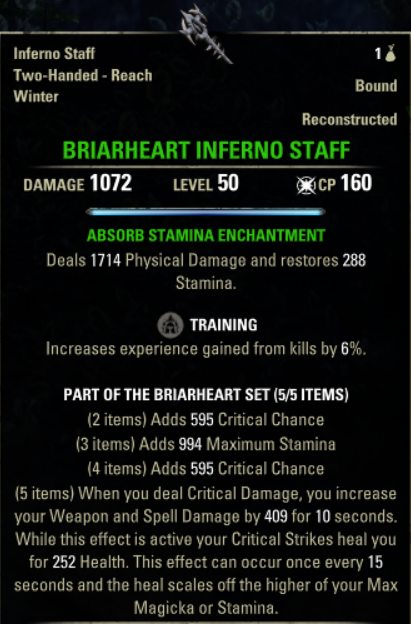
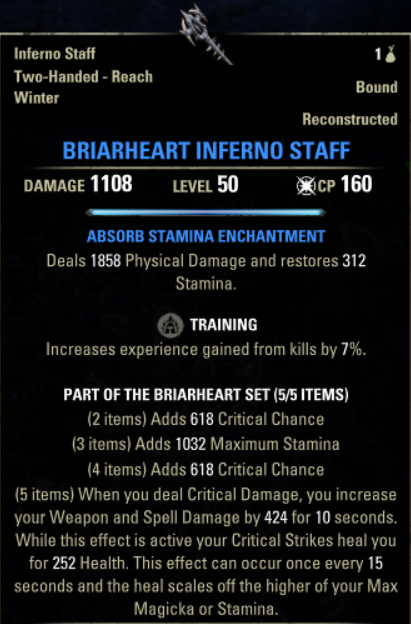
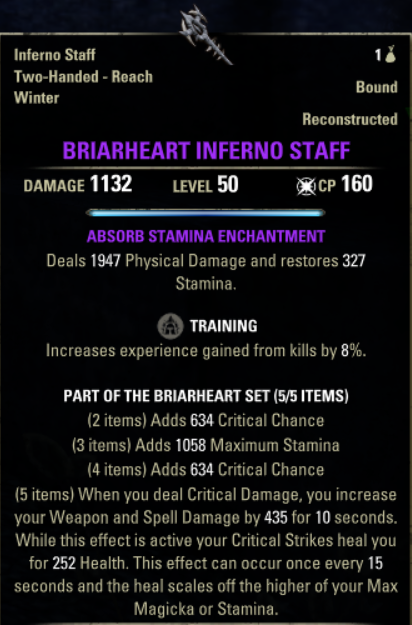
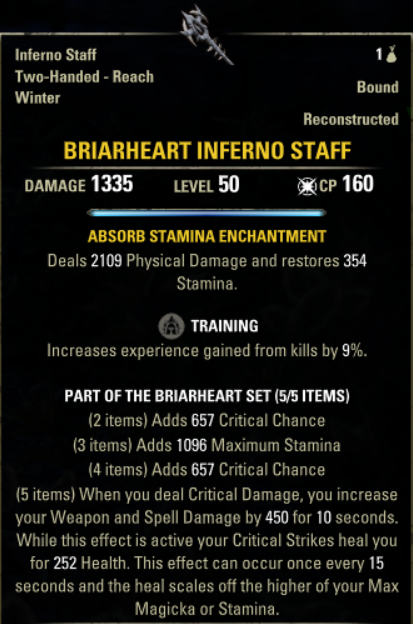
As you can see, improving an item’s quality increases all stats on the item, including the damage (or armor) value as well as flat stat boosts from set bonuses. The item’s trait effect is also enhanced. The enchantment has been improved in quality as well and has also been enhanced
(The more-complex 5-piece bonus has some numbers increased (in this case the weapon and spell damage number) but not others (the healing value remains the same); with more complex effects it can be somewhat unpredictable what values increase, if any at all. Time durations and percentage-based bonuses usually don’t increase; flat bonus values often do)
Level
Level indicates the minimum level your character has to be to equip the item; any lower and you’ll be unable to use it. Normally the gear you collect will match your character’s level, but if you’re getting gear crafted for you or buying it from a guild store, you’ll want to make sure to get gear of the appropriate level
Low-level gear is technically weaker, but when you’re at a low level it will adjust itself by scaling up to similar values as max-level gear. Small differences in gear level normally won’t yield tremendously different bonuses, but if you’re wearing gear that’s far below your character level, you should consider getting new gear
- Note that gear comes in only even-numbered levels (but level 1 instead of 2: i.e. 1, 4, 6, 8, 10, etc.) and multiple-of-10 CP (CP 10, 20, 30, etc.)
The highest gear level is CP 160, known as the “gear cap.” Most people begin proper gear farming and putting their builds together when they reach CP 160, since they will no longer have to replace their gear as they level up further
Outleveling Gear
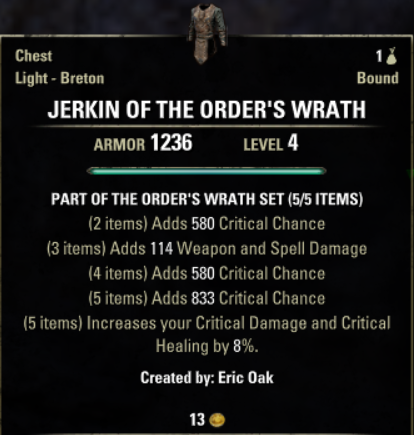
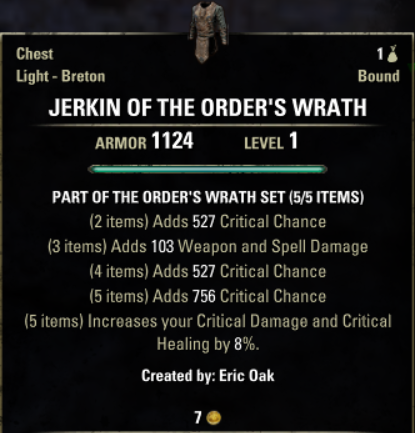
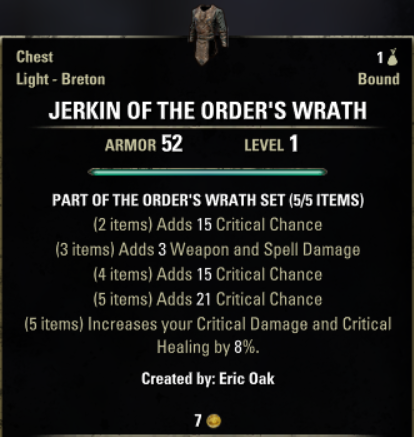
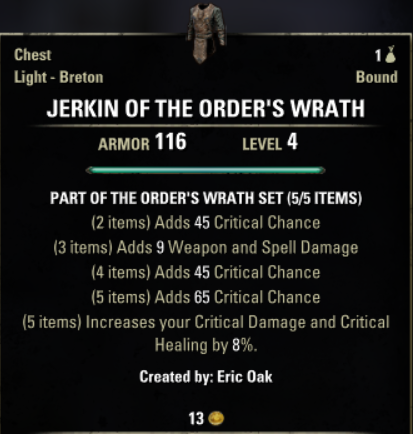
As you outlevel your gear, the upscaling on your gear will reduce. Here’s a comparison of the sort of reduction in bonuses that you get from leveling up just a little bit. On the left is the tooltip for a level 4 character wearing level 4 gear, and on the right is that same character wearing level 1 gear. These differences might look a little substantial but will really hardly be noticeable in actual combat. Outleveling gear will impact the Armor or Damage bonus of the gear and its set bonuses
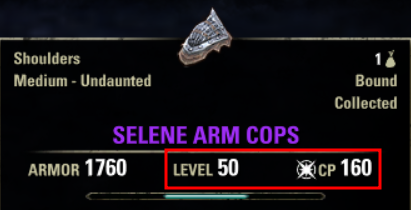
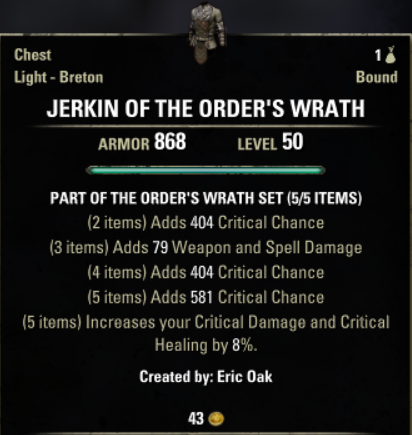
As a more extreme example, below is the tooltip for a max-level CP 160 item worn by a CP 160 character. Next to it is a level 50 and level 1 item worn by the same character. You can see that the lower level items have dropped in power quite a bit more since the character has reached a much higher level
Acquiring properly leveled gear every few levels is usually not practical, so most people tend to swap out their gear about two or three times between level 1 and level 50, and once or twice again between level 50 and CP 160
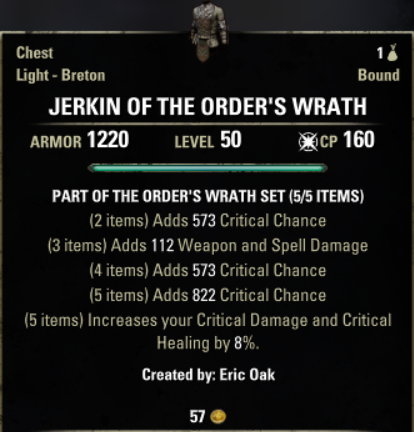
As another comparison, here is the tooltip for a level 4 character wearing a level 4 item, and a CP 160 character wearing the same item. The level 4 character gets more or less the same bonuses as the max-level gear shown above, but the CP 160 character gets massively reduced bonuses
Style
Style is the cosmetic appearance of your gear. Each set you find in the wild has a particular style associated with it, giving all items in that set a distinct look. There are well over 100 different styles available in the game
Crafted gear, on the other hand, can be created in any style whose motif you’ve collected. Motifs are found from many varying sources throughout the world and will let you craft in the corresponding style. Most motifs are only for a specific type of gear (e.g. shoulder pieces in the Ancestral Orc style), so you’ll have to find all the motifs for that style if you want to style a whole set of gear
Remember that you can also change your appearance at an Outfit Station (or a Dye Station, which functions identically). Regardless of your gear’s own styles, you’ll be able to change each piece to appear as any style motif you’ve collected, as well as recolor your gear
Note that only the specific character that consumes a motif can craft in that style. However, all of your characters will be able to use that style at the Outfit Station
An Outfit Station is available in WtU’s guild hall, but you can also use ones out in the world; many cities have them available
Note About Item Names
An item’s name will normally tell you what type of gear piece it is, as well as what set (if any) it belongs to. For instance, Spell Power Cure Breeches are a breeches piece belonging to the Spell Power Cure set
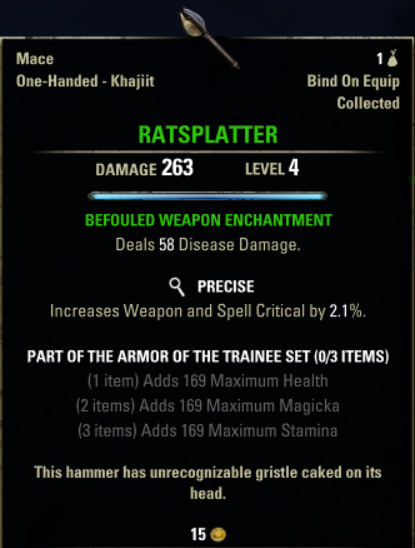
A relatively small number of gear items from quests and dungeons have a special unique name, often related to the quest or where it was found. For instance, the Ratsplatter mace drops from a quest that deals with a rat infestation
Modifying Your Gear
Some attributes of gear are changeable and upgradable, and some aren’t. It’s possible to modify a gear piece’s quality, enchantment, and trait
But it is not possible to modify the level, set, or style of a piece of gear; these attributes are fixed forever. If you want gear of a different level or set, you’ll have to go find, craft, or reconstruct it. (But remember that you can change your appearance at an Outfit Station if you don’t like your gear’s style)
Quality Improvement

You can upgrade, or improve, the quality of your gear at a crafting station by spending special improvement materials. Lower level upgrades need fewer, more common materials, and higher upgrades need more, rarer materials
If you have don’t have enough improvement materials, the upgrade will have a chance of failing, which will destroy the item entirely. Don’t take this risk! Always make sure you have enough upgrade materials to guarantee 100% chance of success
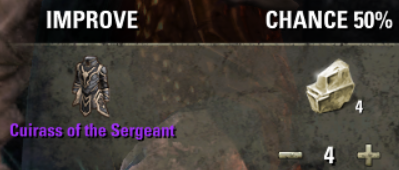
- You can increase your chances of successful upgrades with a passive in the respective crafting skill line. This will allow you to use much fewer materials to improve your gear without risking destroying it. Getting these passives is highly recommended before doing substantial quality upgrades
Remember that upgrades are incremental. If you upgrade straight from white to gold, you’ll still need all the materials for upgrading to green, blue, and purple in addition to the gold materials
Quality upgrades are not always worth your mats! In fact, a single upgrade level usually only gives a fairly small benefit. Green and blue upgrades are affordable and probably worth your mats, but you absolutely do not need to upgrade all of your gear to gold quality to perform well; save your money! In particular, don’t gold out gear unless you’re very confident you’ll be using it for a long time
- In general, weapons yield the most significant results when upgraded; if you do want to upgrade your gear, start with weapons. Jewelry and especially armor upgrades provide minimal bonuses, and all but the most advanced of players will do just fine leaving these items at purple or blue quality
Note: Improving an item’s quality will not necessarily also upgrade its enchantment. The enchantment will only upgrade if the item dropped with that enchantment originally on it. But if you (or another player) put that enchantment on yourself, the enchantment is fully separate forever, and you can only upgrade it by applying a brand new enchantment
Re-Enchantment
To change an enchantment, simply create a new enchantment at an enchanting station, and apply it to your item. (See above for more information)
- Consider being a little liberal with the quality of your new enchantment. Improving the item won’t improve the enchantment, so if you’re planning to improve your gear later, you may want to apply an enchantment of that higher quality from the beginning. Unlike with level, it is possible to put a higher quality enchantment on a lower quality item
Trait Transmutation
To change the trait on an item, you will need to spend transmute crystals at a transmute station. First you must have the desired trait researched for the particular type of piece you want to re-trait. Then you can either transmute your item to change its trait or reconstruct an entirely new item with the desired trait
Transmute Stations are available for use in WtU’s guild hall. If you’d like, you can also transmute out in the world; the world’s one public transmute station is located in the Brass Fortress in Clockwork City
- Reconstruction costs 25 to 75 transmute crystals, depending on how many items you’ve collected in the particular set’s stickerbook; collecting more set pieces will lower the cost
- Transmutation costs a flat 50 transmute crystals
Therefore, if you’ve collected many pieces of a set, it is usually cheaper to reconstruct new items rather than transmuting
However, if you’ve upgraded an item you want to re-trait, you may consider transmuting it rather than reconning. Reconning won’t replicate your upgrades, so if you’ve spent expensive gold materials on your item, you may consider spending extra crystals to transmute it rather than reconning a lower-quality item. Consider whether your gold or your transmute crystals are more valuable to you
Note that transmuted or reconstructed gear is bound immediately; it can’t be given it to another player
Deconstruction
Deconstruction is an excellent way to get rid of gear you don’t need. Unlike Destroying it or selling it to an NPC merchant, you’ll actually get back something of value
Deconstructing an item at a crafting table will give you some of the materials that make up that item, potentially including the base material (e.g. metal ingots, wood, cloth), trait and enchantment materials, style materials, and most notably improvement materials. For instance, blue items may give you blue materials (like Turpen or Dwarven Oil), and gold items may give you gold materials (like Rosin or Tempering Alloy). Deconstructing spare gear and selling the mats is a good way to make some extra money
You’ll get relatively few materials for deconstructing, but you can increase your chances of getting materials using passives in the respective crafting skill lines, and with the Meticulous Disassembly champion point passive (in the green/Craft tree). Make sure to invest in these passives
Deconstructing a reconstructed item will give you 25 transmute crystals back instead of mats. But note that you will only get 25 crystals back, even if you spent more than that to recon the item
Note that mythic antiquity pieces cannot be deconstructed, whether collected directly from the scrying leads or reconstructed at a transmute station
Gear Durability and Degradation
Over time, two durability effects will happen to your gear: your armor will eventually break, and your weapon enchantment will run out of charge
Armor Durability
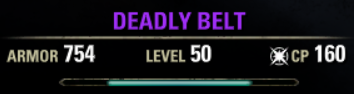
Firstly, your armor will lose durability as you gain XP and also every time you die. You can see your armor’s durability meter on its tooltip
Low durability has no effect until the meter actually runs out. This will cause the item to “break” and lose all its effect. Its armor value will drop to zero, and its trait and enchantment will stop functioning. You’ll also see a red helmet symbol next to your quickslot, and the item’s tooltip will have the relevant effects greyed out
There are two ways to repair your armor:
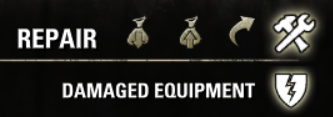
- Visit an NPC merchant, go to the Repair tab, and pay a gold fee to repair your gear
- Right-click the item in your inventory, and spend an Equipment Repair Kit to restore the item to its fully functioning state. Repair Kits can be bought from NPC merchants or guild stores
If you can find a good price, buying Repair Kits from guild stores is normally the cheapest option for repairing
Weapon Enchantment Charge
Secondly, the enchantment on your weapon will slowly run out, expending charge every time it procs. As with armor, you can see a meter on the weapon’s tooltip
When the charge meter hits zero, the enchantment stops working. You’ll see a red weapon symbol next to your quickslot, and the item’s tooltip will have the enchantment effect greyed out
Note: only weapon enchantments can run out; armor and jewelry enchantments are passive and don’t proc or expend charge
To recharge your weapon enchantment, you’ll need to spend a soul gem. Right-click the weapon in your inventory and click Recharge
Consider using the Auto Recharge addon to automate both gear repair and weapon recharging. As long as you have repair kits and soul gems in your inventory, the addon will fix your items as soon as they stop working