If you’re new to ESO, or have some experience but want to start getting into crafting, the systems involved may seem a bit confusing or daunting. In truth, crafting in ESO is fairly straightforward, and this guide will serve both as a tutorial to get you started with crafting and as a reference you can come back to whenever you have a question.
Table of Contents
Equipment Crafting
This encompasses the fields of Blacksmithing, Clothing, Jewelry Crafting, and Woodworking. The items made with these fields are permanent and can be equipped directly to the character: weapons, armor, and jewelry.
Crafted Item Example
To start, here’s an example of a crafted item, with its key elements labeled. We’ll go over each of these aspects in detail in the Creation section.
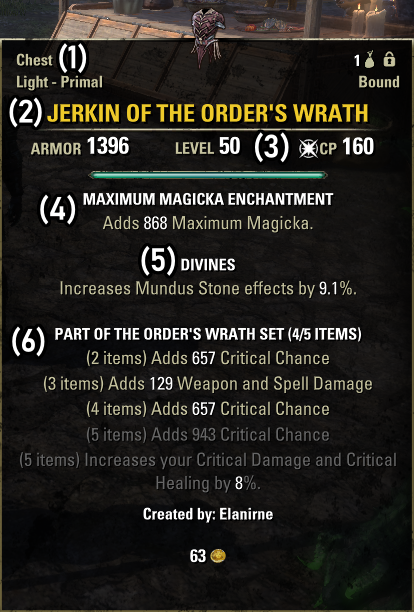
- Item Type and Style: This is the type of item (Chest piece, in this case), its weapon type or armor weight (if it has one), and its style (Primal here).
- Item Name: Simply the name of the item. This will typically be the item type and the set’s name, but items with no set will change their name based on the applied enchantment. Additionally, the color of the name changes to indicate the item’s quality.
- Item Level and Durability: This is the level (and, if applicable, Champion Point) requirement of the item. The closer an item’s level is to your own level, the stronger it is in terms of damage, armor, and set bonuses. The bar just below this represents the durability of the item, and is only present for armor. Equipped armor loses durability as you gain Combat XP (not from taking damage or any other type of XP), and can be repaired by Merchant NPCs or Repair Kits.
- Enchantment: The applied glyph, which confers a significant bonus to the item. For weapons, the enchantment has a charge (represented by the bar just above the name) – when empty, you can recharge it using a Soul Gem. Armor and Jewelry enchantments have no charge, and will always apply their bonus; however, if an armor piece loses all its durability and breaks, the enchantment effect is lost until it is repaired..
- Trait: This is the inherent bonus of the item. Unlike an enchantment, it requires no charge when applied to a weapon. Like an enchantment, however, the bonus is lost if the armor is broken. The strength of a trait increases along with the item’s quality.
- Set: Here you’ll see the name of the item’s set, if it has one, as well as a list of bonuses below it. The more items of a set you have equipped, the more bonuses you’ll receive – this is indicated by the set bonuses lighting up, like the 2-4 bonuses in the example. Sets typically have four bonuses, for wearing 2-5 pieces, but some have even more, and a few grant bonuses for wearing even just one piece.
Refinement
When you first interact with a crafting station, you’ll unlock the relevant crafting skill (if you haven’t already) and be presented with the Refinement tab, shown below. (Note that in order to interact with Jewelry stations, you need to own the Summerset DLC or have an ESO Plus subscription.) Here, you can turn the raw materials you receive from resource nodes out in the world into refined materials you can craft equipment with.
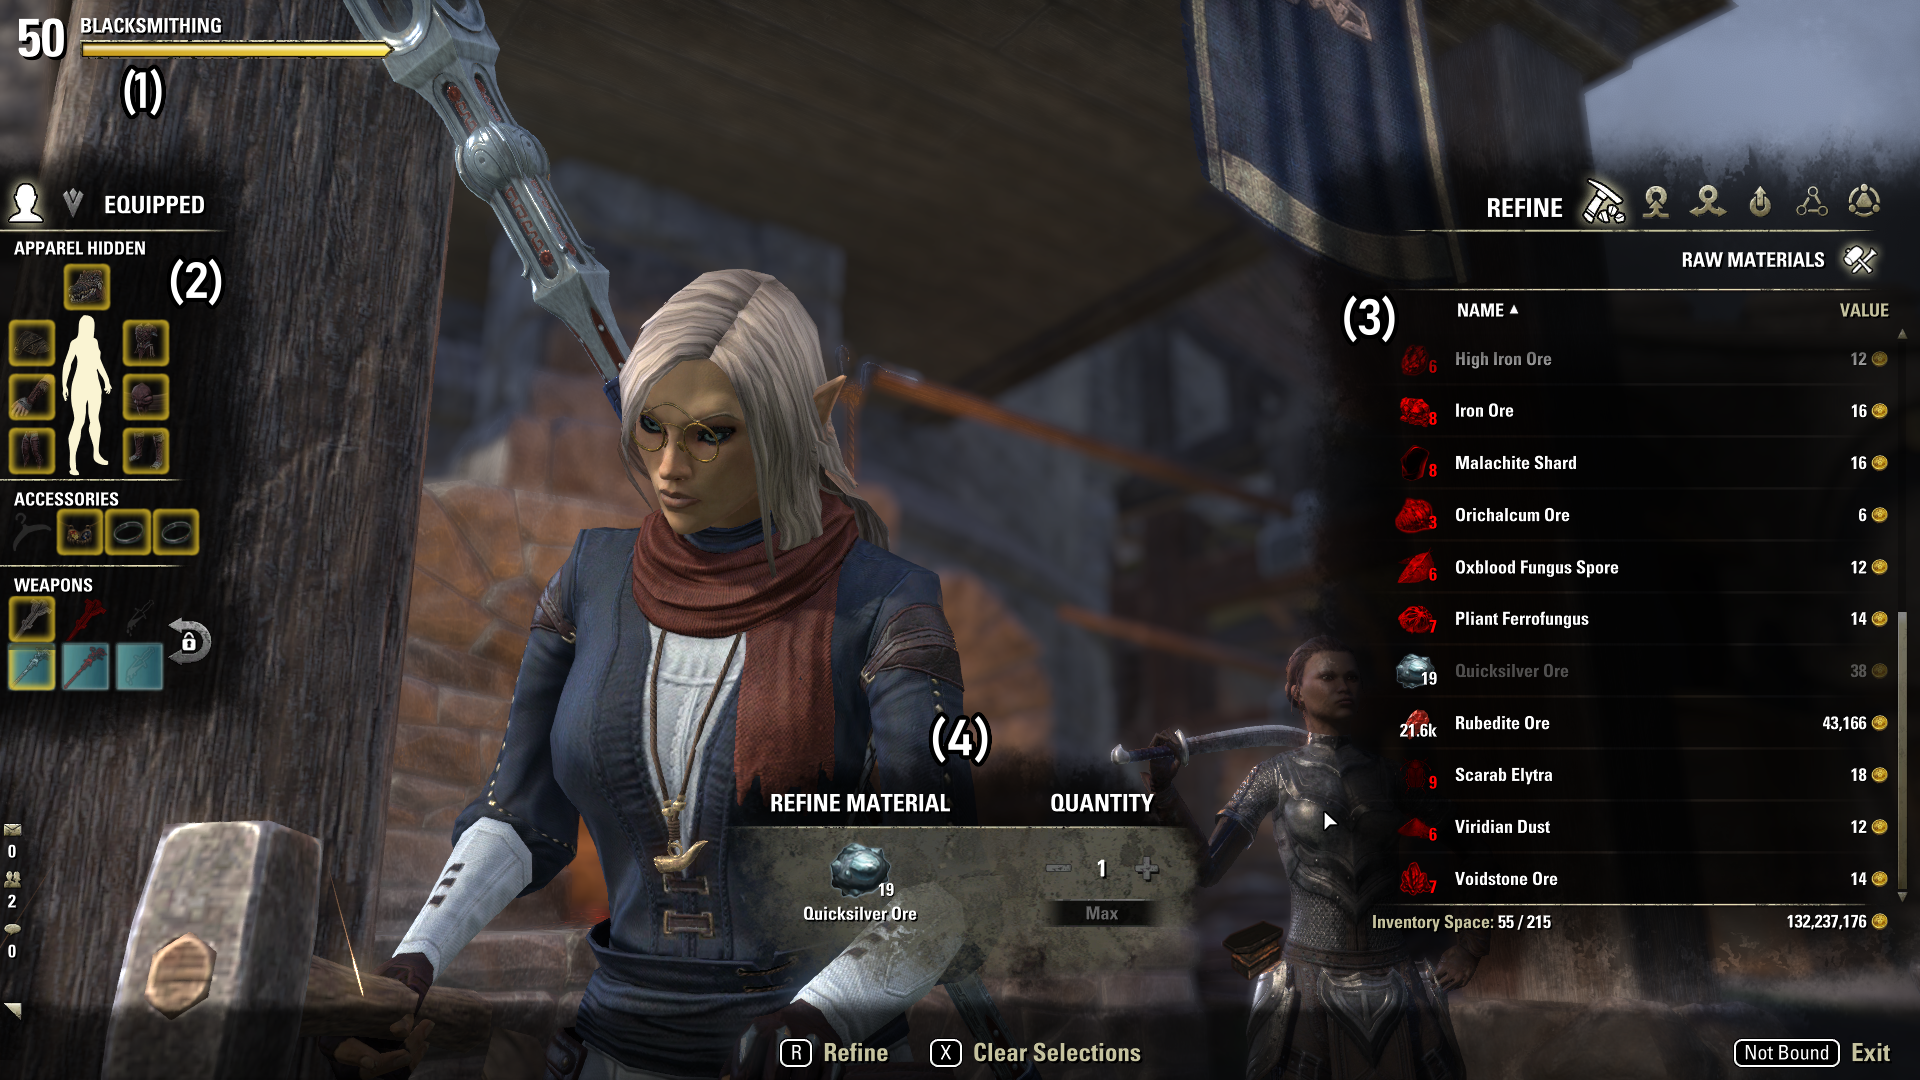
- Crafting Level: Your crafting skill level for the workstation. Max is 50.
- Equipment: Your current equipment.
- Materials: Here you can select materials for refinement by simply clicking them, and they can be refined in batches of 10. You can also select multiple types of materials to refine all at once. These materials can be in your inventory, bank, or Craft Bag. All raw materials that you have in your possession will be displayed here, but only items in excess of 10 can be refined – the rest will have red icons. Your selected materials will have their names greyed out.
- Selection: The materials you’ve selected. If you select multiple types of material (like from different tiers), a generic icon will be shown.
When you select materials for refinement, they’re all added together into a group that can be refined simultaneously. You can select up to 1,000 batches of 10 materials, for a total of 10,000 raw materials refined at once. Generally, though, you’ll be refining in smaller batches as you go. If you do have a large amount of raw materials to refine, but only wish to refine some of them, the Quantity area of section 4 will have +/– (hold Shift when clicking these to adjust by 10), Max, and Min buttons you can use to set the amount to refine, or you can scroll your mouse wheel while hovering over that area.
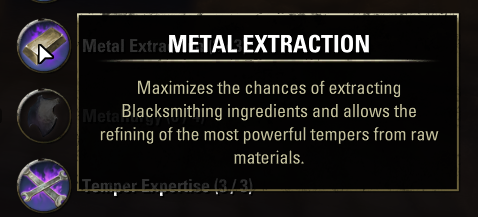
When you refine materials, you’ll create 7-10 refined materials, but you also have a chance of receiving rare materials as well, including trait gems* and tempers. Your odds of receiving these items are improved by taking specific passives in each crafting skill line: Metal Extraction for Blacksmithing, Unraveling for Clothing, Jewelry Extraction for Jewelry Crafting, and Wood Extraction for Woodworking. If you’re curious about approximate odds, I created a thread on the official forums about my experience refining several thousands of raw materials (opens in new tab).
* For Jewelry specifically, you will instead receive Pulverized versions of the trait gems for the Healthy, Arcane, and Robust traits. These can be combined in batches of 10 to create the normal trait gems. For information on how to receive the other Jewelry trait gems, see Acquiring Traited Items.
Creation
The next tab of the Crafting interface is where equipment is actually created. Creating items will slightly improve your crafting skills, but there are better ways: see Deconstruction, below.
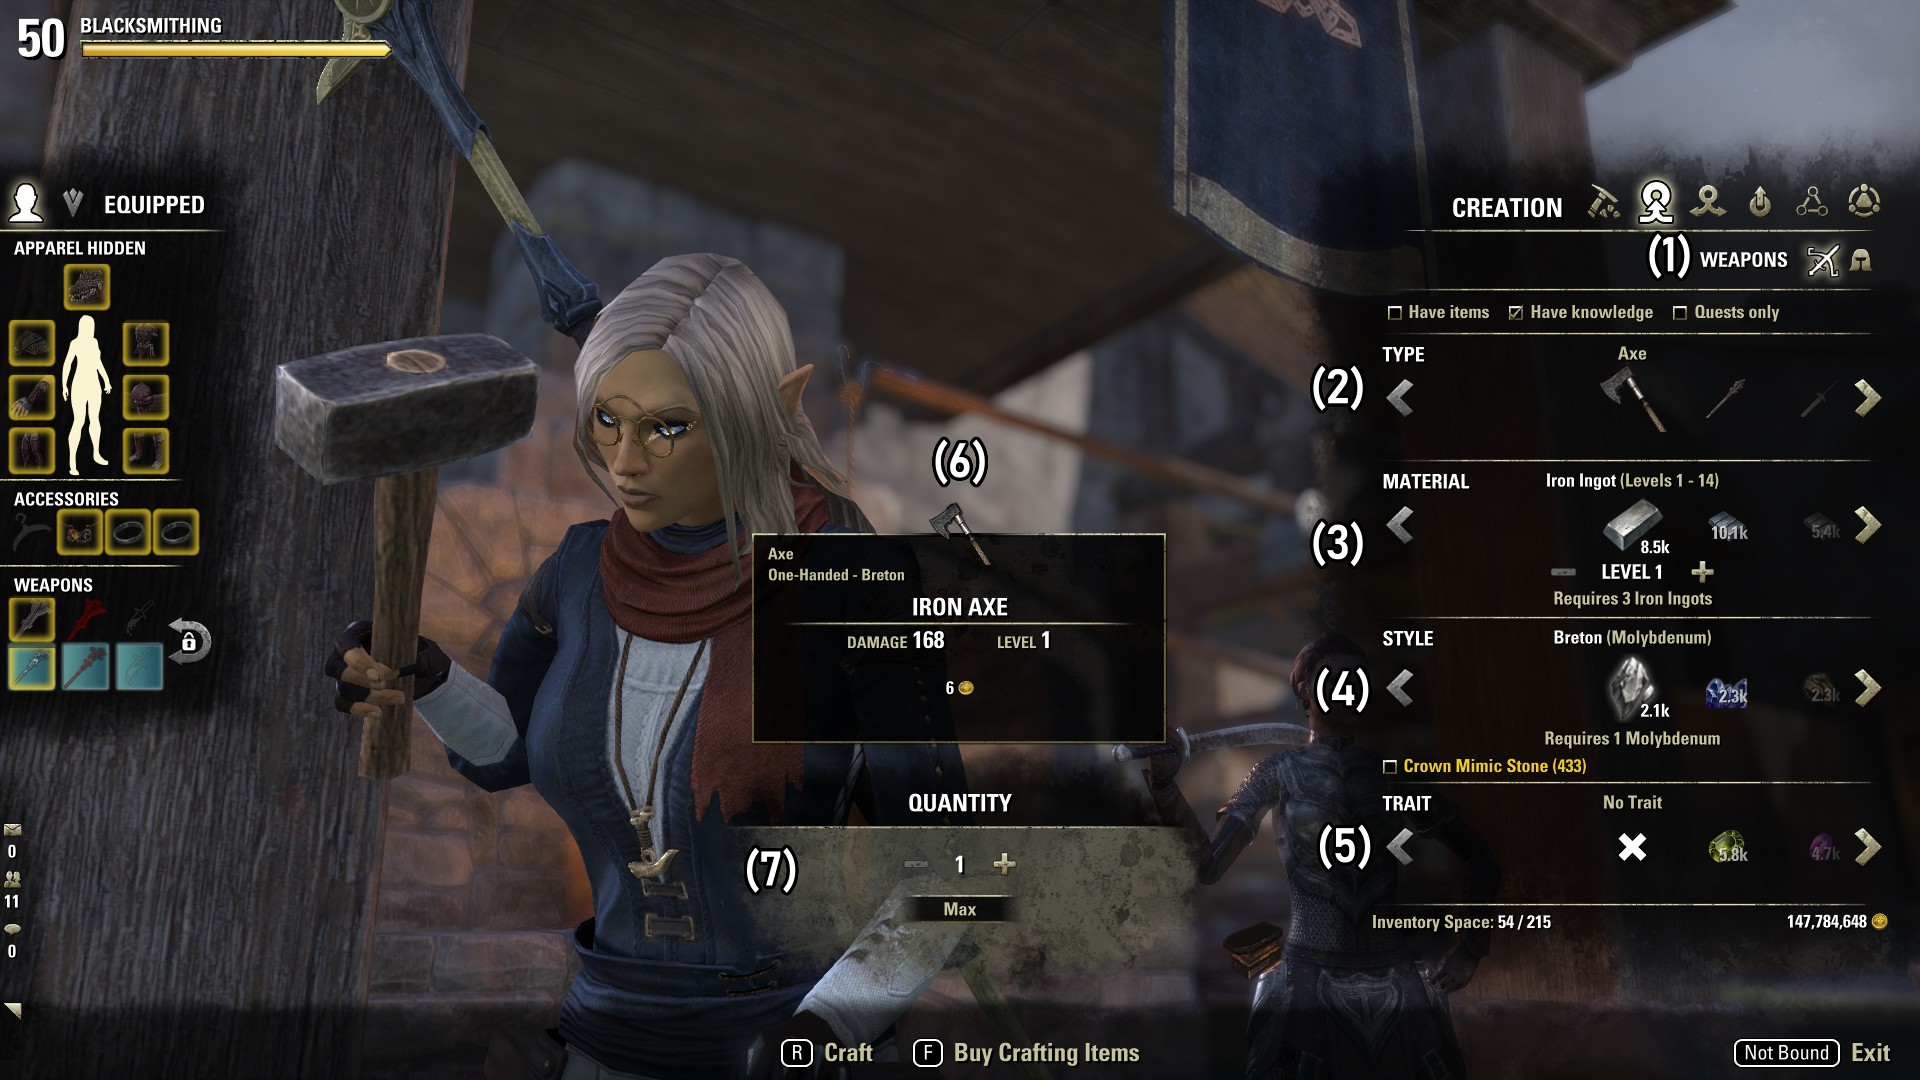
- Options: The two buttons at the top swap between creating Weapons and Armor. They only appear at Blacksmithing anvils and Woodworking tables. This area additionally holds three checkboxes: Have items (which hides anything you can’t craft due to a lack of materials), Have knowledge (which hides any materials, traits, or styles you don’t know), and Quests only (which hides any items not required by your current Crafting Writs).
- Type: Select the type of item you want to create, using the arrows to either side or your scrollwheel.
- Material: Choose the tier of material you’ll use. Change material with the arrows to either side, or your scrollwheel while hovering over that area. Each material applies to a specific level range, and you can increase the level within that range with the + and – buttons, or your scrollwheel while hovering over the level. Materials in your inventory, bank, and Craft Bag are all available to be used.
- Style: This determines how the equipment will look. Learning Crafting Motifs will give you more options here. Each style has a material tied to it. If you don’t have the appropriate material, you can use Crown Mimic Stones to replace them. If you don’t have the appropriate material or a Crown Mimic Stone, you cannot craft in that style. Materials for base game racial motifs can be purchased from crafting vendors, like Blacksmiths, for 15g each, and all style materials have a chance to drop when deconstructing equipment in that style.
- Trait: These apply special properties to the equipment you create. Weapons and Armor have different sets of traits. Learning traits is explained in detail below.
- Item Preview: This is the item you’ll create. Ensure that the desired level, style, and trait are all correct!
- Quantity: Sometimes you’ll need to make multiples of a given item (especially for Crafting Writs, etc.). In those situations, the buttons here (or your scrollwheel) will allow you to make them all at once.
Item Sets
When you’ve researched enough traits, you gain the ability to craft items with certain set bonuses! However, you won’t receive any prompt that this has happened, so the ability may go unnoticed.
Set items are crafted at special workstations all around Tamriel, found out in the wilds and marked by this icon: ![]() . Each set has a trait knowledge requirement, ranging from 2 to 9 traits. Note that the number of traits required has no real correlation to the actual strength of the set – some of the most powerful sets require as few as 3 traits! Additionally, it’s important to remember that each item you can craft has its own set of traits to learn, so to craft every item in a 3-trait set, you need to know 3 traits for each of those items.
. Each set has a trait knowledge requirement, ranging from 2 to 9 traits. Note that the number of traits required has no real correlation to the actual strength of the set – some of the most powerful sets require as few as 3 traits! Additionally, it’s important to remember that each item you can craft has its own set of traits to learn, so to craft every item in a 3-trait set, you need to know 3 traits for each of those items.
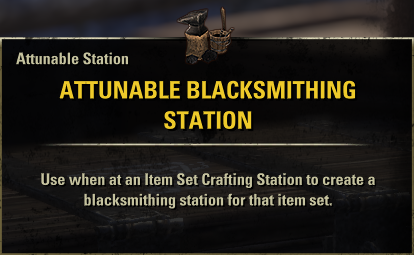
In addition to these workstations, crafters have the right to purchase Attunable Crafting Stations. These workstations are furnishings, and can be placed in a house as normal workstations at any time; however, if the crafter takes them to a set workstation out in the world, they can attune it to those set bonuses, and craft the set at home! You’ll have to do this with all four types of workstation (Blacksmithing, Clothing, Jewelry, and Woodworking) for each set, which eventually adds up to a lot of set stations taking up room in your house. The good news is…

…particularly skilled crafters (with the Grand Master Crafter achievement) have the right to purchase Grand Master Crafting Stations! These powerful workstations have the ability to absorb properly attuned Attunable Crafting Stations, allowing access to all the sets you feed into it at once. See below for a breakdown of how to use these stations.
The Attunable and Grand Master Crafting Stations can be purchased from Rolis Hlaalu, Mastercraft Mediator and Faustina Curio, Achievement Mediator. Both of these NPC Vendors can be found in the alliances’ capital cities: Wayrest, Elden Root, and Mournhold. For more information on these NPCs, and the Writ Vouchers you’ll require to buy them, see the Master Writs section.
Of course, if you don’t want to bother with all that, you don’t have to! Walks-the-Uncharted’s Guild Hall already has fully stocked Grand Master Crafting Stations you can use! These stations, and the stations required to feed them, were generously donated by WtU staff, and even members like yourself, and are free to use.
Creating a Set Item
To create a set item, you just need to interact with a set workstation, either out in the world, in your home, or in the guild hall. The following example uses a Grand Master Crafting Station in the guild hall.
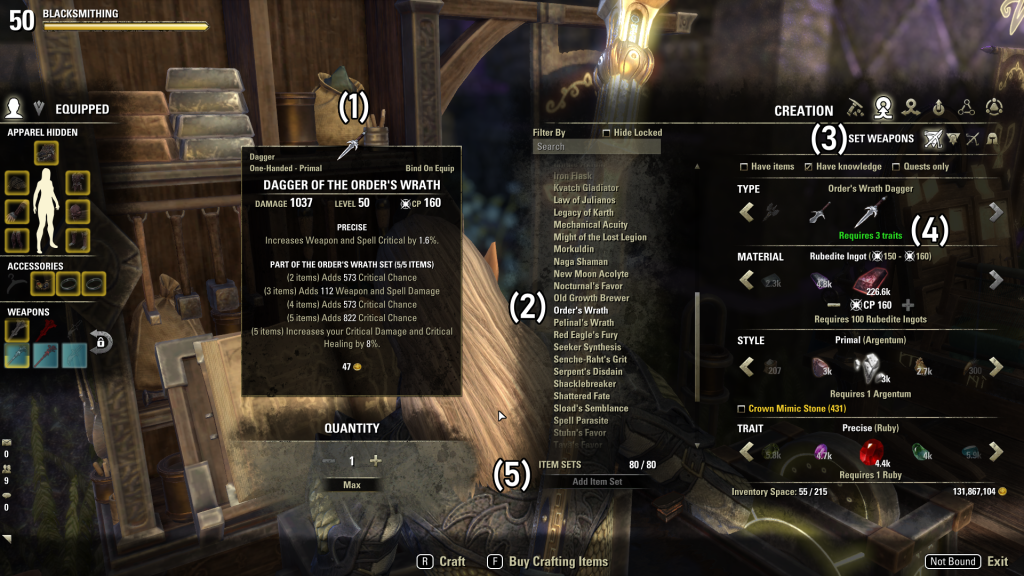
- Item to be Created: This is a preview of the item you’re going to make, complete with its stats and all of its set bonuses. Note that most set bonuses (any that aren’t a named Major/Minor buff) will increase in strength as the quality increases, and decrease in strength as the character outlevels the gear. Otherwise, this is the same as creating a normal item.
- List of Sets: For Grand Master Crafting Stations, this left-hand panel lists all the sets that have been fed into it, and allows you to select from the list based on where the item appears (base game, DLC, PvP, etc.). Note that even at a Grand Master Crafting Station, you must know enough traits for the item you want to craft.
- Set/Normal Toggle: These buttons swap between crafting a set item of the given type, and a normal item of the given type. The icons with the inverted triangle behind them are the set versions.
- Item Selection and Requirements: Here you’ll select the item you want to craft. Beneath the item’s icon is text reminding you of the number of traits required for that item. The icon will be lit and the text green if you qualify to craft the item, dim and red if not.
- Item Set Collection and Feeding: This shows how many unique item sets this Grand Master Crafting Station has absorbed, out of the total number of craftable sets currently available. Below is the Add Item Set button, where you can feed this workstation attuned Attunable Crafting Stations, increasing the number of sets it knows. The set you feed here must be attuned to a set the GMCS doesn’t already know.
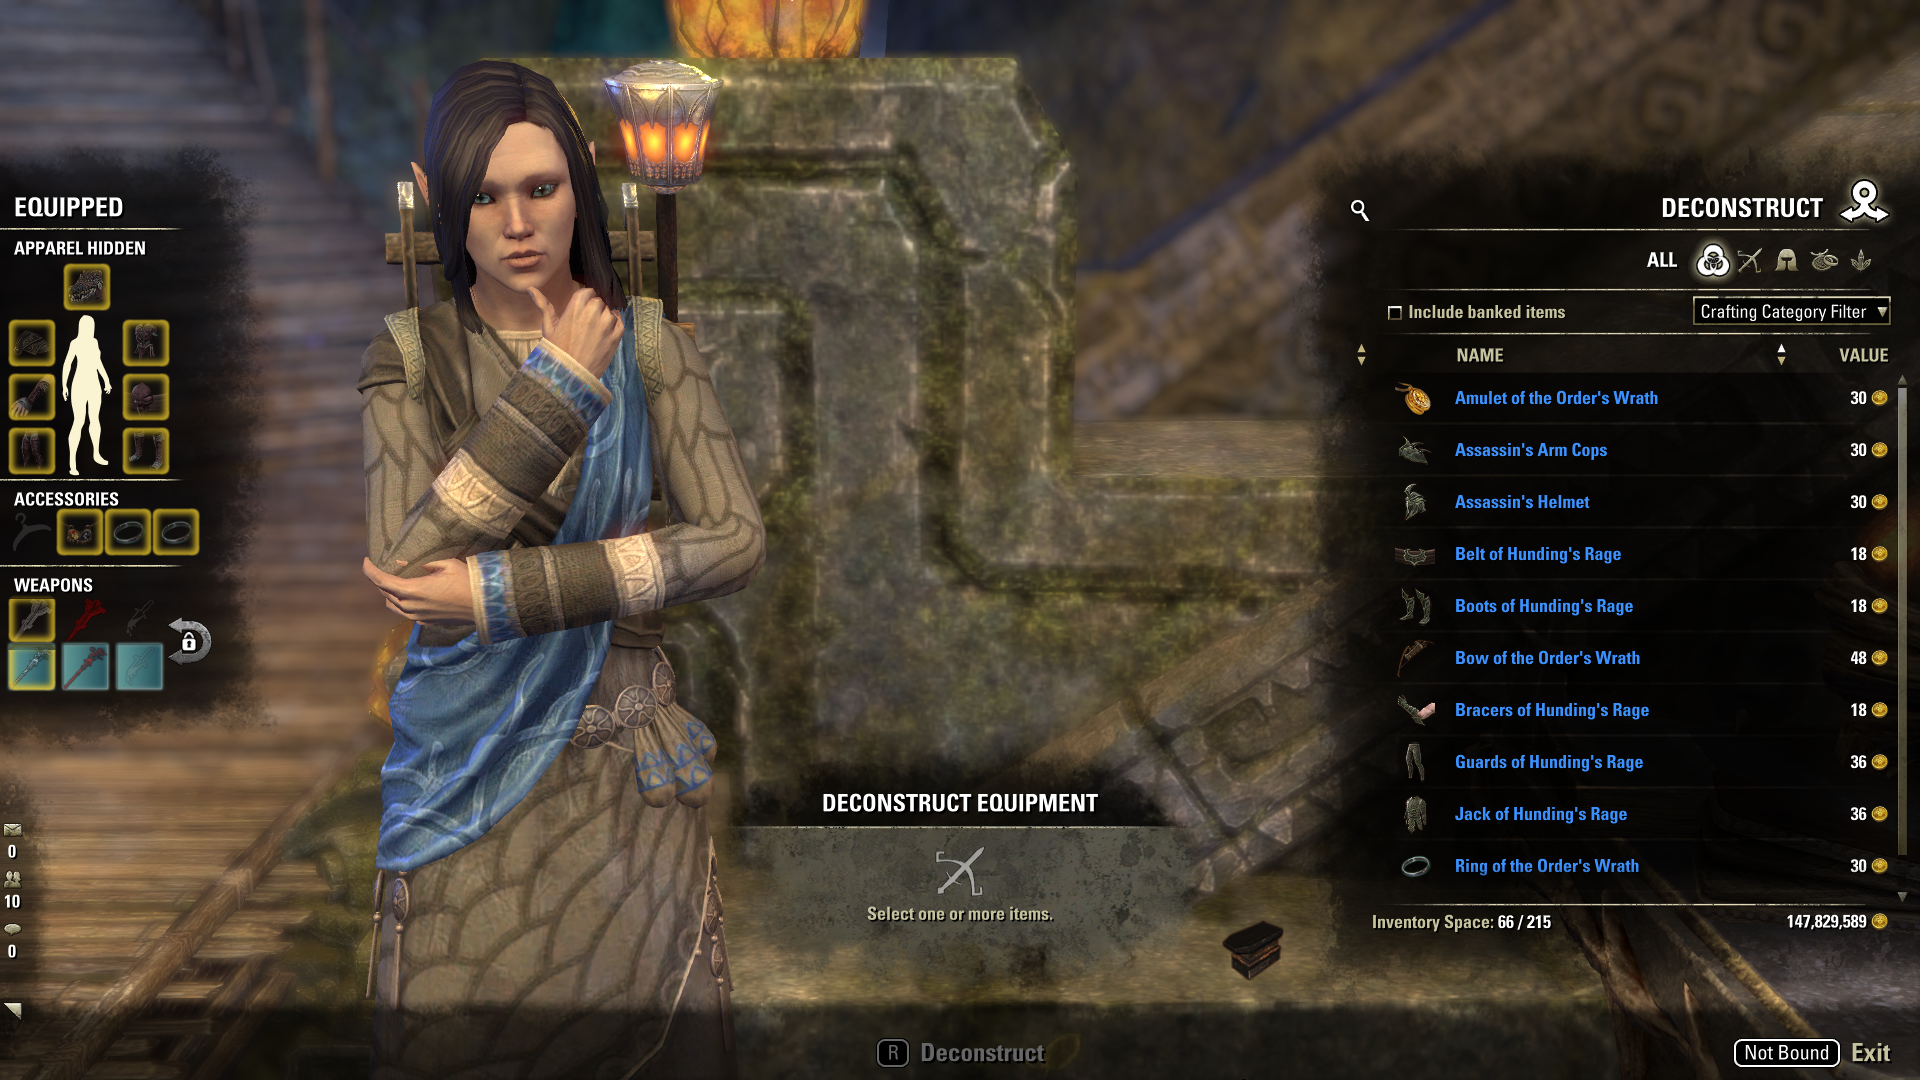
Deconstruct
In the process of adventuring in ESO, you’ll come across a great deal of equipment, most of which you’ll likely have no use for. You could sell it, of course (and I actually recommend this for basic, white-quality gear), but you can get more out of it through deconstruction. Deconstruction is the primary way to improve your crafting skills, and if you can deconstruct an item created by another player, it’s even better. (Crafting XP is called Inspiration, after all!)
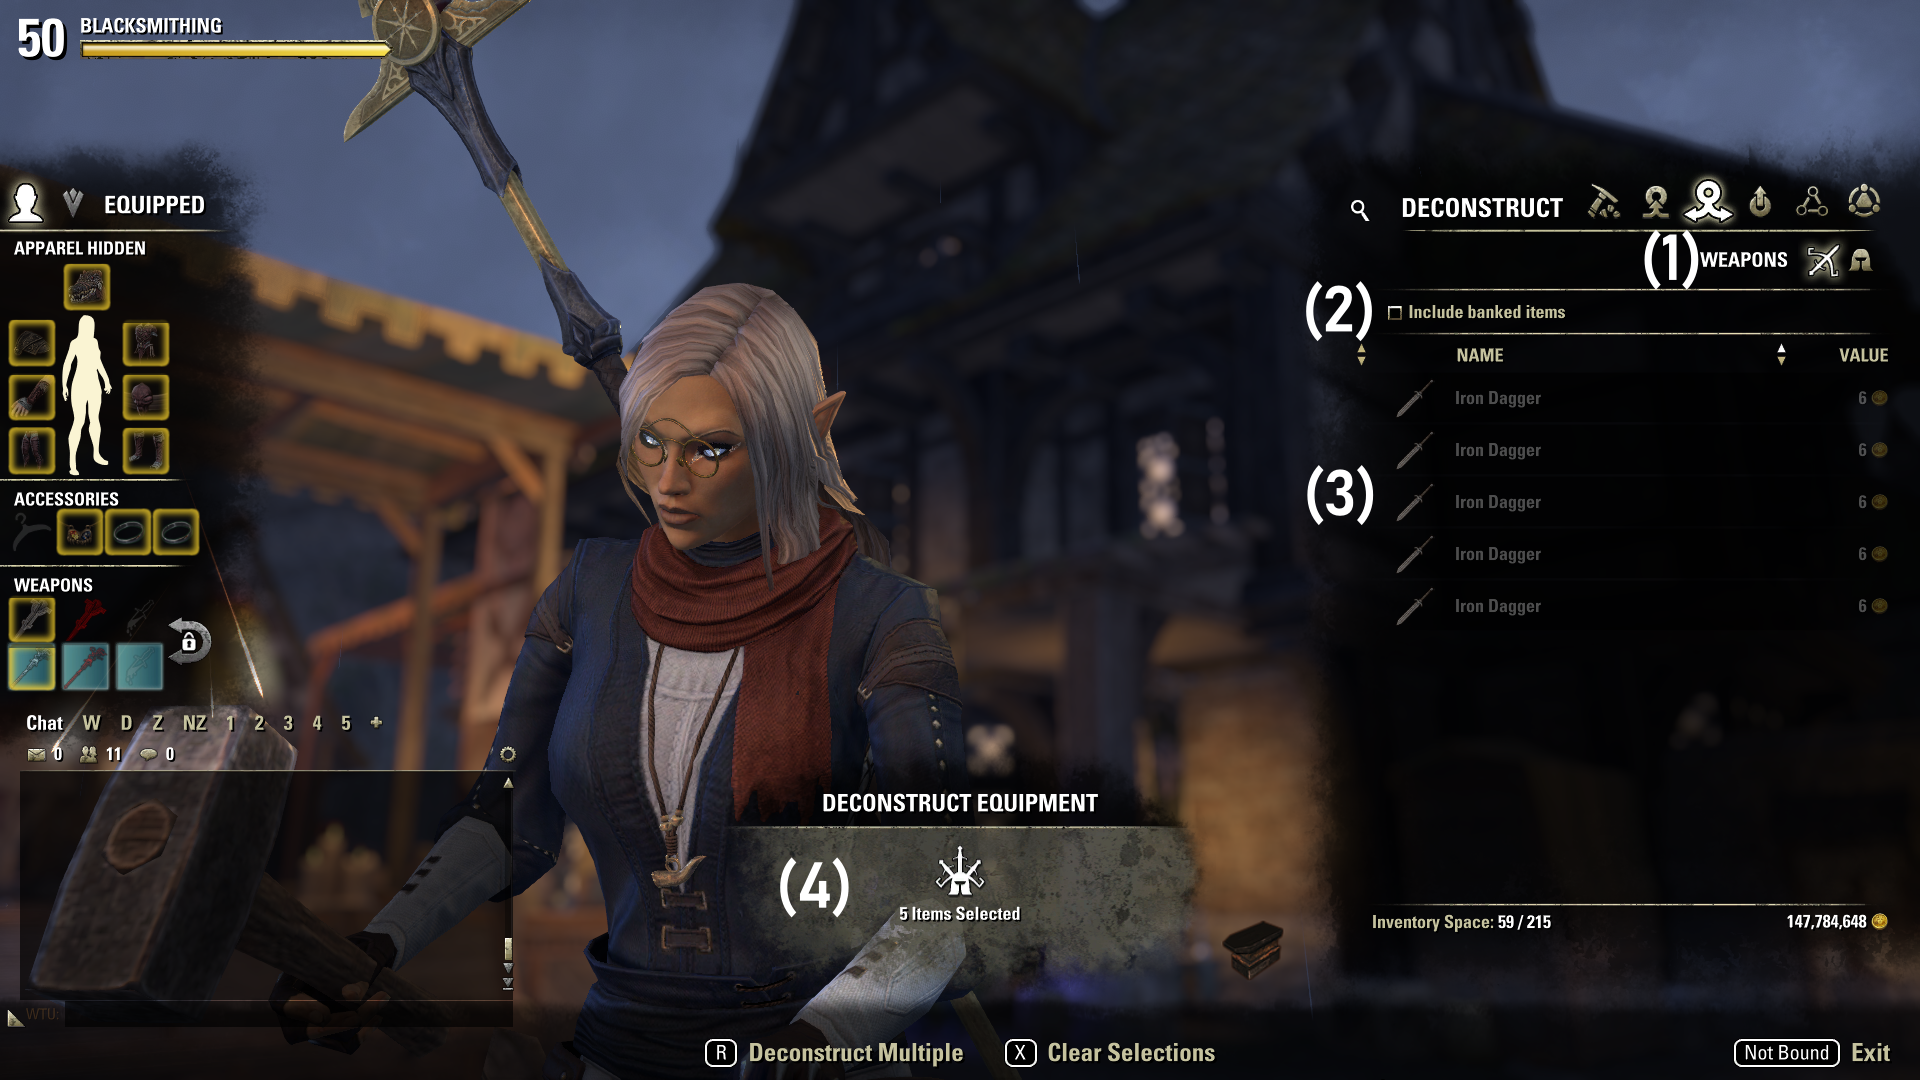
- Weapons/Armor: As in Creation, you can swap between weapons and armor here.
- Include Banked Items: Enabling this checkbox will cause unlocked items in your bank to be available for deconstruction. If it’s unchecked, only items in your inventory are available.
- Item Selection: Select the items you wish to deconstruct by clicking them here. You can choose up to 100 items. When an item is selected, it will be greyed out, as the daggers in this image are.
- Selected Items: The icon of your selected item will be displayed here. If multiple items are selected, a generic icon is shown instead.
When an item is deconstructed, you’ll get some of the materials used to create that item, but never the full amount. Furthermore, items you created yourself will yield even fewer materials. Sometimes, you may get no materials at all! This is more likely if you deconstruct items that are a higher level than your crafting skill, and a message in the top-right corner will confirm this.
If the item was improved, you’ll have a chance to receive one of the highest-tier temper used to improve it. You will never receive any lower-tier tempers, nor will you ever receive more than one of the highest-tier temper. If the item had a trait, you also have a chance to receive the gem used to craft that trait (except for Jewelry, where you will get a Pulverized version of that trait gem; see Refinement).
Special note: There is a type of Assistant, collectively called Deconstruction Assistants, that allow you to deconstruct items on the go! These include Giladil the Ragpicker; Aderene, Fargraves Dreg Dealer; and others. Deconstructing items using one of these Assistants is absolutely no different from using a workstation, except that you can deconstruct items from multiple skill lines all at once. The usual limit of 100 items still applies.
Improvement
You can use the Improvement tab to improve the quality (color) of any equipment you possess. The qualities are: Normal -> Fine -> Superior -> Epic -> Legendary. These are increased one step at a time, with each step improving both the stats of the equipment (armor value or damage), as well as the strength of any traits and set bonuses it may have. Doing so requires materials collectively called Tempers (though each craft actually has its own name for them), which can be acquired from deconstructing higher-quality armor or from refining raw materials.
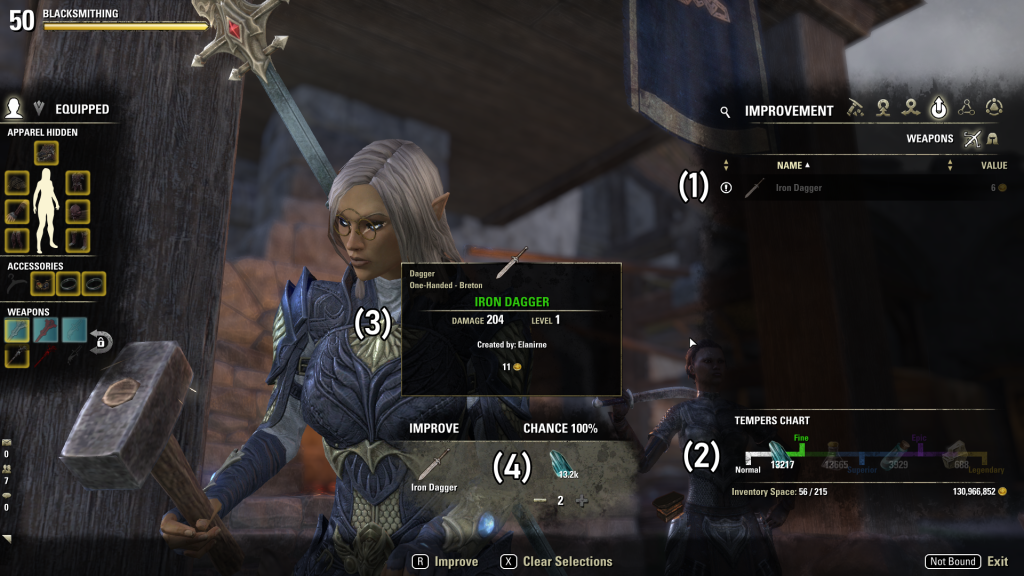
- Item Selection: Choose an item from your inventory or bank to improve. Equipped items cannot be improved until they are unequipped. Items that are already Legendary will not appear.
- Tempers Chart: This displays the Tempers specific to the craft skill you’re using, in quality order, as well as how many of each you have. The next step of improvement is highlighted.
- Item Preview: This tooltip will be the result of your next improvement. It does not show the item as it currently is! You can compare the result here to the current item by hovering over it in the Item Selection panel on the right.
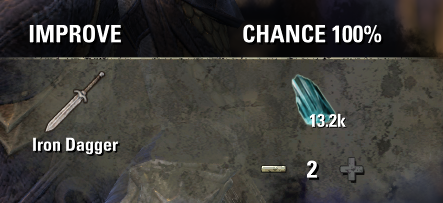
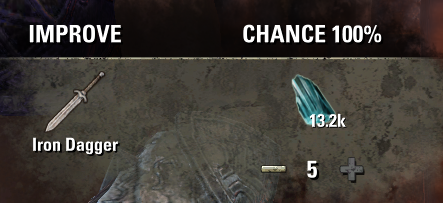
- Temper Chance: This section allows you to commit a number of Tempers to the upcoming improvement. Each Temper you commit increases your improvement chance linearly, up to 100%.
The number of Tempers required depends on your rank in the relevant passive: Temper Expertise for Blacksmithing, Tannin Expertise for Clothing, Platings Expertise for Jewelry, or Resin Expertise for Woodworking. At 3/3 ranks in these skills, the Tempers required are always the same: 2 for Fine, 3 for Superior, 4 for Epic, and 8 for Legendary. Please note that if your improvement chance is less than 100%, and you fail, the item is destroyed. As such, you should always strive to use as many Tempers as necessary for the next step of improvement to be guaranteed!
Research

Research is the most important step on the road to becoming a Grand Master Crafter. By sacrificing an item that has a trait, you can learn how to craft that particular item with that trait. Furthermore, as you learn more traits for a given item, you unlock the ability to craft that item with powerful set bonuses!
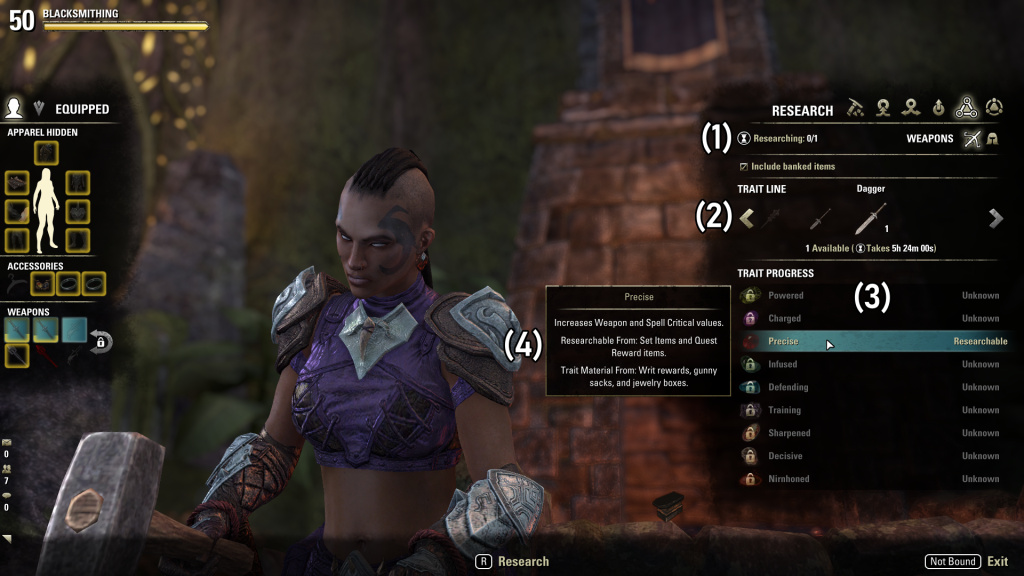
- Research Slots: This shows how many items you’re currently researching and how many items you can research at a time for that craft. You’ll start with 1 slot, and the maximum number of slots is 3, (except for Jewelry, which only ever gets 1). Increase the number of slots and/or research speed through the Metallurgy, Stitching, Lapidary Research, and Carpentry passives.
- Item Selection: Choose the item you want to research a trait for. Under the item, you can see how many traited items are available (in your inventory and bank) to research, as well as how much real time it will take for that research to complete. Research is completely passive, and the timer ticks down even while offline. Note that, for every trait already researched for that item, the time required doubles (to a maximum of 64 days for the 9th trait), but the passives mentioned above reduce that time requirement by certain percentages, and the final rank limits the time to a maximum of 30 days. Being an ESO Plus subscriber further reduces the time required by 10% (to a max of 27 days).
- Trait Selection: Select the trait you want to research for the chosen item. Only traits that show “Researchable” on the right can be selected, which indicates that an item with that trait is in your inventory or bank (if “Include banked items” is selected). If you’re unsure which traits to research, see below.
- Trait Description: An explanation of the trait’s benefits, where you can find items with that trait, and where the trait’s material can be acquired. For weapons and armor, traited items can be acquired fairly easily (except for Nirnhoned), but for Jewelry, certain traits can only be acquired from specific sources. Both of these are explained in more detail below.
What Traits Should I Research?
If you don’t have particular traits you want to research first, here are some recommendations for various item types. These recommendations are based on the types of items typically requested for crafted sets.
- Weapons: Training, Precise (esp. Daggers or Staves), Sharpened, Infused (esp. Two-Handed and Staves), Nirnhoned (esp. Daggers).
- Armor: Training, Divines, Reinforced (esp. Heavy Armor), Sturdy (esp. Heavy Armor), Infused (esp. Chest, Legs, Head, Shield), Impenetrable.
Acquiring Trait Gems and Traited Items
Trait gems are most typically acquired from refining raw materials and deconstructing items that have those traits, though it’s never guaranteed in either case.
For the most part, items with particular traits can be acquired easily. They drop as normal loot in overland and in dungeons, can be received from quests, and are also inexpensive for crafters to make (in fact, most of us in WtU will do so for free). However, there are some traits that are harder to acquire, especially for Jewelry, needing you to do specific things to find them – if you don’t want to buy them from another player.
- Nirnhoned: This trait was added alongside Upper Craglorn in ESO’s early years. The only way to acquire an Exemplary Nirnhoned Item is to do the Craglorn storyline. Completing the penultimate quest, Dawn of the Exalted Viper, rewards you with a Nirnhoned Coffer, which contains a random piece of equipment with the Nirnhoned trait. You can do this quest on multiple characters to receive additional coffers. Beyond that, you’ll have to trade with other crafters to learn more. The Nirnhoned trait requires a material called Nirncrux – either Fortified Nirncrux for armor, or Potent Nirncrux for weapons. This rare material can be found from any Cloth, Wood, or Metal resource node in Craglorn only (including beasts that drop Leather Scraps).
- Triune: An Exemplary item of this trait is a rare reward from Conquest Board repeatable quests in Cyrodiil. The trait material, Dawn-Prism, can be purchased from War Researcher NPCs in Cyrodiil for 25,000 Alliance Points.
- Infused (Jewelry): Exemplary Infused items can be occasionally discovered inside Psijic Portals. These portals only become visible once you have joined the Psijic Order as part of the Summerset Chapter main quest line, granted by the See the Unseen passive (which is unlocked automatically). The material, Aurbic Amber, is found in the same place, either whole or in Pulverized form. Combining 10 Pulverized Aurbic Ambers at a Jewelry workstation creates a complete Aurbic Amber.
- Protective: You can obtain Exemplary Protective items by completing the storylines of Summerset (Ring) and the Psijic Order (Necklace). The material for this trait, Titanium, is acquired in Pulverized or complete form when mining Jewelry resource nodes.
- Swift: These Exemplary items are rarely acquired from daily Jewelry Crafting Writs. To acquire the material, you must exchange 5 Writ Vouchers for each with Rolis Hlaalu.
- Harmony: When you buy Undaunted Coffers from any of the Undaunted Pledge quest givers, there’s a chance it will also contain an Exemplary Harmony item. You can get the material, Dibellium, as a mailed reward from completing Random Normal/Veteran Dungeon queues.
- Bloodthirsty: The first time you complete a Trial each week, you’ll receive a special coffer as a reward from that Trial’s repeatable quest. This coffer has a chance to contain Exemplary Bloodthirsty items, as well as the material required for this trait, Slaughterstone.
Here at WtU, we have many crafters who know these traits and would happily make you a researchable item in exchange for the relevant trait gem! Ask in guild chat or the Discord.
Consumable Crafting
Consumable crafting is quite different from equipment crafting since, as the name suggests, the items made with these skills are consumed upon use. This field encompasses the skills of Alchemy, Enchanting, and Provisioning. Since these are all quite different from each other, they’ll each get their own sections here.
Alchemy
Alchemy is the fine art of creating potions and poisons from ingredients you find out in the world. By combining ingredients with matching traits and a solvent of sufficient strength, you can create potions and poisons with a variety of effects, many of which are extremely useful in endgame PvE and PvP alike.
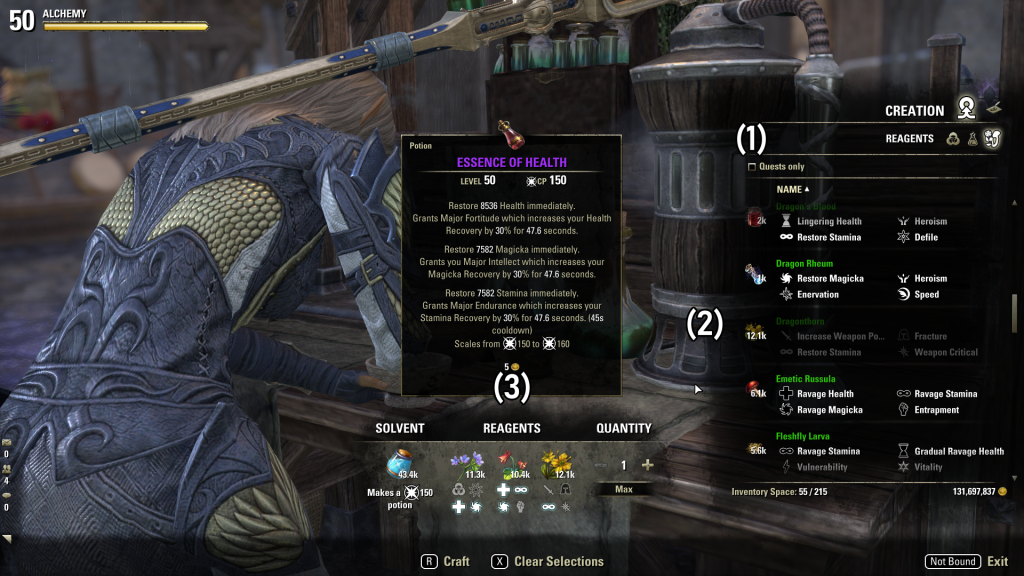
- Options: With the three icons near the top, you can swap between All, Solvents (waters and oils that determine the level of the resulting consumable), and Reagents (ingredients with traits that can be combined). The checkbox here allows the UI to highlight ingredients that will produce the desired effects for any writ quest you currently have.
- Ingredients List: Here you’ll see a list of all the ingredients you have in your possession that satisfy the filters set above. Solvents will show what level of consumable they make, while reagents will list any known traits.
- Combination: This section shows the items you’re about to combine, as well as the result of that combination, if there is one. Reagents with matching traits will see those trait icons highlighted in blue and added to the result’s effects, but reagents with conflicting traits (like Restore Health and Ravage Health) will be highlighted in red and cancel each other out. As with other crafts, you can also set the quantity here using the +, –, Max, and Min buttons or your scrollwheel. Each attempt will create one potion or four poisons; this number is further multiplied by your rank in the Chemistry passive, reaching a maximum of four potions and sixteen poisons. At first, you will only be able to combine two reagents, but at Alchemy level 15, the Laboratory Use passive enables a third slot and even more potent combinations.
Learning Alchemy Traits
Just like the single-player TES games, a way to quickly learn the first trait of a reagent is to simply eat it, by right-clicking the reagent and selecting Use from the menu. To learn additional traits, you’ll have to make combinations of reagents that match.
If you don’t have every trait learned for the reagents you’re trying to use, you’ll see different tooltips above section 3.

While these tooltips are helpful, you may wish to optimize your trait learning even further. Since this guide is already quite long, I will instead direct you to the UESP’s recommendations: Online:Alchemy. There are also addons (like Dolgubon’s Lazy Alchemy Learner) to automate this process.
Additional Alchemy Notes
The duration of your alchemical consumables can be improved in two ways: by combining a third reagent with the desired trait, and the Medicial Use passive, which improves the durations of your potions (but not poisons) by up to 30%.
Furthermore, when making potions, it’s possible to combine ingredients that have harmful effects, such as Breach or Cowardice, if two of your reagents have those traits and nothing to cancel them out. In these cases, the resulting potion will inflict you with these ailments, in addition to any positive effects it may have had. The Alchemy passive Snakeblood reduces the harmful effects of potions combined this way, and can even remove them entirely; however, it’s also easy to simply avoid such combinations.
Alchemy Reagents and Where to Find Them
There are six distinct types of alchemy reagents, each found from different sources. Reagents of the first three types can potentially spawn from any resource node of its type. The remaining three only come from specific sources.
- Grassy: These are plant reagents found in grassy areas. This category includes Blessed Thistle, Bugloss, Columbine, Corn Flower, Dragonthorn, Lady’s Smock, Mountain Flower, Nightshade, and Wormwood.
- Mushroom: These will typically grow in shady environments, near the bases of trees, in caves, etc. Here we find Blue Entoloma, Emetic Russula, Imp Stool, Luminous Russula, Namira’s Rot, Stinkhorn, Violet Coprinus, and White Cap.
- Water: As the name suggests, you’ll find these near or slightly within bodies of water. This small group consists only of Crimson Nirnroot (only found in Blackreach!), Nirnroot, and Water Hyacinth.
- Insects: This is a varied group, found either by collecting flying insects, or occasionally found on undead or chaurus. Here you can find Beetle Scuttle1, Butterfly Wing2, Chaurus Egg3, Fleshfly Larva2,3, Scrib Jelly1, Spider Egg1, and Torchbug Thorax2.
- Incursions: Here we have ingredients that can only be acquired from completing specific DLC incursion events; specifically, Dragons and Harrowstorms. This includes Dragon’s Bile, Dragon’s Blood, Dragon Rheum, and Vile Coagulant.
- Clams: The final two alchemy ingredients can be found within Giant Clams, which spawn all along the coasts of Summerset and High Isle. In them you can sometimes find Clam Gall or Powdered Mother of Pearl.
1: defeat the appropriate insect, large or small.
2: pick the appropriate insect out of the air.
3: found on specific enemy types (chaurus and undead).
Enchanting
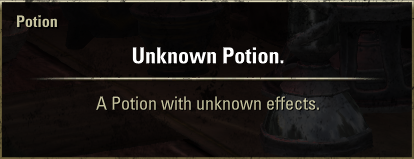
Enchanting is how you combine runes, found in runestones out in the world, into glyphs. These glyphs can then be applied to armor, jewelry, and weapons to grant additional benefits. Like alchemy, you need to learn what each rune does by using it to make a glyph; however, unlike alchemy, there’s no combination that doesn’t result in a glyph.
- Options: With these buttons you can choose Creation or Extraction. Creation allows you to create new glyphs, while Extraction will attempt to extract the runes from an existing glyph, though it will not always be successful. Below those options, you have the choice of viewing All runes, or just the Potency, Essence, or Aspect runes, discussed in more detail below.
- Rune List: Here you’ll see the set of runes you chose above. Unlike alchemy, the UI doesn’t show you the translation or effects at a glance – you’ll have to hover over the rune for a translation, see 3.
- Rune Tooltip: This shows the rune you’re currently hovering over, as well as its translation, if you know it. Unknown translations will simply be a ?.
- Assembled Runes and Result: Below, the runes you’ve currently selected are slotted into the UI. Only one rune of each type can be used. This area also allows you to make multiple runes, using the +, –, Max, and Min buttons on the right. Above, the resulting glyph is displayed, once you have one rune of each type. If you don’t know the translation of any of the slotted runes, an Unknown Glyph tooltip will display instead.
Rune Types
Potency
Potency runes determine the level range of the resulting glyph, as well as whether the effect will be “positive” or “negative” for the selected Essence. Negative potencies are not a bad thing, like poisons are to potions; instead, it indicates a reversal of the energy type in question. See the Essence section for more details. All Potency runes can be purchased from Enchanter NPCs for 30-111g, depending on their level, or rarely acquired from runestones.
Essence
Essence runes are tied to a distinct energy type; channeling this positively or negatively changes how the glyph ultimately functions, and where it can be applied. These runes are the most common result of farming runestone nodes.
Aspect
Aspect runes only serve to determine the final quality of the resulting glyph, from Normal to Legendary. These can also be acquired from runestones, but the higher-quality runes are much rarer than other types.
Provisioning
With Provisioning, you use recipes to combine ingredients into foods or drinks that improve a character’s attributes. The recipes are the key: unlike Alchemy and Enchanting, you can’t simply combine ingredients you know would work. Recipes are divided into two types: food and drink. With some exceptions, food will improve maximum attributes, while drinks will improve attribute recoveries.
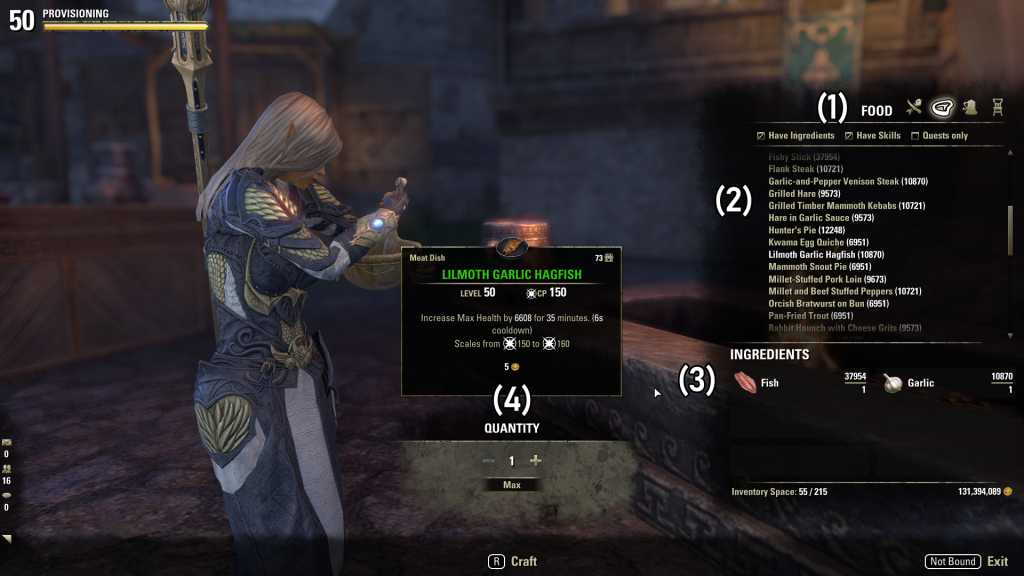
- Options: These buttons determine what you’ll be doing at the provisioning station. The first button is unusual: it allows you to Fillet fish en masse. Then there’s Food and Drinks. Below, the checkboxes toggle what recipes you’ll see in the list: those you Have Ingredients for, those you Have Skills for, and any that apply to your Quests only (for writs).
- Recipe List: Here you’ll see a list of all the recipes you’ve learned so far, presented alphabetically and sorted into eight categories each for food and drinks. The first three categories influence a single attribute, the second three influence a pair of attributes, and the seventh influences all three attributes. The eighth category is the same for both types, Delicacies, and the recipes found here tend to influence some combination of both a max attribute and an attribute recovery.
- Ingredient Requirements: This section shows the ingredients required for the selected recipe. Your total amount of the ingredient in your bag, Craft Bag, and bank is shown on top of the line, and the amount required is below it.
- Result: The tooltip above shows the resulting food or drink to be created. Below you have the quantity options, where you can use the +, –, Max, and Min buttons or your scrollwheel to set how many of the resulting food or drink you want to make. As you improve the Chef and Brewer passives, you’ll make more food or drink with each craft, to a maximum of four per craft.
Recipe Types
As mentioned above, both foods and drinks have eight categories. The category determines the quality of the dish, how many attributes it affects, and its duration. To craft higher-quality consumables, you must increase your rank in the Recipe Quality passive. Durations can be improved through the Gourmand and Connoisseur passives, each adding up to 20 minutes to any food or drink you consume, respectively. Note that these passives increase the duration of food you eat, not what you craft!
- Meat Dishes/Alcoholic Drinks: Fine quality, improving Maximum Health or Health Recovery. 35 minute duration.
- Fruit Dishes/Tea: Fine quality, improving Maximum Magicka or Magicka Recovery. 35 minute duration.
- Vegetable Dishes/Tonics: Fine quality, improving Maximum Stamina or Stamina Recovery. 35 minute duration.
- Savouries/Liqueurs: Superior quality, improving Maximum Health/Magicka or Recoveries. 1 hour duration.
- Ragout/Tinctures: Superior quality, improving Maximum Health/Stamina or Recoveries. 1 hour duration.
- Entrement/Cordial Teas: Superior quality, improving Maximum Magicka/Stamina or Recoveries. 1 hour duration.
- Gourmet/Distillates: Epic quality, improving Maximum Health/Magicka/Stamina or Recoveries. 2 hour duration.
- Delicacies: Unique dishes from events and DLC that affect a variety of attributes, or special effects. 2 hour duration.
Finding Recipes
Recipes from the first seven categories can be found all over the place, most typically in containers like furniture (desks, wardrobes, etc.) and backpacks. Additionally, the food and drink recipes used for daily crafting writs can be purchased from Chef and Brewer NPCs when you unlock new ranks in the Recipe Improvement passive. When finding recipes in the world, they will tend to be for foods or drinks close to your level range.
Delicacies, however, come from specific sources. These sources vary widely, and are explained in detail below.
- Psijic Recipes: These recipes boost XP gain, rather than improving any attributes. Because of this, they can be stacked with other food or drinks. Psijic Ambrosia (+50% XP gain) is acquired as fragments from Provisioning daily writs – combine the seven fragments together to make the recipe. The recipe for Aetherial Ambrosia (+100% XP gain) is purchased from Rolis Hlaalu for 250 Writ Vouchers. Lastly, the Mythic Aetherial Ambrosia (+150% XP gain) requires the Aetheric Cipher, an exceedingly rare drop from enemies in base game zones, to be combined with a Psijic Ambrosia recipe. Unlike every other Delicacy, these recipes only last a base of 30 minutes.
- PvP Recipes: These recipes instead increase the amount of XP earned for the Assault and Support Alliance War skill lines specifically, by multiplying the AP you earn in PvP areas (note that they do not increase the amount of AP you actually earn, only the XP you gain in those skill lines for earning that AP). Like the Psijic Recipes above, these can be stacked with other food or drink. This category includes the Colovian War Torte (+50%), which can be rarely found in place of a resource node in Cyrodiil; the Molten War Torte (+100%), which combines a Colovian War Torte recipe with Chef Arquitius’s Torte Dissertation, which costs 500,000 Tel Var; and the White-Gold War Torte (+150%), which combines the Colovian War Torte recipe with Chef Arquitius’s Lost Thesis, a rare drop from completing a Battleground match.
- Wrothgar Recipes: Orzorga’s Blood Price Pie, Orzorga’s Red Frothgar, Orzorga’s Tripe Trifle Pocket, and Orzorga’s Smoked Bear Haunch all come from a quest chain in the Wrothgar zone. You can find Orzorga on the platform above the Morkuldin Forge POI.
- Clockwork City Recipes: Deregulated Mushroom Stew, Spring-Loaded Infusion, and Clockwork Citrus Filet are acquired from a quest chain in the Brass Fortress’s Slag Town Outlaws Refuge, given by Brengolin.
- Artaeum Recipes: Artaeum Pickled Fish Bowl (which also improves your odds of finding trophy fish) and Artaeum Takeaway Broth can be found in Waterlogged Psijic Satchels, fished up from the mythic waters of Artaeum. Unlike other recipes, these are Bind on Pickup and cannot be traded; however, the unopened satchels can be.
- Jester’s Festival Recipes: Princess’s Delight, Candied Jester’s Coins, Jewels of Misrule, and Dubious Camoran Throne are all acquired as occasional rewards from Jester’s Festival Boxes, which you receive for completing the event’s repeatable quests.
- Witches Festival Recipes: Sweet Sanguine Apples, Bowl of “Peeled Eyeballs”, Crisp and Crunchy Pumpkin Snack Skewer, Crunchy Spider Skewer, Frosted Brains, Ghastly Eye Bowl, Witchmother’s Party Punch, Witchmother’s Potent Brew, Bewitched Sugar Skulls, Corrupting Bloody Mara, Pack Leader’s Bone Broth, and Purifying Bloody Mara all have a chance to drop from Plunder Skulls, given out as rewards for defeating bosses and completing event-specific repeatable quests during the Witches Festival.
- New Life Festival Recipes: Alcaire Festival Sword-Pie, Old Aldmeri Orphan Gruel, Rajhin’s Sugar Claws, Snow Bear Glow-Wine, Bergama Warning Fire, Betnikh Twice-Spiked Ale, Jagga-Drenched “Mud Ball”, Lava Foot Soup-and-Saltrice, and Hissmir Fish-Eye Rye (which also highlights and identifies fishing holes) can all appear within New Life Festival Boxes, acquired by completing New Life Festival repeatable quests.
Finding Ingredients

Provisioning ingredients might seem hard to source at first, if you don’t know where to look. Unlike every other craft, Provisioning lacks traditional resource nodes; instead, you’re most likely to find them inside various containers like crates, barrels, and sacks, making delves and dungeons a great source. Many ingredients also have specialized containers you can find in the world, like Flour Sacks, Greens Baskets, Honey Jars in West Weald, etc. And of course meats can be acquired from wild animals you’ll find on your adventures. Provisioning also has some unique ingredients with their own specific sources:
- Frost Mirriam and Bervez Juice are primarily sourced from daily writs and Hireling mails. These are used in many advanced recipes, especially Gourmet and Distillates.
- Perfect Roe is rarely acquired by filleting white-quality fish (like Salmon or Slaughterfish). They’re used for Psijic Ambrosia and several other recipes.
- Aetherial Dust (for Mythic Aetherial Ambrosia) is very rarely received from base game resource nodes of any type. Its weaker variant, Diminished Aetherial Dust (for Aetherial Ambrosia), can be purchased from Rolis Hlaalu for 50 Writ Vouchers.
- Cyrodiil Citrus (Colovian War Torte) is a common reward for repeatable settlement quests within Cyrodiil. Rubyblossom Extract (Molten War Torte) can be purchased from Imperial City General Merchants for 100,000 Tel Var. Mourning Dew (White-Gold War Torte) can very rarely be acquired through harvesting resource nodes in Cyrodiil.
Conclusion
This covers all the basics of crafting! But this is only Part 1 of the Comprehensive Crafting Guide – there’s plenty more to come! In future parts, we’ll discuss Crafting Writs and Furniture Crafting. For now, though, you should be well equipped to handle crafting in general. In the meantime, if you have any questions not covered by this guide, you can find me on Discord and in ESO as @Circuitous – feel free to reach out in any way you like. Thank you for reading!