Hello! This is a beginner’s guide on how to deal more damage in PvE content. Many players struggle with developing the techniques needed to do well as a DPS, and this guide aims to teach them
This guide is designed for PvE DPS and will focus on group trials and dungeons, though this information is largely applicable to overland and solo content as well. (This guide will not help you in PvP)
This guide is updated for U46 (June 2025)
Table of Contents
- DPS Overview
- Assembling Your Build
- Setting Up Your Skill Bars
- Using Your Skills
- Handling Groups and Mechanics
- What Not to Focus On
- Practice on the Dummy
DPS Overview
First, let’s go into a brief overview of what your goals are as a DPS in a group
- Dealing damage! This one is intuitive of course. As a DPS your job is to deal as much damage as you can to kill enemies as fast as possible
- The faster enemies die, the faster you’ll get through the fight, and the fewer times you’ll see challenging mechanics that might kill your group
- Handling mechanics. Mechanics will of course happen, and some of them are the responsibility of the DPS. Every fight is different, so listen to your leader for insight. As examples:
- Some fights have stacking mechanics where everyone needs to gather close together, or anti-stacking mechanics where everyone needs to spread out
- Some fights have “portal” mechanics where several DPS travel to a different area of the fight to kill a miniboss
- Reviving fallen allies. If someone dies, it’s the job of the DPS to revive them. Tanks are much too busy blocking blows from the boss, and healers are busy putting out heals to make sure no one else dies too. If you see someone dead, don’t hesitate to rez as soon as it’s safe to do so. You’ll lose out on some damage, but your group will be much better off without a dead DPS doing no damage for the rest of the fight
Assembling Your Build
This section will discuss how to ensure you have a complete build. However, deciding exactly which skills and gear and champion points to use is much more complex than can be detailed in this guide. Look to a build guide or post in the guild Discord for more focused help
Quick Guide to Stats
First let’s get a basic idea of what each of our offensive stats do, to guide us in making our build. These stats can all be seen on your Character menu (C key). Remember that they may increase when you start getting buffs from your skills and other players in combat, so the numbers on your Character screen when you’re out of combat may not tell the full story
- Maximum Stamina/Magicka: These are your resource pools, but they also impact your damage directly. Your damage will scale higher based on the value of whichever of these stats is larger. If your Max Magicka is higher, then more Max Magicka will increase your damage, and similarly for Max Stamina
- Since only our higher stat affects our damage scaling, we want to choose just one stat and build it as high as possible. Any attribute points or enchantments going into the other stat are wasted in terms of damage
- Stamina/Magicka Recovery: Your resources regenerate constantly, giving you resources every two seconds, and this value tells how much you get. If your Stamina Recovery is 600, you’ll get 600 stamina back every two seconds
- Weapon/Spell Damage: Like Max Stamina and Magicka, these stats increase your damage directly
- Again, only the higher value technically matters, but you’ll rarely be given just one or the other; almost all sources of these stats provide both together, so you don’t really have to worry about building into just one
- Penetration (a.k.a. Offensive Penetration or Physical/Spell Penetration): This stat breaks through enemy armor (or “resistance”) that reduces damage to them. Every 500 armor points negates 1% of our damage, so an enemy with 18,200 armor takes 36.4% less damage from us. Penetration directly counters armor; every point of penetration removes a point of armor from the enemy, so 1000 penetration will change that 36.4% resistance to 34.4%
- Dungeon and trial enemies always have 18,200 armor to penetrate, and overland enemies have 9100
- Penetration is the strongest stat to build into to do more damage, but only up to that 18,200 mark. Any more pen will have no benefit since the enemy has no more armor to break through. Remember that your tank and other group supports will be providing lots of buffs and debuffs for you, so there’s no need to actually build your penetration all the way to that nearly impossible 18,200 value
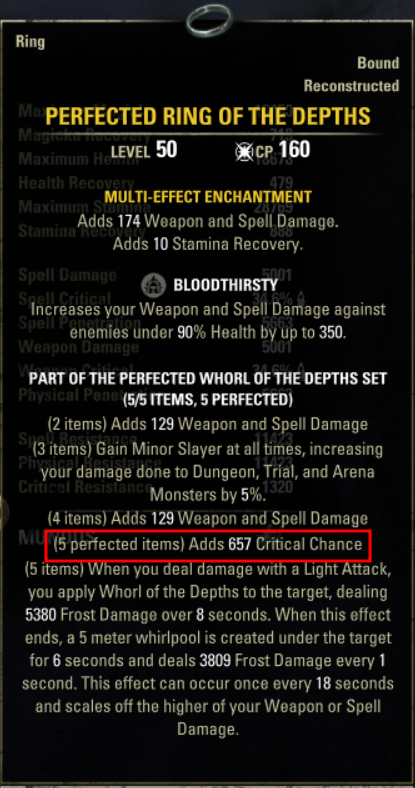
- Critical Chance (a.k.a. Weapon/Spell Critical): All of our attacks have a random chance to critically strike, dealing lots of extra damage. This stat shows how often this will happen
- Many references to critical chance use a strange numerical value, where every 219 Critical Chance is equivalent to 1%. Therefore a bonus giving 657 Critical Chance is adding 3%
- Critical Damage: This stat shows how much extra damage your critical hits do. We have 50% critical damage by default to crit for 1.5 times an effect’s usual damage
- Critical damage caps at 125% (i.e. double damage plus 25% more); any higher will have no benefit
- Find this stat by expanding the Advanced Stats on your stats display. (The value shown gives only your additional crit damage above the 50% base, so add 50% to find your actual crit damage)
Basic Checklist
Now we’ll start with a checklist of basic setup to do on your character. This can be a long process; farming the gear and transmute crystals to get everything just right can of course be a significant endeavor. You don’t need to get everything perfect (especially if you think you might make more changes soon), but at least put a little effort into each of these steps
- Equip a mundus stone boon.
 Thief (+1212 critical chance, or 5.5%) is best most of the time, but
  Lover (+2744 penetration) can work well if you don’t have much penetration. We’ll be using Divines trait on our armor to increase our mundus bonus even higher
 - Pick either Max Stamina or Max Magicka to build into, and stick with it. Only the higher stat impacts our damage scaling, so build just one stat as high as possible. This means using the same stat for your attributes, your armor enchantments, and your choice of food
- Using some skills of the opposite stat, however, is both okay and recommended
- Make sure your attribute points are set: everything into one stat, 64 stamina or 64 magicka
- Putting points in health is generally not recommended since stamina/magicka raises our damage, but if you want some extra survivability you can drop a few in there
- Use full sets of gear. The last bonus on a set is almost always the most powerful, so make sure to use full sets and not just mix and match arbitrary items. Usually this means two full five-piece sets
- Optimized sets are always best, but wholly unnecessary for respectable damage. If you’re just getting started, craftable sets are an excellent option that will be easy to obtain from a fellow guild member. From there, just work your way up
- Use proper offensive weapons. Each bar should be one of these: dual wield, two handed, bow, or destruction staff. Shields and restoration staves are for tanks and healers and will perform poorly at dealing damage
- Make sure all your gear has enchantments:
- Armor gets Max Stamina/Magicka based on your choice of resource
- Jewelry gets Weapon/Spell Power (or Stamina/Magicka Recovery if needed)
- Frontbar weapon gets Poison, Flame, or Absorb Stamina (for dual wield, pick two)
- Backbar weapon gets Weapon Damage (for dual wield, add one of the above)
- Make sure most of your gear has good traits. Weapons are the most important to have good traits for, followed by jewelry and then armor
- Armor gets Divines
- Jewelry gets Bloodthirsty
- Frontbar weapon gets Precise (or use Nirnhoned + Charged or Charged + Charged for dual wield)
- Backbar weapon gets Infused
- Upgrade your weapons. Purple quality will do just fine for most content, though gold is often worth the expense for more advanced trials and dungeons. Only splurge the mats for gold quality if you’re sure you’ll be using the weapons for a long time
- In contrast, gold armor and jewelry are very much not worth the expense. These upgrades give extremely small benefits to a DPS and can be skipped by all but the very most advanced of players. Purple or even blue is normally plenty
- Use a food or drink buff. Foods are normally ideal because they have bonuses to Maximum Stamina or Magicka which will boost our damage, but certain drinks will have these bonuses too. Choose one of these based on how much health and sustain you need. Naturally it should match your stamina/magicka resource choice
- Max Resource + Max Health (
 Braised Rabbit with Spring Vegetables,
  Melon-Baked Parmesan Pork, or lower-level Ragouts and Savories with similar buffs)
 - Max Resource + Recovery (
 Lava Foot Soup-and-Saltrice,
  Ghastly Eye Bowl)
 - Max Resource + Max Health + Recovery (
 Dubious Camoran Throne,
  Witchmother’s Potent Brew)
- Max Resource + Max Health (
- Use potions
- For most content, the

 Essence of Stamina/Magicka potions you loot from the world will be plenty. Crafting more complex potions can get pricey, but you can consider
  tri-stat potions (Health + Stamina + Magicka) or
  Weapon Power / Spell Power potions if you need more buffs
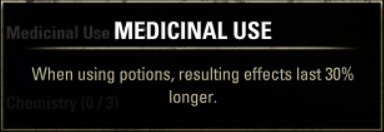
 - Level the Medicinal Use passive in the Alchemy tree to ensure your buffs don’t run out before you can drink another potion. (This does unfortunately require extensive Alchemy leveling, but without this passive your potion uptimes will suffer)
- For most content, the
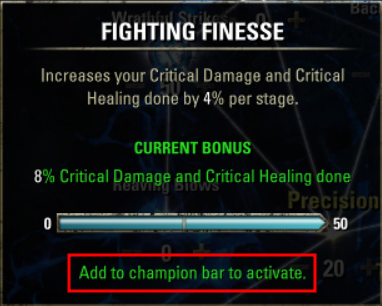
- Spend your Champion Points (level 50+). Don’t forget to add your slottable CP to your Champion Bar, or they won’t have any effect
Buffs
A good assortment of buffs can easily add an extra 10 to 20% of your damage. In group content, your healers and tanks will often be providing a fair amount of buffs and debuffs, but there are several that they can’t normally give you that you will be best off finding your own sources of
If you’re fighting solo without supports to buff you, even a few more buffs may be useful to you
At the least, consider obtaining the following buffs. A comprehensive list of ways to get each buff can be found here, but I’ll list the most common and simplest ways to get the buffs below. If you’re using scribing skills, an affix script providing a buff you’re missing can also be a great move
- Major Brutality/Sorcery (+20% weapon or spell damage) (you only need one of these, though most sources will provide both anyway)
- Get this buff from
 Degeneration or certain class skills
 - You can also get this buff from weapon or spell power potions, though making enough potions to keep this buff up at all times can be expensive
- Get this buff from
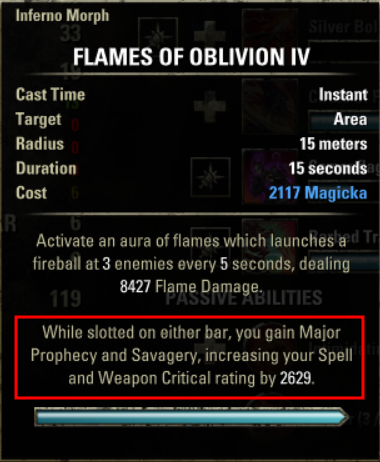
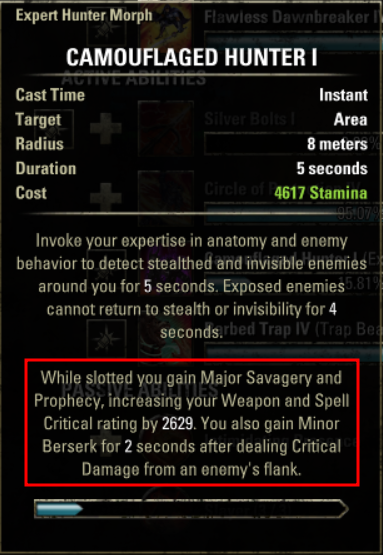
- Major Savagery/Prophecy (+2629 critical chance, or 12%) (again, only need one but will likely get both)
- Get this buff from
 Camouflaged Hunter,
  Inner Light, or certain class skills
 - Like Brutality/Sorcery, you can get this buff from weapon or spell power potions
- Get this buff from
- Minor Force (+10% critical damage)
- Get this buff from
 Barbed Trap or the Velothi Ur-Mage Amulet mythic
- Get this buff from
- Minor Slayer (+5% damage done in dungeons, trials, and arenas)
- This buff comes from certain DPS-focused sets that are obtained from trials. It is normally ideal for your build to include one set with the Minor Slayer buff. If you haven’t run many trials yet, you may consider joining some runs to get these great sets
Also consider Major Resolve for a defensive buff, as well as Minor Resolve, which can be sourced from the ![]() Resolving Vigor skill, which is already one of the best self-healing skills available
Resolving Vigor skill, which is already one of the best self-healing skills available
Settings Adjustments
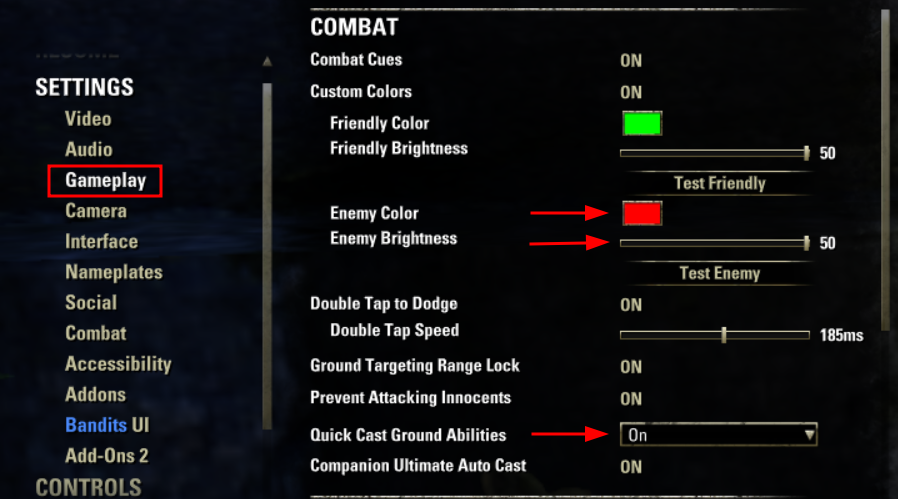
As another step of basic setup, consider a few changes to your settings to make your life a lot easier in combat:
- First, change enemy AoE brightness all the way up. This will make it much easier to see harmful areas you don’t want to be standing in. Also consider switching from red to a brighter color; many people prefer a bright pink or white to stand out against certain terrain
- Next find the Quick Cast Ground Abilities setting and turn it on. Without this setting, certain ground-targeted skills will take two button presses to cast; we want them to only take one press for much smoother casting
Finally, always make sure your camera is in third person mode and zoomed all the way out. It’s important for our field of vision to be as wide as possible for situational awareness
Setting Up Your Skill Bars
The first step to using your skills well is to read their tooltips. Make sure you understand, at least generally, what they do. Is the skill single-target, or does it do area damage? Does it do extra damage under certain conditions, like when the boss has low health? Does it do steady damage over time, or does it ramp up as it ticks or do all of its damage in one big burst at the end of its timer? Does it give any buffs or special effects?
Once you’ve read some of your skill tooltips, let’s get our skill bars set up
Choosing Your Skills
- One spammable. This is a skill that does lots of damage right when you cast it, so you can spam it every second to do a bunch of dps while your timer skills are busy ticking
- Your spammable should use your main resource, not your off-resource, since you’ll be casting it often
- Some fights are conducive to a single-target spammable (which does lots of damage to one target), and some have more adds around so that an AoE spammable is more ideal (which will hit more targets but usually do a bit less damage to each). You might consider having two different spammables in mind to swap between fights
- Examples:
 Cephaliarch’s Flail,
  Molten Whip,
  Ricochet Skull,
  Biting Jabs,
  Lethal Arrow,
  Whirling Blades,
  Carve
Carve
- Possibly an execute spammable, depending on your class skill lines. These skills do very high damage, but only when the enemy’s health is low, so they will give us lots of extra damage toward the end of a fight. Slot this alongside your regular spammable. There are only two good execute spammable skills
- Execute spammables:
 Assassin’s Blade,
  Radiant Destruction
- Execute spammables:
- A bunch of damage skills with timers. These skills are meant for you to cast them, and then leave them alone for a while while their timers tick. This includes DoT (damage-over-time) skills, which do small ticks of damage over a period of time; pets and summons; and delayed damage skills, which wait for some time and then do a large burst of damage. Most builds will do best with 6 to 9 DoTs, pets, and other timered skills
- Utility skills. These might include self-healing skills and buff skills. Heals that heal several allies are generally not worth slotting, because they’ll put out a lot less healing per person than a skill that heals just you. If you’re in a group with a healer, one healing skill is usually enough to keep yourself alive in an emergency; let healers do most of the healing so that you can focus on damage. Solo players may consider some extra defensive buffs
- Healing examples:
 Resolving Vigor,
  Critical Surge
 - Buff examples:
 Inspired Scholarship,
  Summoner’s Armor,
  Bull Netch, Critical Surge,
  Banner Bearer
 - Passive buff examples:
 Bound Aegis, Inner Light
- Healing examples:
Since using the right sort of skill as a spammable can be a pain point for many new players, and there are relatively few good spammables, I’ve included a comprehensive list here:
Good Spammables
These spammables are very good
Single target: ![]() Molten Whip,
Molten Whip, ![]() Flame Skull (either morph),
Flame Skull (either morph), ![]() Veiled Strike (either morph),
Veiled Strike (either morph), ![]() Crystal Fragments,
Crystal Fragments, ![]() Dive (either morph),
Dive (either morph), ![]() Snipe (either morph),
Snipe (either morph), ![]() Flurry (either morph),
Flurry (either morph), ![]() Wrecking Blow,
Wrecking Blow, ![]() Force Shock (either morph),
Force Shock (either morph), ![]() Silver Shards
Silver Shards
AoE: ![]() Cephaliarch’s Flail,
Cephaliarch’s Flail, ![]() Puncturing Strikes (either morph)
Puncturing Strikes (either morph)
Additional spammables can be built with the scribing system. They’ll usually be a little lower damage but can be set up to give you buffs
Situational Spammables
These spammables are a bit less strong. Only use them if you have a particular reason to (e.g. you need an AoE spammable and your class doesn’t have one)
Single target: ![]() Runeblades (either morph),
Runeblades (either morph), ![]() Stone Giant
Stone Giant
AoE: ![]() Death Scythe (either morph),
Death Scythe (either morph), ![]() Drain Power (either morph),
Drain Power (either morph), ![]() Acid Spray,
Acid Spray, ![]() Whirlwind (either morph),
Whirlwind (either morph), ![]() Cleave (either morph),
Cleave (either morph), ![]() Pulsar
Pulsar
Arranging Your Skills
We’ll get the most damage by loading lots of buffs and bonuses onto one bar specifically, and then staying on that bar as often as we can. Our frontbar will have stronger weapon stats and traits, and sometimes we’ll even put extra buffs active on just the frontbar
For our backbar, we’re not as interested in high stats per se; rather, our backbar will focus on long timered effects that will stay active for as long as possible, so that we can switch back to our high-damage frontbar and still have them running
With this system in mind, we’re going to arrange our skills so that we can stay on our frontbar for as much of the time as possible, and only go to our backbar to refresh long DoTs and other timers. Skills that we want to use a lot go on the frontbar; skills that have long timers that we don’t need to cast often can go on the back. Here are guidelines to how to fill up your skill bars
Don’t put a skill on both bars unless you have a good reason to. Usually this is just a waste of an extra skill slot you could have used for an extra DoT skill to do more damage. Using the same skill twice won’t stack its effects even if you’ve slotted it twice, so do your best to slot ten distinct skills on your bars (minus a few particular skills that need to be double-barred)
Start by filling up your frontbar, and then drop remaining skills on your backbar. Your frontbar should include, roughly in priority order:
- Your spammable
- Your execute spammable if you have one
- Buff skills that are only active when you’re on that bar
- This includes skills that you may be slotting in part, or solely, for an effect given by a passive skill in the skill’s skill line, for instance slotting a Fighters Guild skill for the Slayer passive
- Skills with a short timer (10 seconds or less)
- Any other skills that you expect to use especially often
- Anything else that happens to fit on this bar
Your backbar should include:
- One very specific skill from your backbar weapon’s skill line: either
 Blade Cloak (dual wield, either morph),
  Stampede (two handed),
  Volley (bow, either morph), or
  Wall of Elements (destruction staff, either morph)
- As well as dealing strong damage per se, these AoE DoT skills have the additional benefit of proccing your backbar enchantment. Other weapon skills on your backbar, as well as light attacks, will proc this powerful enchantment just once when cast, but these particular four skills will continue proccing it for as long as the skill is running, and even while we’re on our frontbar
- Whatever didn’t fit on the frontbar. These should mostly be skills with long timers, or passive effects that carry over to your frontbar
Some skills need to be slotted on both bars to work properly. This includes:
- Sorcerer and warden pet summons, which will unsummon if you switch to a bar they’re not slotted on
- The Banner Bearer skill, which will similarly deactivate under that condition
and may also include:
- Any skills that give a passive buff that doesn’t cover both bars. You may want to double-bar such a skill, or you may find it adequate to just use it on your frontbar
The example tooltips below show the distinction between buffs that only buff you when you’re on that bar, and buffs that carry over to the other bar too. Notice that Flames of Oblivion specifies it gives its buffs “while slotted on either bar”
If you’re using an arena weapon, make sure to put the particular skill the set buffs on the same bar as the weapon. For instance, the Crushing Wall weapon from Maelstrom Arena buffs the Wall of Elements skill, so Wall would need to be slotted on the bar this weapon is on

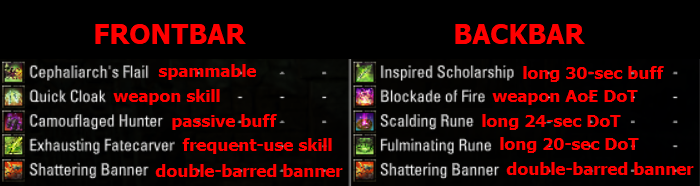
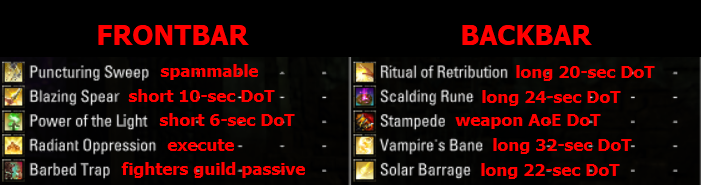
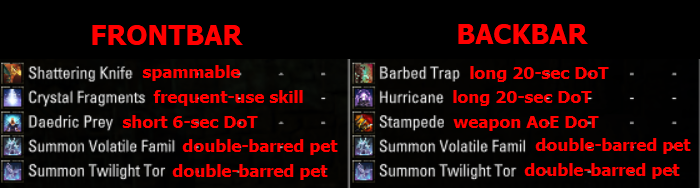
Examples
Here are some example skill loadouts, with descriptions of the logic behind why I’ve placed which skill on which bar
Using Your Skills
Having a good build will only get you so far. By far the biggest factor in your damage production is your own personal proficiency at a good skill rotation: casting the right skills at the right time at the right speed. This section will go into more detail on how to do this
Casting Speed
ESO is secretly a rhythm game at 60 BPM
— a trial leader in another of my guilds
To understand how to cast our skills, we need to understand their Global Cooldown (or GCD). After you cast a skill, there’s a one-second cooldown before you can cast another skill. You can see this for yourself by spamming your skill buttons as fast as you can at an enemy. They won’t all cast; you’ll only see a skill cast once every second
One of the most critical mistakes most people make when learning to do more damage is simply casting skills too slowly. This can happen for two reasons: pushing skill buttons slowly, or spamming them really fast so that they don’t really cast at the right times.
We want to make sure skills cast as fast as possible; the faster you cast skills, the more damage you’ll do. This means casting skills on that one-second GCD; you should aim to cast skills at as close to one skill per second as possible
- Correct skill casting is done on a rhythmic pattern. Cast a skill, wait a second, cast a skill, wait a second
- It can be tempting to just frantically spam skills over and over until they cast, and sometimes this can get your casts out at a reasonably fast rate. But doing this a waste of your energy and attention, and you’ll get better results by casting at a steady rate; stick to a one second rhythm
Consider practicing on a dummy using a metronome to get a feel for the rhythm. Combat Metronome is a good addon designed to help teach this rhythm
Another good option is using a generic online metronome. Start off with a slower beat of maybe 45 or 50 BPM— don’t stress yourself trying to get a one second rhythm right away— and work your way up
Developing the muscle memory of casting at one skill per second is one of the best things you can do for your damage
Light Attack Weaving
A second technique to master is light attack weaving. Casting skills has a one-second cooldown, but light attacks do not fall under this cooldown. Therefore, it’s possible to squeeze in a light attack before each skill for extra damage. If you can successfully alternate skills with light attacks throughout a fight, you’ll be able to deal quite a bit more damage
In addition to doing damage per se, light attacks have the following benefits:
- Light attacks generate ultimate. Every time you land a light attack, you get a buff that gives you 3 ultimate per second for 9 seconds. (This buff is not shown on the UI)
- Light attacks proc your weapon enchantment to do a burst of damage or grant you a short buff
Many recent builds have been able to minimize the importance of light attacks by using the Velothi Ur-Mage Amulet. This mythic gives several damage buffs but mostly negates light attack damage. However, even though your light attacks do almost no damage, it’s still important to land a few light attacks once in a while for the benefits listed above
The correct time to cast your light attack is immediately before your skill cast. These screen captures demonstrate the correct speed and rhythm. (Click to play them)
Practicing
You probably won’t get a good one-second rhythm right away, and that’s okay! The first step to good weaving is to start slowly to understand the basic rhythm of “a light attack, then immediately a skill.” Pick a skill (ideally one that costs relatively few resources), and practice just this two step sequence at a dummy over and over. It doesn’t need to be once per second; just practice LA-then-skill until you understand the rhythm
Once you get this down, you can gradually move on to faster rhythms
Below is an example of weaving slowly. Click to play the screen capture
Rotation
Your rotation is what sort of order you cast your skills in: when you cast your skills to get the most damage out of them based on their timers. We have just three basic principles here:
- If one of your DoTs or other timers runs out, recast it so it can keep doing damage
- If none of your timers are running out, cast your spammable
- When your ultimate is ready, cast it (usually)
Let’s dig a little deeper into this
Refreshing Timers
We want to refresh our DoTs and other timers within a couple seconds of their timers running out. The longer you wait after they expire, the longer you’re not doing damage with them. You won’t hit the skill perfectly on cooldown every time, but you want to get close!
- Pay special attention to skills that do a big burst of damage at the end of their timers, or that ramp up in damage as they tick. These skills are especially important to not recast early or else you’ll lose out on that big end-of-timer damage
If a timer isn’t running out soon, don’t touch it. It’s already doing damage, and we can put out more damage by casting something else. Casting a skill that’s already active is called overcasting and is usually just a waste of a cast where you could have used your spammable instead
- Occasionally though, overcasting can be a good idea. For instance, if the enemy moves away from a ground effect we’ve just cast, going to the new position and recasting the skill to hit the enemy again is the right move. But if the enemy hasn’t moved, just leave that skill alone till it times out
The basegame default settings do us a disservice by only showing us the timers on our active skill bar. To effectively manage both bars, we want to be able to see timers for both bars. The settings have an option to show a little timer meter for our backbar, but we can do much better with addons. Consider Fancy Action Bar, or perhaps Action Duration Reminder

Spamming Your Spammable
This is straightforward enough. If none of your timers are running out, cast your spammable repeatedly until one is. Most spammables do a bunch of damage right when you cast them, so they’re perfect for squeezing in lots of extra damage between refreshing DoTs
If you’re using an execute spammable, switch to spamming this skill when the enemy hits the health threshold listed on the skill. Use your regular spammable before the threshold, and your execute spammable after
Casting Your Ultimate
Work your ultimate into your rotation as well. In general, whenever it’s ready you should go ahead and cast it. It can be tempting to put off using your ultimate till just the right moment, but ultimates usually refresh in only a minute or so, so it won’t be too long till you can cast it again. Make sure to keep up light attacking to get ult back as quickly as you can
- Occasionally a little discernment can be useful for ultimates, however. Is this the last quick add fight before the boss? You might save your ult for the boss. Is the boss about to move away from you? Then maybe wait a few moments till it’s in position so your ult isn’t wasted sitting in the wrong spot
- Most of the time though, just cast your ultimate when you see it’s ready
Putting It All Together
Here’s a second-by-second diagram of how a rotation might look. The X marks show where you might cast each skill, and after each cast you can see a countdown of how long the skill has left before it runs out, based on the skill’s cooldown on the left column
Your rotation doesn’t need to follow this chart precisely by any means, but hopefully this shows a little more clearly what it looks like to cast your DoTs on cooldown and spam your spammable in between

In this rotation, I’m prioritizing Power of the Light since it’s one of my highest damage skills, and making sure to cast it every 6 seconds exactly on cooldown. Then I’m casting my other skills around that 6-second rhythm: anytime a DoT is expired or about to expire, I cast that DoT. Otherwise, I spam Puncturing
We can notice a few more things here as well
- Your spammable (Puncturing Sweeps here) is by far the skill you’ll cast most. Many DoTs last 20 seconds or more, which leaves lots of downtime for spamming your spammable. You might spam your spammable several times in a row; this is a big contrast to DoTs, which you should only cast once at a time and then leave alone
- Sometimes multiple timers run out at once. If that happens, just do your best by casting one skill a little early or a little late
Naturally, switching between skills like this is going to involve a fair amount of bar swapping, but fortunately we’ve put all our shortest timers on our frontbar so that we can bar-swap as little as possible. Like light attacks, bar swapping can be done between skills, so a skillful player can press that button between casts without breaking their rotation. That’s a skill cast, light attack, and a bar-swap all in a single second. This will likely take practice
As a final note, if you’re using potions, keep an eye on your potion timer as well as your skills. Like light attacking and bar swapping, drinking a potion can also be done between skill casts
Managing Your Resources
One very common mistake people make is letting themselves run out of resources. This usually leads to heavy attacking a lot to make up the resources, which wastes a lot of time. Heavy attacks are slow, and every moment you’re heavy attacking is a moment you’re not casting skills. It’s okay to heavy attack once in a while, but if you have to heavy more than once in a minute or so, you need to rework your build
How to Fix Sustain
- Make sure you have skill points invested in your armor passives: Evocation for magicka in the light armor line, and Wind Walker for stamina in medium armor
- You can mix and match light and medium armor to get the right balance of sustain. If you need more stamina, try more medium armor; for more magicka, try more light. Heavy armor doesn’t provide you with resource passives, so don’t use heavy armor unless you’re in an environment like Infinite Archive that needs particularly extra tankiness
- Also make sure you have points invested in your class passives. Each class has a passive or two that gives you extra resource recovery or makes your skills cheaper
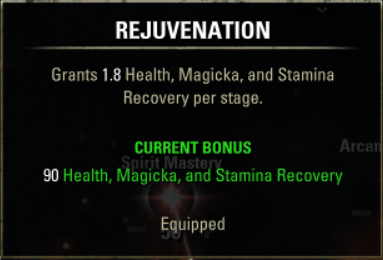
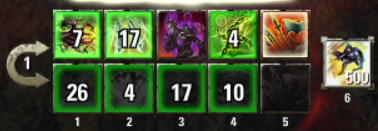
- Slot the Rejuvenation node from the Fitness (red) champion point tree
- Make sure you use a few skills that cost the opposite resource of your main resource, so that you can use less of your main resource. If you’re on a stamina build, somewhere around three magicka-costing skills is usually the right number, and vice versa. Sometimes this is as simple as switching a skill to the other morph
- You should even consider using weapons of the opposite resource. Backbarring a staff on a stamina build, or a two-hander or bow on a magicka build, will give you access to more opposite-resource skills. For several classes, it can be a tremendous struggle to get enough sustain without using an opposite-resource weapon
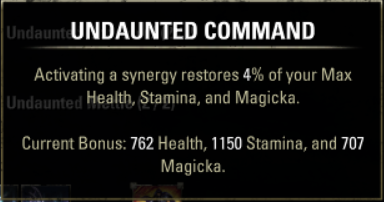
- Use synergies. Many of them will give you resources directly, and the Undaunted Command passive (in the Undaunted line) will give you some extra resources from any synergy
- Consider using potions. Potions only last 36 seconds (46 with the Medicinal Use passive), so if you use them on cooldown you’ll consume quite a few, which can get expensive. Endgame players always use potions, but depending on how much gold or farming time you have, you may want to look at other sustain options
- If you’re using potions, make sure you have the Medicinal Use passive from the Alchemy crafting line, so that your potion buffs don’t finish before you can drink another potion again. This skill line may take some effort to level, but it’s well worth it for the extra buff uptime
- Consider food with a recovery buff. These foods will have a bit less boost to your offensive stats, but if you don’t have enough resources, this will be well worth it
- Consider recovery glyphs on your jewelry, replacing Weapon or Spell Power glyphs with Stamina or Magicka Recovery. Losing the stat boosts will drop your damage a little, but again it’s well worth it to have enough resources to cast skills to do that damage in the first place
Building into sustain can be just as important as building into damage. If you don’t have resources, you’re not going to do any damage
Conversely, if you have more resources than you need, check if you can convert some of that extra sustain into damage by swapping glyphs or food
Handling Groups and Mechanics
We won’t forget the fact that we’re in a fight with mechanics and a group we’re working with. To make things easier on our tanks and healers who are supporting us, and the other DPS who are fighting with us, we need to follow some additional guidelines
Finding guides online for the particular trial or dungeon you’re going into, whether a written guide or a video guide, can be helpful for understanding fights and mechanics before you go into a trial. Much of the time, this isn’t very necessary because your trial leader will be explaining things; but if you are more of a visual learner or just want a head start, you may consider such guides. Just be aware that normal content and veteran content are of significantly different difficulty levels. Watching a guide for a veteran trial may emphasize difficult mechs that you don’t actually need to worry much about in a normal trial, and watching a normal trial guide will likely fail to prepare you for a veteran trial
Where to Stand
Most of the time, the ideal place to stand is right behind the boss. Some fights have exceptions, so always listen to your trial leader for instructions. But as a general rule, you should stand:
- Behind the boss. Even if the tank is adequately taunting the boss, many bosses deal heavy cleave damage that could hit you if you’re too close
- In front of your healers. Remember that healers cast their skills in front of them just like you do. If you’re not standing in front of them, you’re not going to get any of their healing or buffs
- Close to other DPS, ideally right behind the boss. Along the same reasoning, healers’ skills usually cast in an area just like yours do, so if DPS are spread out all over the arena, the healers won’t be able to heal them all. DPS must work together to stand close together so that everyone gets healing and buffs. The best place to do this is right behind the boss. This will make it easier for you to target the boss, keep you in range for any melee skills you have, and let your healers stand behind you so that they can see you, the boss, and the tank all at once and heal everyone
Touch the boss. Hug it. Standing close to the boss is unintuitive and feels dangerous, but you can trust your healers to keep you alive. It doesn’t matter if you have a ranged build; your healing and buffs depend on you standing where your healers can see you
A well organized group will normally position themselves something like these pictures. Most groups are not coordinated enough to have everyone stand quite this neatly together, but this should be your goal


Consider using addons to help see particular group members better. OdySupportIcons is a great option that will put markers over your group members based on their role. I recommend keeping markers for just your healers and your tanks
Staying Alive
Just as important as increasing your damage output is learning fights and understanding how to deal with mechanics and survive. Dead people don’t do any damage
The more experience you get in dungeons and trials, the more you’ll develop an intuition for how to avoid taking damage and stand where you’re supposed to
If you’re having trouble seeing enemy AoE circles, consider turning their brightness up (see above). Since the default red color sometimes camouflages against certain terrain, many people even change the color to something like bright pink or white
Group Etiquette
Follow these guidelines to help to keep your group running smoothly and avoid causing extra inconveniences
- If someone dies, revive them. As mentioned at the beginning of this guide, it’s the job of the DPS to revive dead allies. Tanks and healers are too busy performing their own roles and making sure no one else dies, so be proactive about rezzes
- Do not slot a taunt skill. If anyone who isn’t a tank taunts the boss, the boss is going to turn around and most likely kill them and anyone standing near them. As a dps, you should never use a skill that takes aggro away from the tank
- Taunt skills are
 Puncture,
  Inner Fire,
  Destructive Clench (with frost staff only; other staves will not taunt),
  Runic Sunder, and
  Focused Charge, as well as any scribed skill with the Taunt focus. Don’t use these skills!
- Taunt skills are
- Avoid using the Ring of the Pale Order mythic or the Blood Frenzy vampire skill. These can both be useful for solo builds, but they will prevent your healers from healing you. This will most likely get you killed, so remember to unequip these before playing with a group
- Don’t pull fights. Damaging an enemy or approaching too close to an enemy will start the fight. It’s the tank’s job to run ahead and pull the fight so that they can taunt the most dangerous enemies before they can kill the fragile DPS and healers. Don’t run ahead of your group, and don’t attack enemies until the fight has started
- It’s common to jump around idly or press miscellaneous skills while waiting for a leader to explain a fight. This is fine to do in principle, but make sure you don’t get too close to the enemy or cast anything long-range toward an enemy that might start the fight
- Above all, listen to your leader. Your leader may give you strategies for the fight or advice on how to avoid dying or get through the fight faster. Listen to what they say, trust them, and obey them
What Not to Focus On
Not every little optimization is really worth it. It’s common for people to put lots of time, effort, and gold into micro-optimizations hoping for big changes, and then they just don’t happen. This section lists out changes that are not likely to improve your damage significantly
The following items matter extremely little
- Race. Some races have slightly better offensive stats than others, but they really don’t differ by much. You’ll get a small amount of extra damage from using an optimal race, but unless you’re with a very advanced group attempting difficult hardmodes or trifectas, you can save your race change tokens and use whatever race you like best
- Gold-quality armor and jewelry. While fully upgraded weapons can give a moderate damage increase, gold armor and jewelry give extremely small damage boosts. You’ll hardly notice the difference; do yourself a favor and save your gold
- Perfected gear. The only benefit of perfected gear is a single extra stat bonus. The bonus can help a little, but not having it won’t by any means make or break your build. Some sets’ perfected bonuses are barely even substantial at all. Save yourself the veteran grind and stick to non-perfected gear unless you’re in sweaty endgame content or just genuinely enjoy the veteran farming experience
- In particular, for any arena weapon that you’re putting on your backbar, a perfected bonus is going to be essentially negligible. Don’t force yourself through a tedious grind for a small bonus that won’t even be active most of the time
These next items also matter fairly little, but can make some difference in moderately advanced content. In normal-level content, you definitely don’t need to worry about these
- Class. All classes are capable of very good DPS. Endgame groups will often optimize their group compositions to include certain classes, but for anything short of these, your personal skill level at managing a rotation and fight mechanics matter far, far more than which class you are. Feel free to pick any class you like
- Stamina vs. Magicka builds. Some classes will do a bit better with one or the other, but for all classes, both versions are capable of solid damage
- Weapon types. As long as you pick one of the four damage-oriented weapon skill lines (dual wield, two handed, bow, destruction staff), you can do very good damage. Certain combinations yield a little more damage, but if you have a strong preference, save the optimization for the endgamers
- As a caveat, you may find you run out of stamina or magicka unless you switch to a weapon of the opposite type for opposite-cost skills. In this case, it may be in your best interest to switch weapons, though there are most likely more ways to get sustain with a relatively small drop in damage
Practice on the Dummy
The best way to learn your skills, your rotation, and your weaving is to practice! Training dummies are available in the WtU guild hall for your convenience. Their purpose is twofold:
- When you finish the fight (or reset the dummy with F5), they’ll put out a measurement of your DPS against them in your chat box
- They’re an excellent way to practice your rotation without the pressure and extra mechanics of a real fight
Obviously a stationary dummy is no comparison to an actual boss, but it’s difficult to learn the intricacies of weaving and rotations while you’re also trying to learn and perform mechanics and follow your group around. The more you can practice and understand your rotation on the dummy, the better you’ll be able to do that rotation naturally in a trial
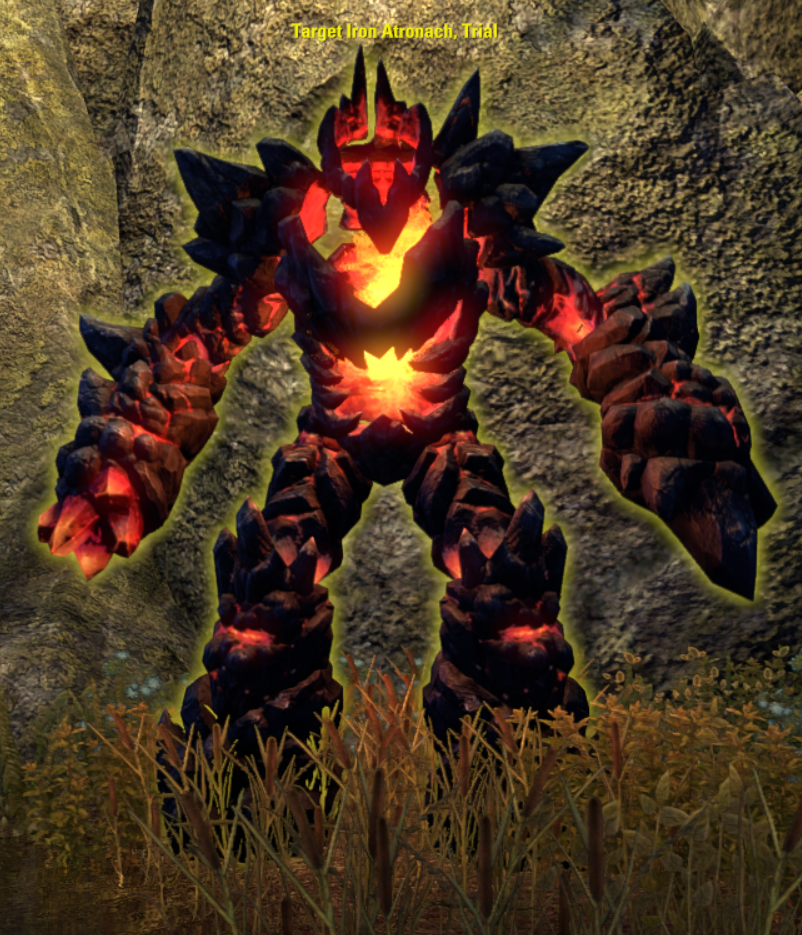
I recommend using a trial dummy for your practice. Trial dummies have “Trial” at the end of their names (e.g. “Target Iron Atronach, Trial”) and will give you a large number of buffs to your damage and sustain to (very roughly) simulate a very optimized trial environment where healers and tanks are providing many buffs. These buffs will allow you to put out much higher damage numbers than you can on regular dummies, and it’s these dummies that any experienced player will use when talking about a dummy parse most of the time
Find several trial dummies in various places around the guild hall. There are several different types of trial dummy, but functionally they are all identical
If you want an accurate estimation of your damage, fight the dummy until it dies. Real boss fights can be lengthy, so a dummy parse tests not just the burst damage you can put out in a short time, but how much damage you can keep putting out over the course of a long fight. Do you run out of resources after a minute or so? Do you lose track of your rotation? The dummy will help you test all of this
- In addition, many builds have execute damage that does more damage when the enemy’s health is low. Stopping the fight while the dummy is still healthy can underrepresent your damage because you didn’t get to do your extra execute damage
The trial dummy has 21 million health and can take some time to kill. Skilled players can down the dummy in a few minutes, but a beginner may take upwards of 10 minutes. If this is too long for you, then at least parse for 3 to 5 minutes for a reasonably accurate estimate of your damage output. Press F5 to reset the dummy as soon as you’re done, or else the dummy will stay active for a while longer and lower your damage result
It’s important to note that a trial dummy is not an accurate representation of your damage in a real fight, nor is it meant to be. If you get an 80k parse on the dummy, don’t expect to be putting out that much in a real trial where the boss is moving around and you’re dealing with mechanics. Further, the dummy puts out way more buffs than you’ll see in most trials, and some of its buffs are from outdated metas and don’t reflect buffs that are actually common now
Rather, the purpose of the trial dummy is a standardized, controlled testing environment where you can test your skill at performing your rotation and weaving light attacks. Everyone who’s parsing on the trial dummy gets exactly the same buffs, so you can compare your parse with theirs. Are your peers hitting 80k on the class you’re using? Maybe that’s an achievable parse for you soon if you put in some practice. Are the extremely talented endgamers on YouTube hitting 140k parses? That’s probably not a realistic goal for most of us, but now you know the ceiling of how much room there is to improve on your rotation based on your own damage
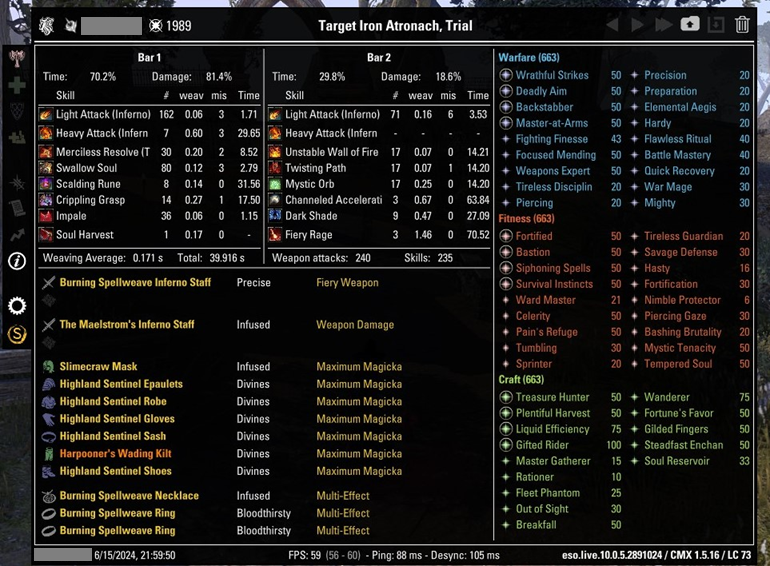
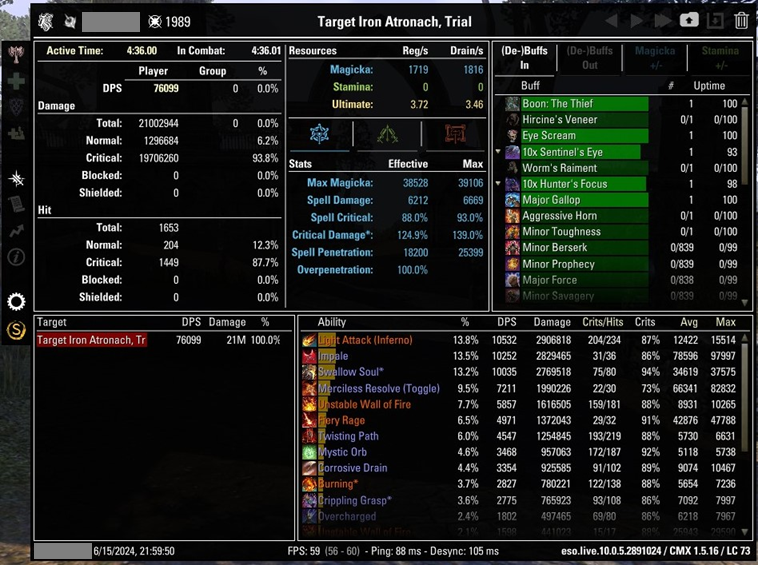
Combat Metrics
Combat Metrics (or CMX) is a popular addon used to show lots of information about your stats and damage output during a fight. This addon is one of the best tools available for understanding what you can do better in your rotation and build
Reading the complex output is beyond the scope of this guide, but tutorials can be found elsewhere online. Some of us in WtU are familiar with CMX though, so if you’re looking for help getting higher numbers, consider downloading the addon and posting the output screens in the guild Discord. These info screens can provide a whole lot more information about your build and how you parsed than you could give by just describing what you did